My Mid Production Tiger

Forum for discussion relating to Tiger 1, Mid, Early, Late Production and Sturmtiger
Tim Bowman
Posts: 1762
Joined: Fri Jul 13, 2007 4:53 am
Location: Northern California
Been liked: 177 times
Contact:

Post by Tim Bowman »

Mike Kasputis wrote: Here are a few more mods. I modified the vent from Mike Stannard (made top thicker, added the funnel thing and added screws to inside) and I redid the loaders periscope guard.

[/img]Image]
SO COOL! 8) 8) I love the job you did on the loaders hatch-guard as well. Really remarkable work Mike! More stuff for me to do.(not the loaders hatch as mine's a late Tiger)

kind regards
Tim
"So long as one isn't carrying one's head under one's arm, things aren't too bad." – Erwin Rommel

Brian Leach
Posts: 363
Joined: Tue Nov 18, 2008 4:15 pm
Location: Auburn, Wa USA
Been liked: 3 times

Post by Brian Leach »

Great job!

Kent Wiik: Just a quick question please, Concerning the recessed fasteners in the lower drivers visor protector, are those bolts or large slotted screws. I have looked and looked but I cannot be sure,

Please excuse the interruption and thanks.

-Brian

Tim Bowman
Posts: 1762
Joined: Fri Jul 13, 2007 4:53 am
Location: Northern California
Been liked: 177 times
Contact:

Post by Tim Bowman »

Hi Brian

Sorry to butt in, hope you(and Kent) don't mind. They look exactly like the blank fasteners on the turret roof in the photo above on Mikes' turret. I believe they are bolts fastened from underneath. Similar ones are used on hinges too.

Tim
"So long as one isn't carrying one's head under one's arm, things aren't too bad." – Erwin Rommel

Per Sonnervik
Posts: 153
Joined: Sat Jul 12, 2008 12:01 pm
Location: Stockholm, Sweden
Been liked: 2 times

Post by Per Sonnervik »

Mike, again nice work on the hatch details and the fan cover with the funnel, not many would go to all that trouble. I think the top of the fan cover looks a bit too thick, it should be 5.4 mm in 1/6 scale and also there´s a small slotted screw in the centre of the cover.

About the zimmerit, the point I was trying to make was that the zimmerit was factory applied (and only one factory in this case) so it´s on every zimmeritted tank´s front plate, even the 507´s. The angle of the plate makes it hard to see, that´s the problem, but it´s there. Of course, it´s a free world and you can model whatever you like :D

Here´s a photo from a 507 tank with cut outs in the commanders hatch for the scissor periscope ( from Tigers in combat I).


Image


All the best from Sweden,

Per

User avatar
Robert E Morey
Posts: 2349
Joined: Wed Jul 18, 2007 12:59 am
Location: Seattle, WA USA
Has liked: 161 times
Been liked: 830 times

Post by Robert E Morey »

Mike,
Awesome work on the loaders hatch! I love scratch built additions!
Thanks for sharing your work.

Thanks for all the details and photos everyone...the Tiger 1 build is well documented.

Per I've never noticed the cutouts in the CDR's hatch either! Learn something new everyday! :shock:
Bob

Brian Leach
Posts: 363
Joined: Tue Nov 18, 2008 4:15 pm
Location: Auburn, Wa USA
Been liked: 3 times

Post by Brian Leach »

Thanks Tim
-Brian

Brian Leach
Posts: 363
Joined: Tue Nov 18, 2008 4:15 pm
Location: Auburn, Wa USA
Been liked: 3 times

Post by Brian Leach »

Hello again,

Sorry to be a pain, but what thickness brass sheet did you use for the fenders you built?

Thanks for the help!

-Brian

Mike Kasputis
Posts: 104
Joined: Thu Jul 26, 2007 2:17 am
Location: Maryland, USA
Been liked: 54 times

Post by Mike Kasputis »

Per
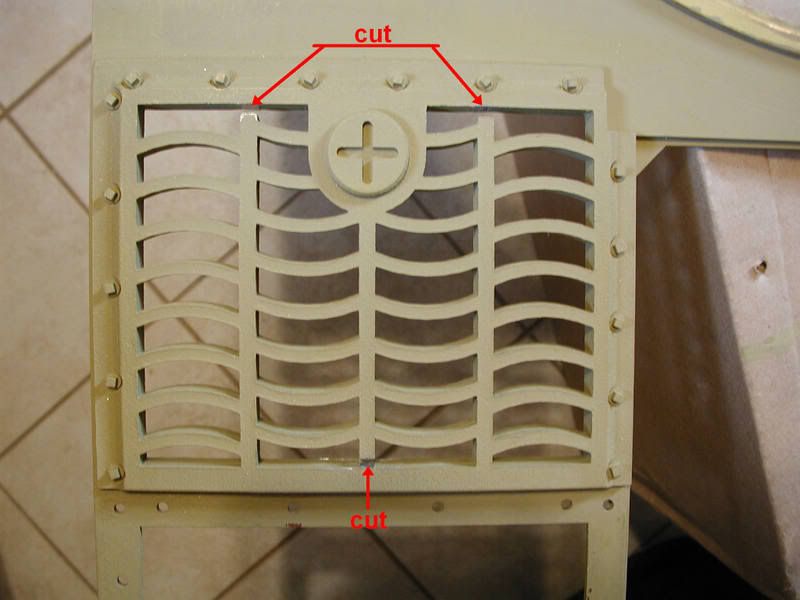
After I finished the fan cover I thought it was too thick, now that I know the thickness I will fix it, Thanks. Do you have a picture showing the screw in the middle, from all the pictures I have seen I cannot see a screw.
You are right about not being able to see the zimmerit on the plate, I thought that it was not applied there since I could not see it. I guess that not alot of people see it because if you look at all the models built of the Tiger (all scales) very few have applied the zimmerit there. Good point about there only being one factory applying the zimmerit.
That picture from Tigers in combat I is that from the hard cover version, I have the soft cover and it is not in there, what page is it on.

Brian
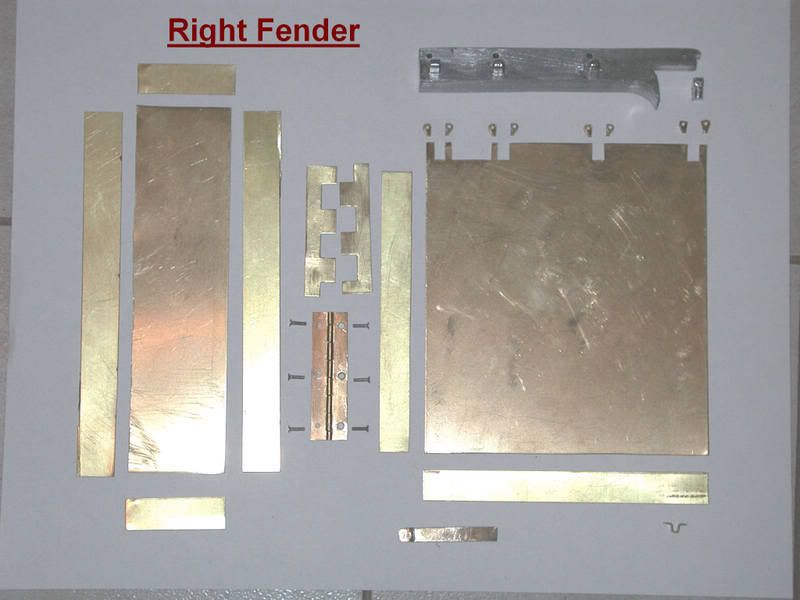
I used .015" brass for the front, rear and side fenders.
Here is a picture showing the parts to make the front fender. I made my own hinges also.

Image

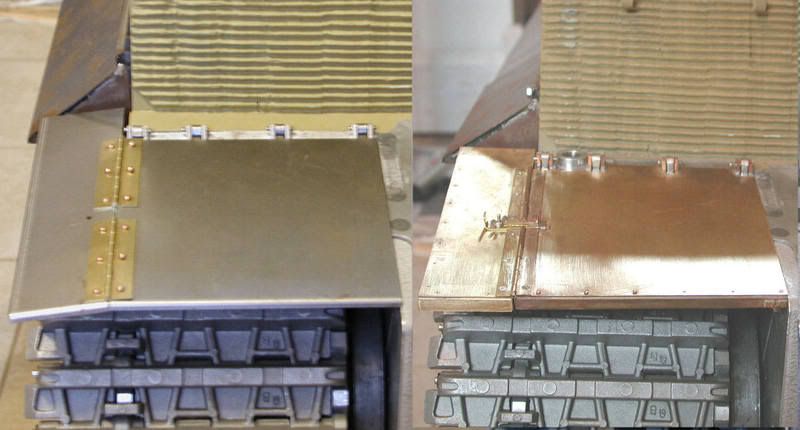
Here is a comparison of my fender to the original one. The original did not come forward enough.

[/img]Image

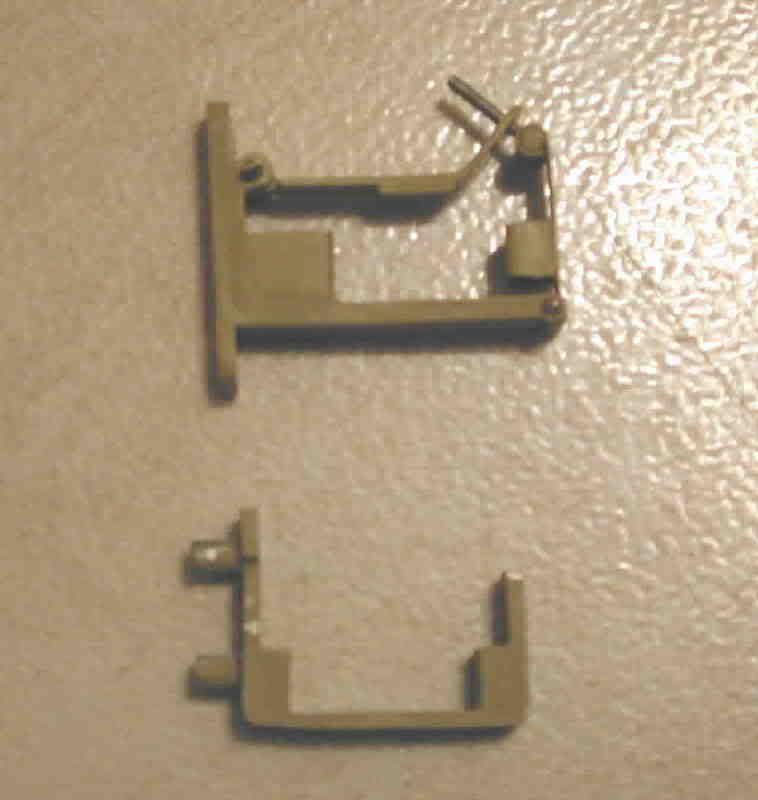
I also made my own functional jack brackets. compared to original.

Image

[/img]Image

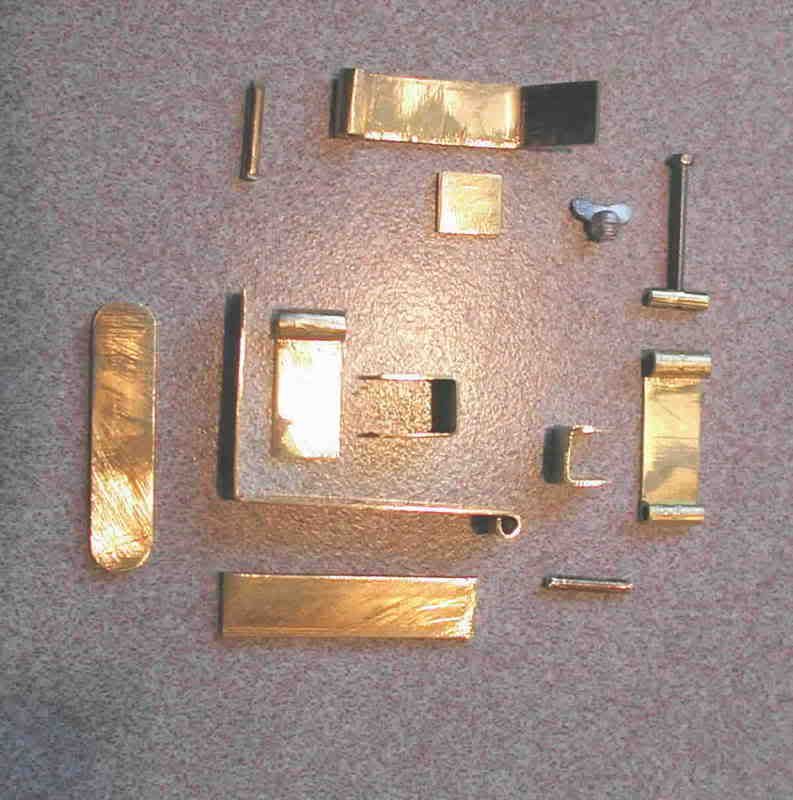
Here are the parts to make the jack brackets.

Image[/img]
Last edited by Mike Kasputis on Sun Oct 16, 2011 2:03 am, edited 1 time in total.

Brian Leach
Posts: 363
Joined: Tue Nov 18, 2008 4:15 pm
Location: Auburn, Wa USA
Been liked: 3 times

Post by Brian Leach »

Mike,

Thank you for this thread. You and others are an inspiration.

I am chomping at the bit here (and I have yet another year to wait for mine, dam!, uh darn!).

-Brian

Brian Leach
Posts: 363
Joined: Tue Nov 18, 2008 4:15 pm
Location: Auburn, Wa USA
Been liked: 3 times

Post by Brian Leach »

Mike,

This link from the Tiger1.info page has the screw locations you are looking for

http://tiger1.info/EN/FirstTurretFan.html

Brian

User avatar
Robert E Morey
Posts: 2349
Joined: Wed Jul 18, 2007 12:59 am
Location: Seattle, WA USA
Has liked: 161 times
Been liked: 830 times

Post by Robert E Morey »

Mike,
Thanks for the fabulous details! First rate work on the front fender. I haven't tried to make my own hinges yet. That should be fun.
Great pictures.
Bob

Mike Kasputis
Posts: 104
Joined: Thu Jul 26, 2007 2:17 am
Location: Maryland, USA
Been liked: 54 times

Post by Mike Kasputis »

Brian
I was looking through my books and found what I needed in "The Modeler's Guide To The Tiger Tank ".

Image

Here is one more mod for the rear deck. If you use the screens on the deck this will not be noticable.

[/img]Image

Here is something that needs to be fixed. Part #CE0119 (LH cover) is not facing the correct way, should face the same as part # CE0119m (RH cover).
See picture below for the correct way. Again this is from "The Modeler's Guide To The Tiger Tank ".


Image[/img]
Last edited by Mike Kasputis on Sun Oct 16, 2011 2:04 am, edited 1 time in total.

Online
Steve Norris
Posts: 1231
Joined: Thu Jul 12, 2007 11:42 am
Location: Manchester
Has liked: 8 times
Been liked: 701 times

Post by Steve Norris »

Hi Mike,
I have used the Modelers guide for reference on my Tiger and have done the cuts in the gates like yourself. Unfortunatly i think the only way to get the rear grates correct would be to produce a new batch of L/H grates. I may leave my R/H grate in red primer so that it looks like it has been replaced due to being damaged with a spare from the earlier batch.
Your detail parts are great inspiration, keep up the good work.
Regards
Steve

Kent Wiik

Post by Kent Wiik »

Here is a good photo of a later ventilator:

Image

This is from The Late Tiger at Lenino in Russia.
Please note all the nice welding to be made... :wink:

And the rolled steel surface on the turret roof - a must have today! :shock:

Kent

User avatar
Armortek
Site Admin
Posts: 2935
Joined: Tue Jul 10, 2007 10:30 am
Location: Winchester, England
Been liked: 3699 times

Post by Armortek »

Hi all

I have watched and not commented on the discussion with reference to the finish of the armour plate on these tanks. Until now.

I may be wrong, but I feel that most of the surface texture that you see on the tanks preserved today is a product of age, not manufacture. Rolled steel boiler plate (which is essentially what WW11 armour plate is) was produced with a pretty good finish in the period. Steel plate of all types, ages due to weathering and exposure to damp and temperature differences. The sort of appearance that you see today is typical of this type of ageing. This is why it is more pronounced on vehicles stored outside. Perhaps if you are modeling the tank as it appeared during the war, applying this finish is not appropriate.

I must stress that this only my opinion.

Mark
Armortek

Post Reply