Churchill Mk3 number 67
-
- Posts: 567
- Joined: Tue Sep 07, 2021 5:37 pm
- Location: Somerset
- Has liked: 750 times
- Been liked: 1765 times
Re: Churchill Mk3 number 67
Hi all
I have been experimenting with fibre optic cables and 8mm ultra bright LEDs to use on the headlights. I also finished the lens for the left hand headlight, took a while as I wanted the ribbed effect on the reverse. I blocked the rear of the lens cavity with silicone mat and laid a series of 1mm diameter pieces of fibre optic tube where the back of the lens will be, this took a while as each bit was a different size . When they were all nice and straight I tried to carefully add the UV resin one drip at a time until it was level with the lens rim. Unfortunately I got a small air bubble trapped in the bits of fibre optic and one of the pieces of optic tube got attached to the nozzle and came adrift. It still looks ok and got the ribbed effect I was after. If you ever use UV resin be aware that air bubbles can form as you start to set it with the UV light. I was told it can happen with dissimilar materials and it is the second time I have had it happen when making lenses.
I tried the fibre optic with the sidelights and it works but I am limited to one 1.5mm fibre or two 1mm fibres. I could try a 2mm fibre optic but the bend radius becomes quite large beneath the armour plate. With the main lights I can use two 1.5mm fibres plus a 1mm through the hole in the stem.
I ran out of time today and will have to try again with the GOR bulbs to see how good they are. I took a few photos of the fibre optic in the headlight but will get some more to show the difference later.
Regards
Gary
2021 Late Tiger 1 Abteilung 301 (Funklenk), 2022 Churchill Mk3 AVRE, 2x Czech Hedgehogs, 2024 Triple span Bailey Bridge, M26 Pershing, 17 Pounder and Limber.
-
- Posts: 567
- Joined: Tue Sep 07, 2021 5:37 pm
- Location: Somerset
- Has liked: 750 times
- Been liked: 1765 times
Re: Churchill Mk3 number 67
Good morning all
I am still experimenting with different means of illuminating the front lights. These photos show the use of 12v grain of rice bulbs in the right hand set of lights. The warm colour is more realistic than the bright LED but the incandescent bulbs get very hot and there is no room left once the lenses go in and I suspect the plastic lens will distort. I have ordered a variety of warm white and diffused 1.8mm LEDs including a red lighthouse one for the rear convoy light. I suspect a brighter bulb is required in the main headlight and will add more photos once I have made a decision.
Regards
Gary
2021 Late Tiger 1 Abteilung 301 (Funklenk), 2022 Churchill Mk3 AVRE, 2x Czech Hedgehogs, 2024 Triple span Bailey Bridge, M26 Pershing, 17 Pounder and Limber.
-
- Posts: 567
- Joined: Tue Sep 07, 2021 5:37 pm
- Location: Somerset
- Has liked: 750 times
- Been liked: 1765 times
Re: Churchill Mk3 number 67
Good morning
I am juggling the tanks at the moment, Tiger needs maintenance but I still want to progress the Churchill. I am also helping Guide Dogs by doing collections in the run up to Christmas in Taunton, so progress is a bit hit and miss.
The various LEDs arrived and I have remodelled the convoy light by drilling it out, partially inserting a brass tube with a 2mm inside diameter and using UV resin on the outer domed end. The 2mm lighthouse red diffused LED fits snuggly in the tube allowing easy removal once the convoy light is epoxied in position. This morning I will try the 2mm warm white LEDs in the side lights and I have 3mm warm whites for the headlights. If successful I will make up the wiring loom and attach it to the BEC and nano switch. I may split the sidelights and headlights so I can choose which will be on via a switch on the transmitter. Photos to follow.
Here a little job I completed earlier. Welds were added to the loaders hatch.
Regards
Gary
2021 Late Tiger 1 Abteilung 301 (Funklenk), 2022 Churchill Mk3 AVRE, 2x Czech Hedgehogs, 2024 Triple span Bailey Bridge, M26 Pershing, 17 Pounder and Limber.
-
- Posts: 567
- Joined: Tue Sep 07, 2021 5:37 pm
- Location: Somerset
- Has liked: 750 times
- Been liked: 1765 times
Re: Churchill Mk3 number 67
Good evening
After a break of three weeks due to a cold and then collecting for Guide dogs in Taunton I finally managed to get all the lights working. I used 1.8mm warm white LEDs for the side lights but had to cut the legs off leaving just 1.5mm to solder the wires onto as it was the only way they would fit. The rear convoy light is also working using a red LED.
Next job is to tidy the wiring and connect them to the nano switch and BEC which I am hoping to fit just inside the pannier door. I also need to test all the modules, motors etc but not sure if I will have time this side of Christmas.
Regards
Gary
2021 Late Tiger 1 Abteilung 301 (Funklenk), 2022 Churchill Mk3 AVRE, 2x Czech Hedgehogs, 2024 Triple span Bailey Bridge, M26 Pershing, 17 Pounder and Limber.
-
- Posts: 567
- Joined: Tue Sep 07, 2021 5:37 pm
- Location: Somerset
- Has liked: 750 times
- Been liked: 1765 times
Re: Churchill Mk3 number 67
Hi all
Happy New Year one and all.
I was going to bolt the bogies onto the panniers but have decided to do the paint work and detailing first. The techniques will be the same as for my Funklenk Tiger 1, acrylic base coat and shadowing, then a coat of Citadel matt varnish followed by oil paints to do the dot fading, filtering, washes and scratches etc.
The techniques worked very well on the Tiger but will be adjusted slightly on the Churchill due to the single plain base coat. The fading will need to be applied using colours very close to the SCC15 base coat to avoid over lightening the larger panels.
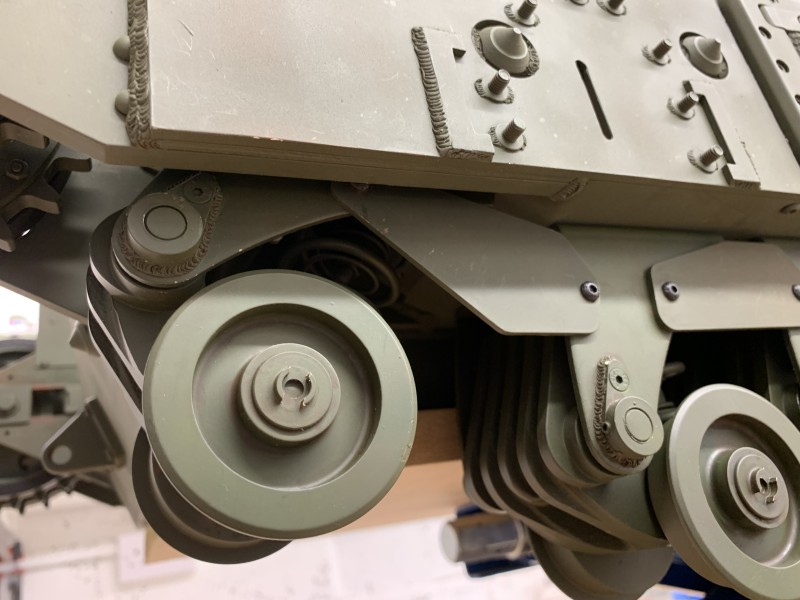
I made a start this morning by mixing a small amount of dark green into the SSC15 paint and applying it to the areas on the wheels I want shadow to show. This has to be quite subtle so I used a wet brush first then a dry brush to feather the result by simply spinning the wheel with the brush held in place. Now the paint had dried you can just see a difference around the inside corners of the wheels where it is slightly darker. Next step is to apply the matt varnish.
Regards
Gary
2021 Late Tiger 1 Abteilung 301 (Funklenk), 2022 Churchill Mk3 AVRE, 2x Czech Hedgehogs, 2024 Triple span Bailey Bridge, M26 Pershing, 17 Pounder and Limber.
-
- Posts: 567
- Joined: Tue Sep 07, 2021 5:37 pm
- Location: Somerset
- Has liked: 750 times
- Been liked: 1765 times
Re: Churchill Mk3 number 67
Hi all
I have just started using the oil paint dots to add depth to the bogies. As you can see from the photo I am trying different colours to see what works on the base coat. I have added a coat of Citadel matt varnish over the Tamiya base coat. This is not as easy to do as the Tiger, it is harder to see the paint dots blending in and I suspect the effect will only become truly apparent on a sunny day.
Regards
Gary
2021 Late Tiger 1 Abteilung 301 (Funklenk), 2022 Churchill Mk3 AVRE, 2x Czech Hedgehogs, 2024 Triple span Bailey Bridge, M26 Pershing, 17 Pounder and Limber.
-
- Posts: 567
- Joined: Tue Sep 07, 2021 5:37 pm
- Location: Somerset
- Has liked: 750 times
- Been liked: 1765 times
Re: Churchill Mk3 number 67
Good afternoon
I have given all 22 bogies the dot treatment and have tried various combinations of colours which should ensure the finish is not uniform. The SCC15 base colour (being quite dark) means the depth of colour shading is less obvious than the Tiger finish, I have taken a photo but it is difficult to see through the lens but is noticeable when the sun is shining.
This process is quite time consuming but I think it will be worth while when the whole tank has been done. I have also started to add grime to the wheels but will leave the scratches, wash and dust layer until after the bogies have been installed on the panniers.
Regards
Gary
2021 Late Tiger 1 Abteilung 301 (Funklenk), 2022 Churchill Mk3 AVRE, 2x Czech Hedgehogs, 2024 Triple span Bailey Bridge, M26 Pershing, 17 Pounder and Limber.
-
- Posts: 567
- Joined: Tue Sep 07, 2021 5:37 pm
- Location: Somerset
- Has liked: 750 times
- Been liked: 1765 times
Re: Churchill Mk3 number 67
Hi all
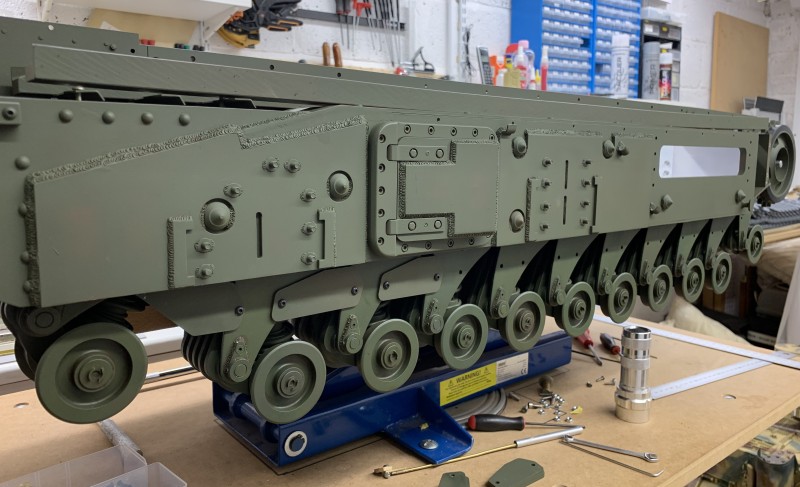
I have started bolting the bogies to the panniers and it is proving a bit tricky as my panniers have already been attached to the hull. It is also very difficult to get a suitable spanner behind the plates that link the bogies.
HEADS UP: For anyone about to add the bogies with the panniers already in place is to start from the rear bogie and work forwards. This enables an allen key to be used and you can see the front holes in the bogie. I used a small piece of tape to hold the bolt in place on the allen key. Two people would make it even easier
I made the mistake of starting with the front bogies and it becomes very difficult to get to the front holes and I have had to use a tool I made for the tiger deck nuts to be able to hold the plate nuts in place. It took over an hour to add two bogies and one plate and I still have to tighten them up. It will be easier if I remove the front two bogies and start again from the rear
Regards
Gary
2021 Late Tiger 1 Abteilung 301 (Funklenk), 2022 Churchill Mk3 AVRE, 2x Czech Hedgehogs, 2024 Triple span Bailey Bridge, M26 Pershing, 17 Pounder and Limber.
-
- Posts: 53
- Joined: Thu Feb 16, 2023 9:41 am
- Been liked: 57 times
Re: Churchill Mk3 number 67
Thank you for sharing that Gary, I am approaching this stage and it’s going to be good not learning the hard way on this one.
-
- Posts: 567
- Joined: Tue Sep 07, 2021 5:37 pm
- Location: Somerset
- Has liked: 750 times
- Been liked: 1765 times
Re: Churchill Mk3 number 67
Good evening
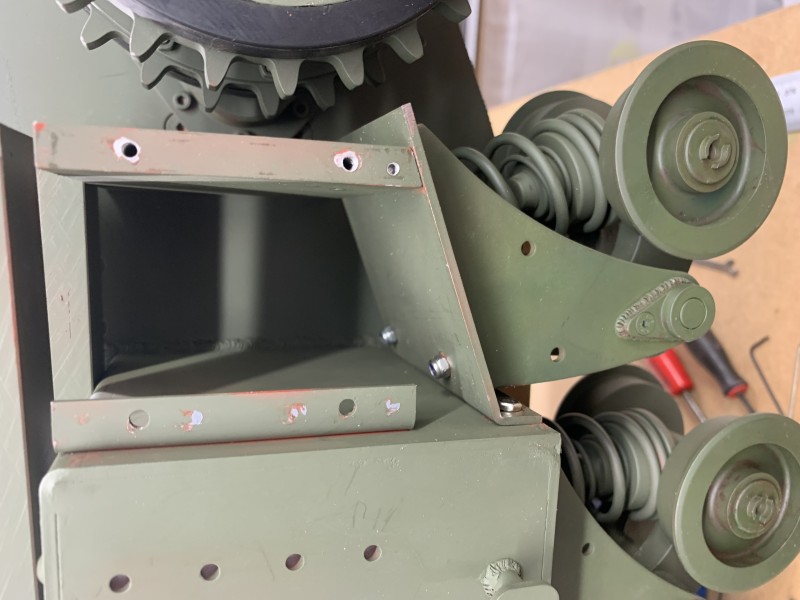
I have some more info on the bogies I thought I would share. I have added all the bogies to the left hand pannier and it is definitely easier starting from the rear and working forwards. The rear most bogie that sits on the angled plate and the front bogie also set at an angle are the most difficult as there is limited access to attach the nuts. The rear one required me to strip down the drive sprocket area and the front required the help of a friend and still took over an hour just to get the two front nuts in place. A long allen key is required to engage the button heads and a cranked 5.5mm spanner helps with the plates. A small bright led torch also helps.
Be aware the front armour plate linking bogies 1 and 2 needs to be bolted to the front bogie prior to locating the bogie otherwise it is very tricky getting the button head bolt and nut in place as its hidden by the pannier side.
I used the self locking nuts for the bogies and plates to make sure none of them could come adrift in the field. Be careful as you put the button heads in the bogies, if it drops out it can get wedged behind the rollers and springs jamming them. This happened to me twice and it is very hard to get them out once everything is assembled. I put a couple of layers of kitchen roll under the bogies to ensure any that did drop stayed where I could see them to make sure I didn't 'lose ' any.
I am sure there must be an easier way to assembly the bogies and plates and it may just be that because I prefer painting all the parts separately and already had the panniers in situ with all the welds and applique armour added that was making it difficult. Turning the hull upside down doesn't help as you then cannot get access to put the nuts on.
Anyway it is all a learning curve and I like the way it is engineered, it looks very industrial.
Regards
Gary
2021 Late Tiger 1 Abteilung 301 (Funklenk), 2022 Churchill Mk3 AVRE, 2x Czech Hedgehogs, 2024 Triple span Bailey Bridge, M26 Pershing, 17 Pounder and Limber.
-
- Posts: 567
- Joined: Tue Sep 07, 2021 5:37 pm
- Location: Somerset
- Has liked: 750 times
- Been liked: 1765 times
Re: Churchill Mk3 number 67
Hi all
Further to Micks remarks about using hex heads on the bogie armour plates I have checked through my photos and the bolts were inserted from behind the plates with the nuts on the outside. Definitely hex heads in the photos.
I have only done three plates so far and used a hex head for the 'hidden hole' . I will see how my stock of m3 x 8mm hex head stands and use those instead. I will have to check whether the bolts can be inserted from behind the plate but even if that isn't possible it will still be closer to full size with the hex head showing. Thanks Mick for pointing it out
Regards
Gary
P.S
I have tried the M3 X 8 bolts from behind the plates and they will not go in as they is insufficient wiggle room. I am ordering some M3 x 8 hex heads to use on the the plates.
2021 Late Tiger 1 Abteilung 301 (Funklenk), 2022 Churchill Mk3 AVRE, 2x Czech Hedgehogs, 2024 Triple span Bailey Bridge, M26 Pershing, 17 Pounder and Limber.
-
- Posts: 567
- Joined: Tue Sep 07, 2021 5:37 pm
- Location: Somerset
- Has liked: 750 times
- Been liked: 1765 times
Re: Churchill Mk3 number 67
Good morning all
A quick update on the bogies. Yesterday I started on the right hand pannier bogies and found a trick to help locate nuts over holes prior to inserting the bolts in those area with very restricted access. I used a strong magnet, one of those button size ones, attached next to the hole on the outside of the bogie which is steel. You can then place the nut on the back on the bogie and slide it into position. This allows the bolt to engage the first few threads making it a lot easier. I also tried my magnetic pick up tool which also worked when the nut is attached to the tool then slid in place.
Obviously this only works if the area is ok for the magnet to grip onto. Luckily a lot of the pannier area is steel
If you have already painted the bogies I suggest sticking a piece of paper onto the magnet to help remove it without scratching the paintwork.
Regards
Gary
2021 Late Tiger 1 Abteilung 301 (Funklenk), 2022 Churchill Mk3 AVRE, 2x Czech Hedgehogs, 2024 Triple span Bailey Bridge, M26 Pershing, 17 Pounder and Limber.
-
- Posts: 567
- Joined: Tue Sep 07, 2021 5:37 pm
- Location: Somerset
- Has liked: 750 times
- Been liked: 1765 times
Re: Churchill Mk3 number 67
Hi all
I have now completed assembling the bogies and armour plates. In the end the Tiger tool I had made was the easiest method of holding the nuts in place with the odd use of the magnets where it was a bit too restricted. I also used nyloc nuts to secure the bogies and the plates, using hex heads for the plates looks better than the button heads and is realistic.
The Churchill is proving trickier than the Tiger to build but mainly due to the lack of build info on the forum to consult when problems arise. I will continue to do a 'warts and all' build and highlight any areas that I find difficult as it may helps others. Overall I am enjoying the build, this is a great kit and so different from the Tiger in many aspects.
Regards
Gary
2021 Late Tiger 1 Abteilung 301 (Funklenk), 2022 Churchill Mk3 AVRE, 2x Czech Hedgehogs, 2024 Triple span Bailey Bridge, M26 Pershing, 17 Pounder and Limber.
-
- Posts: 2182
- Joined: Wed Nov 15, 2017 1:43 pm
- Location: Malta
- Has liked: 773 times
- Been liked: 1740 times
-
- Posts: 567
- Joined: Tue Sep 07, 2021 5:37 pm
- Location: Somerset
- Has liked: 750 times
- Been liked: 1765 times
Re: Churchill Mk3 number 67
Good morning
Thanks Vince.
Yesterday I was playing about with the two periscopes to see how I could add detailing. I had some spare Tiger parts that I milled down to the right size then added Plasticard strips to the ends to keep the right profile. It looks like some of the pericope covers were spring hinged at the top according to my photos from the Tank Museum but need to check as other photos appear to show a solid top. Could they have been upgraded between the Mk3 and Mk4 variants ? If they are hinged I will add the detail to make them more interesting.
P.S.
I have found out there were at least 5 different types of periscope covers used on Churchills. The one in the kit is modelled on the most widely used variant. There is a hinged version which has a lot of detail and as my tank represents an AVRE I will go for that as it is reasonable to expect they could have been changed them during the 1944 upgrade. Plus I just love adding detail
Regards
Gary
2021 Late Tiger 1 Abteilung 301 (Funklenk), 2022 Churchill Mk3 AVRE, 2x Czech Hedgehogs, 2024 Triple span Bailey Bridge, M26 Pershing, 17 Pounder and Limber.