
First some general assumptions
- This discussion is to show how a gravity pour mold can be used. No fancy tools are needed just a ladle and propane torch are required to heat and pour the metal (and safety equipment of course).
- This mold type is limited to plastic resins and metals with melting temps below 500F. I like to use lead free Pewter. Higher temperature metal will destroy the RTV quickly.
- The mold is made from readily available RTV rubber (Room Temp Vulcanization).
- This is not the only way to cast the part. There are usually several ways to tackle a project.
- This mold type is generally for casting metal, but it can be used to cast plastic resins. Subtle differences in technique are noted.
Now the master. The master is the part used to make the mold. It can be any material really and is generally not destroyed by the mold making process - and can be used many times.
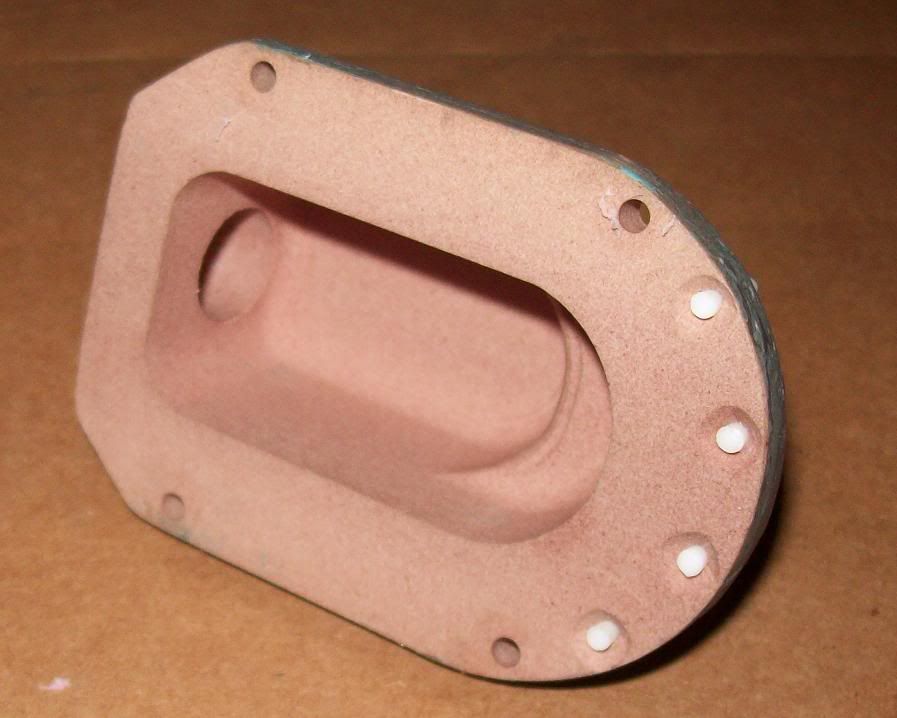
The Panther exhaust housing master shown here was CNC machined from prototype board material on both sides and covered on the top side with epoxy to give it the real cast effect. The big white post in the center is the feed sprue. The blue modelling clay is used to smooth the transition of the sprue rod going into the housing. The sprue rod is made of teflon, and is where the molten material comes into the mold. Second you will notice the small white posts at the bottom of the master. These are teflon inserts for the screws that will be cast into the part. These bolts (on real part) held the engine starter crank bracket - on right side housing. The screws are brass and are inserted into the mold with each pour. The molten metal flows around them holding them in place in the finished casting. Missing from the master is the Teflon cores for the 4 bolt holes to mount the housing to the tank. These cores are used in the mold (see lower photo of mold) to "pre-drill" the bolt hole locations. These could have been left out and the bolt holes drilled in each finished casting later.

There are a couple of mistakes to note on the master. First on the underside of the master you will see the 4 screw holes at bottom of master are counter-sunk. These do not need to be countersunk. I forgot I made teflon cores for the screws, and thought I would use flat head machine screws as cores- so I countersunk the holes for the screws. The result was small bumps of RTV rubber that filled in the countersinks that later had to removed. This was a minor mistake.
The next mistake was more serious. I thought I could cast the .50 dia hole (in top of casting) for the exhaust coupling and save myself the work of not having to drill it later. So I made a nice teflon core and poured the mold. I then relized once the mold was done, the part would be difficult to remove with that .50 core in the part - and it would tear the mold apart after a few casts. As it turned out there was an easy fix for this issue as well. Moral of that story - keep the master as simple as possible, holes can always be added later
So now the mold. First I made an elaborate box to surround the master while the rubber is poured around it. The mold box can be made of any material -plywood, particle board, or whatever you have. The mold box can be very simple. I had some oak scraps around so that is what I used. Note the interlocking tabs on top and bottom half of the mold. This is to keep the mold halves aligned during each pour - so that every part made is identical to the master. The tabs could have been pins or other features in the mold halves to maintain alignment.
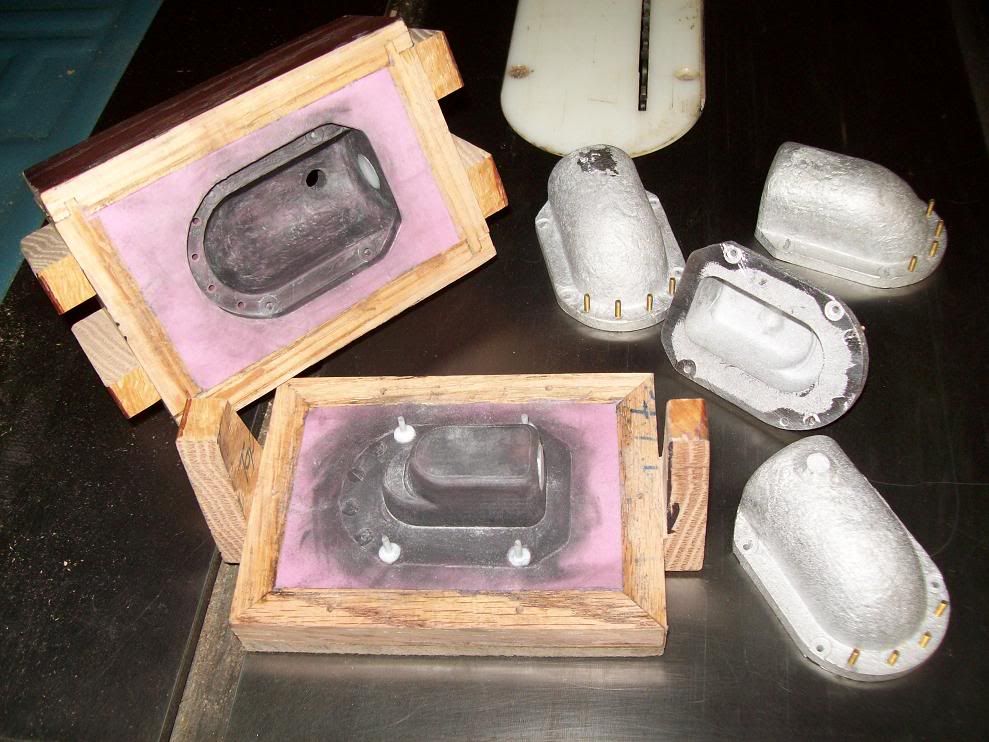
Notice the pink RTV rubber in both mold halves. The mold must be made over two days, and in two halves. The liquid RTV is poured into each half over the master and allowed to cure (hence the name -room temp vulcanization). And BTW I didn't pick the pink color that is what color the RTV is when mixed with the curing agent.
Notice the teflon cores to make the mounting holes. Several finished castings are shown to the right. After drilling the holes slightly larger and machining the .50 coupling hole in top of the castings they are ready to be used. Note also the Teflon patches that fill the core hole to fix my mistake. One final thing is to be sure to hold the mold closed with a couple c-clamps when pouring. The last thing you want is molten metal pouring on your shoes!
In summary even though mistakes to the mold were made excellent results can be achieved with practice. Its fun to see what you can make with this process. Always wear safety goggles, leather gloves and long sleeved clothing when handling hot metal. A respirator is also a good idea when casting metal.
I hope this article is helpful and that you give this process a try.
Happy Tanking.
Bob
