I recently had fun making a mold to cast the exhaust housing for the Panther G kit. I thought some might find it interesting and helpful if I showed how the master and mold were made should you want to contemplate casting a part in metal yourself.
First some general assumptions
- This discussion is to show how a gravity pour mold can be used. No fancy tools are needed just a ladle and propane torch are required to heat and pour the metal (and safety equipment of course).
- This mold type is limited to plastic resins and metals with melting temps below 500F. I like to use lead free Pewter. Higher temperature metal will destroy the RTV quickly.
- The mold is made from readily available RTV rubber (Room Temp Vulcanization).
- This is not the only way to cast the part. There are usually several ways to tackle a project.
- This mold type is generally for casting metal, but it can be used to cast plastic resins. Subtle differences in technique are noted.
Now the master. The master is the part used to make the mold. It can be any material really and is generally not destroyed by the mold making process - and can be used many times.
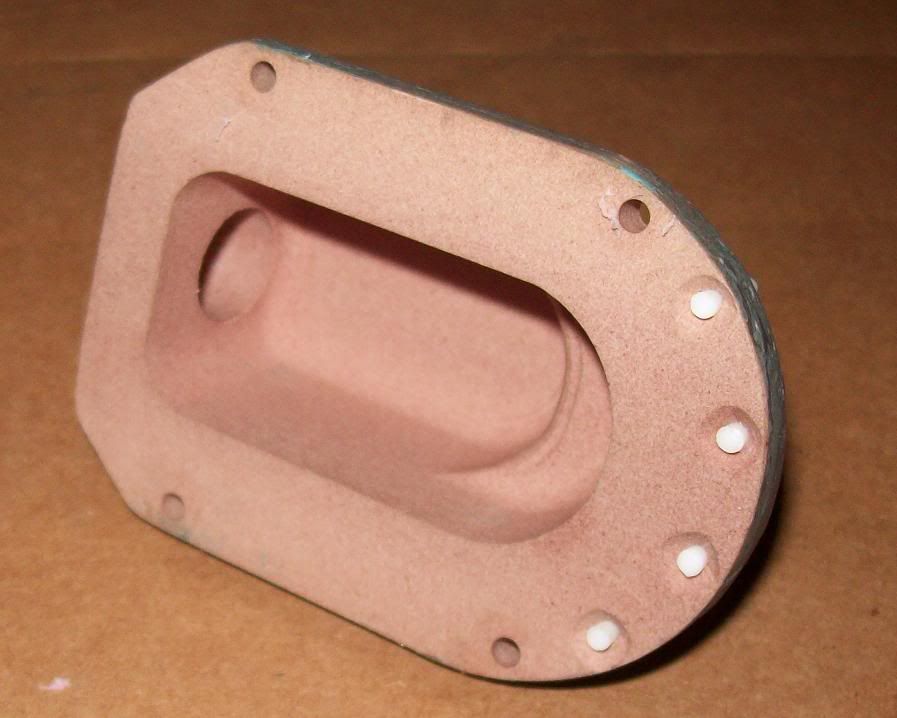
The Panther exhaust housing master shown here was CNC machined from prototype board material on both sides and covered on the top side with epoxy to give it the real cast effect. The big white post in the center is the feed sprue. The blue modelling clay is used to smooth the transition of the sprue rod going into the housing. The sprue rod is made of teflon, and is where the molten material comes into the mold. Second you will notice the small white posts at the bottom of the master. These are teflon inserts for the screws that will be cast into the part. These bolts (on real part) held the engine starter crank bracket - on right side housing. The screws are brass and are inserted into the mold with each pour. The molten metal flows around them holding them in place in the finished casting. Missing from the master is the Teflon cores for the 4 bolt holes to mount the housing to the tank. These cores are used in the mold (see lower photo of mold) to "pre-drill" the bolt hole locations. These could have been left out and the bolt holes drilled in each finished casting later.
There are a couple of mistakes to note on the master. First on the underside of the master you will see the 4 screw holes at bottom of master are counter-sunk. These do not need to be countersunk. I forgot I made teflon cores for the screws, and thought I would use flat head machine screws as cores- so I countersunk the holes for the screws. The result was small bumps of RTV rubber that filled in the countersinks that later had to removed. This was a minor mistake.
The next mistake was more serious. I thought I could cast the .50 dia hole (in top of casting) for the exhaust coupling and save myself the work of not having to drill it later. So I made a nice teflon core and poured the mold. I then relized once the mold was done, the part would be difficult to remove with that .50 core in the part - and it would tear the mold apart after a few casts. As it turned out there was an easy fix for this issue as well. Moral of that story - keep the master as simple as possible, holes can always be added later .
So now the mold. First I made an elaborate box to surround the master while the rubber is poured around it. The mold box can be made of any material -plywood, particle board, or whatever you have. The mold box can be very simple. I had some oak scraps around so that is what I used. Note the interlocking tabs on top and bottom half of the mold. This is to keep the mold halves aligned during each pour - so that every part made is identical to the master. The tabs could have been pins or other features in the mold halves to maintain alignment.
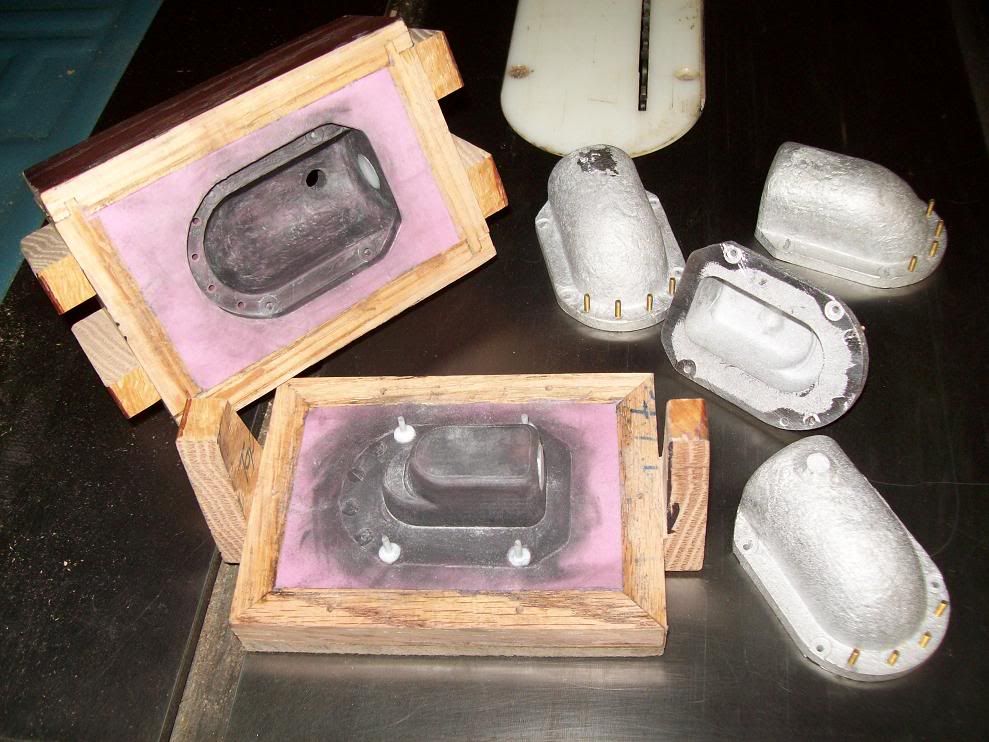
Notice the pink RTV rubber in both mold halves. The mold must be made over two days, and in two halves. The liquid RTV is poured into each half over the master and allowed to cure (hence the name -room temp vulcanization). And BTW I didn't pick the pink color that is what color the RTV is when mixed with the curing agent. The black smudgy stuff on the mold halves is not from burning. It is graphite. Graphite is added to the rubber to act as a lubricant, it makes the mold slippery for the molten metal. It also protects the mold rubber from the melted metal and gives longer life to the mold. There is also white powdery talc added to the mold. This also acts like tiny ball bearings for the metal to flow into all the areas easily. If pouring resin, then the talc and graphite are not used, but instead a spray mold release is used to prevent the part from sticking and as a lube while the mateial flows into the mold. If using this mold for resin, it is a good idea to inject the resin with a syringe, to minimized the amount of trapped air in the resin
Notice the teflon cores to make the mounting holes. Several finished castings are shown to the right. After drilling the holes slightly larger and machining the .50 coupling hole in top of the castings they are ready to be used. Note also the Teflon patches that fill the core hole to fix my mistake. One final thing is to be sure to hold the mold closed with a couple c-clamps when pouring. The last thing you want is molten metal pouring on your shoes!
In summary even though mistakes to the mold were made excellent results can be achieved with practice. Its fun to see what you can make with this process. Always wear safety goggles, leather gloves and long sleeved clothing when handling hot metal. A respirator is also a good idea when casting metal.
I hope this article is helpful and that you give this process a try.
Happy Tanking.
Bob
Metal casting 101
- Robert E Morey
- Posts: 2298
- Joined: Wed Jul 18, 2007 12:59 am
- Location: Seattle, WA USA
- Has liked: 125 times
- Been liked: 755 times
-
- Posts: 142
- Joined: Fri Jan 11, 2008 7:36 pm
- Location: Genoa
- Been liked: 1 time
- Contact:
- Adrian Harris
- Posts: 5060
- Joined: Thu Jul 12, 2007 10:46 pm
- Location: Berkshire (UK)
- Has liked: 1369 times
- Been liked: 1567 times
Excellent article Bob
A couple of questions:
1) The master needs to be suspended within the mould whilst the RTV takes up its shape. You say this done over two days but could you explain this process in more detail please
2) Is there any kind of shrinkage involved or have you countered that by scaling the master up to compensate
This has always been an area of the hobby which has seemed out of reach to me but judging by the excellent parts you've produced you've obviously mastered it
Adrian.
-
- Posts: 253
- Joined: Fri Aug 17, 2007 4:34 pm
- Location: athlone rep of ireland
- Been liked: 9 times
thanks bob
a good down to earth tutorial nothing fancy
i have suggested a tips and tricks section to be put in the forum index a few times now for this very reason to help us builders that would normally not dabble in this type of work
colin
a good down to earth tutorial nothing fancy
i have suggested a tips and tricks section to be put in the forum index a few times now for this very reason to help us builders that would normally not dabble in this type of work
colin
2003 first batch tiger 1 mid still fiddling with it
2006 222 SOLD
2009 pzr111 046 SOLD
- Robert E Morey
- Posts: 2298
- Joined: Wed Jul 18, 2007 12:59 am
- Location: Seattle, WA USA
- Has liked: 125 times
- Been liked: 755 times
Thanks for the feedback on the article guys.
Adrian, to answer your questions:
1) Yes the master must be suspended. The best way to do this for this part was to lay the housing on a flat board, and place the top half mold box on it. The top half box is the larger of the two boxes. Then pour the RTV around the part and let it cure. Once that is cured, put the lower mold box on and pour the the RTV into the lower box. Use separating compound (vaseline disloved in solvent) to insure the two RTV halves do not bond to each other. Once both halves are cured, then open the mold and remove the master. This technique "suspends" the part between the two mold halves. Since I planned on my mold being two halves from the start, I had to do 2 RTV pours - one for each half, unless I had two like machined masters (I only had one in this case). Then I could have done both pours simultaneously.
Another technique is to suspend the part as you describe with small wires and then pour the RTV in one pour. This would require the mold to be removed from the mold box, and cut into two halves so you can remove the finished part (and master). The wire tracks would act as air vents to remove trapped air which is good, but cutting a mold apart can be tricky. Don't forget the sprue rod if using this techniqe. This technique is useful if the part has no flat sides - like a tire for example.
2) Shrinkage is a problem depending on material. The white metal I use has very low shrinkage, so I may make the master just a few thousands oversize, but generally 1:1. Some white metals even expand, so the master may need to be undersized. Resins typically expand to fill the cavity as they cure, so the master can be 1-1 size. Contact the manufacturer of the casting material to be sure. Sometimes a little shrink of the part is helpful to remove it from the mold. A little experimentation with the metal will tell you how it will perform.
The great thing about the RTV mold process is the master can be any material, easily worked styrene for example. The master is not damaged by the mold making process, so many molds can be made from a master.
A downside is the metal or material being cast is not injected under pressure, so air pockets, or voids can occur if the mold maker isn't careful to vent the mold properly.
Glad you guys enjoyed the article.
A tips and tricks section, or scratch build section would be a great addition to the Forum. I like to see what other builders create too!
Bob
- Armortek
- Site Admin
- Posts: 2882
- Joined: Tue Jul 10, 2007 10:30 am
- Location: Winchester, England
- Been liked: 3409 times
Colin
We have discussed your suggestion of a hint and tips section in the forum. We feel that there are already so many sections in this forum, that it is difficult to keep up. The more sections there are, the more there is a risk of missing something relevant. We are considering combining some of the existing sections, for example combining the sdkfz7 and 88mm flak sections, or combining the jagd and panther sections.
Mark
Armortek
- Adrian Harris
- Posts: 5060
- Joined: Thu Jul 12, 2007 10:46 pm
- Location: Berkshire (UK)
- Has liked: 1369 times
- Been liked: 1567 times
Mark,
Unless there is a technical reason for doing so, my preference would be to retain the current layout.
There may be some duplication between models such as the Panther and Jagd in areas such as the suspension but the search function of the Forum works well (except for that annoying only-one-search-per-30-seconds rule ) for finding old threads and new messages show up as unread so are unlikely to be missed by anyone who reads the whole forum.
I do feel the introduction of a non-Armortek Wibble topic and stricter moderation of the Owners topic would lessen the noise in there - of which I'm as guilty as anyone
Adrian.
-
- Posts: 253
- Joined: Fri Aug 17, 2007 4:34 pm
- Location: athlone rep of ireland
- Been liked: 9 times
-
- Posts: 122
- Joined: Tue Jul 17, 2007 4:35 pm
- Been liked: 22 times
- Contact:
Hi Mark,
I would like to see some the forum sections combined as you suggest.
I think there are far to many as it stands and would like to see the number cut down in order to allow a hints & tips or 'How too' section, which would be far easier to navigate than having to trawl through old posts in diferent sections trying to find a information on how to do somthing that you remember seeing in the past.
Regards
Phil