My Beaut Aussie Cent

Forum for discussion relating to the Centurion
Post Reply
Stephen White
Site Admin
Posts: 3108
Joined: Sat Oct 11, 2008 7:05 pm
Location: Dorset
Has liked: 1022 times
Been liked: 2091 times
Contact:

Re: My Beaut Aussie Cent

Post by Stephen White »

Ah, the XF-11 maybe, surely not the Spruce Goose?

Next up, the exhausts. I started by making the flanges for the exhaust elbows.

Image

Image

Image

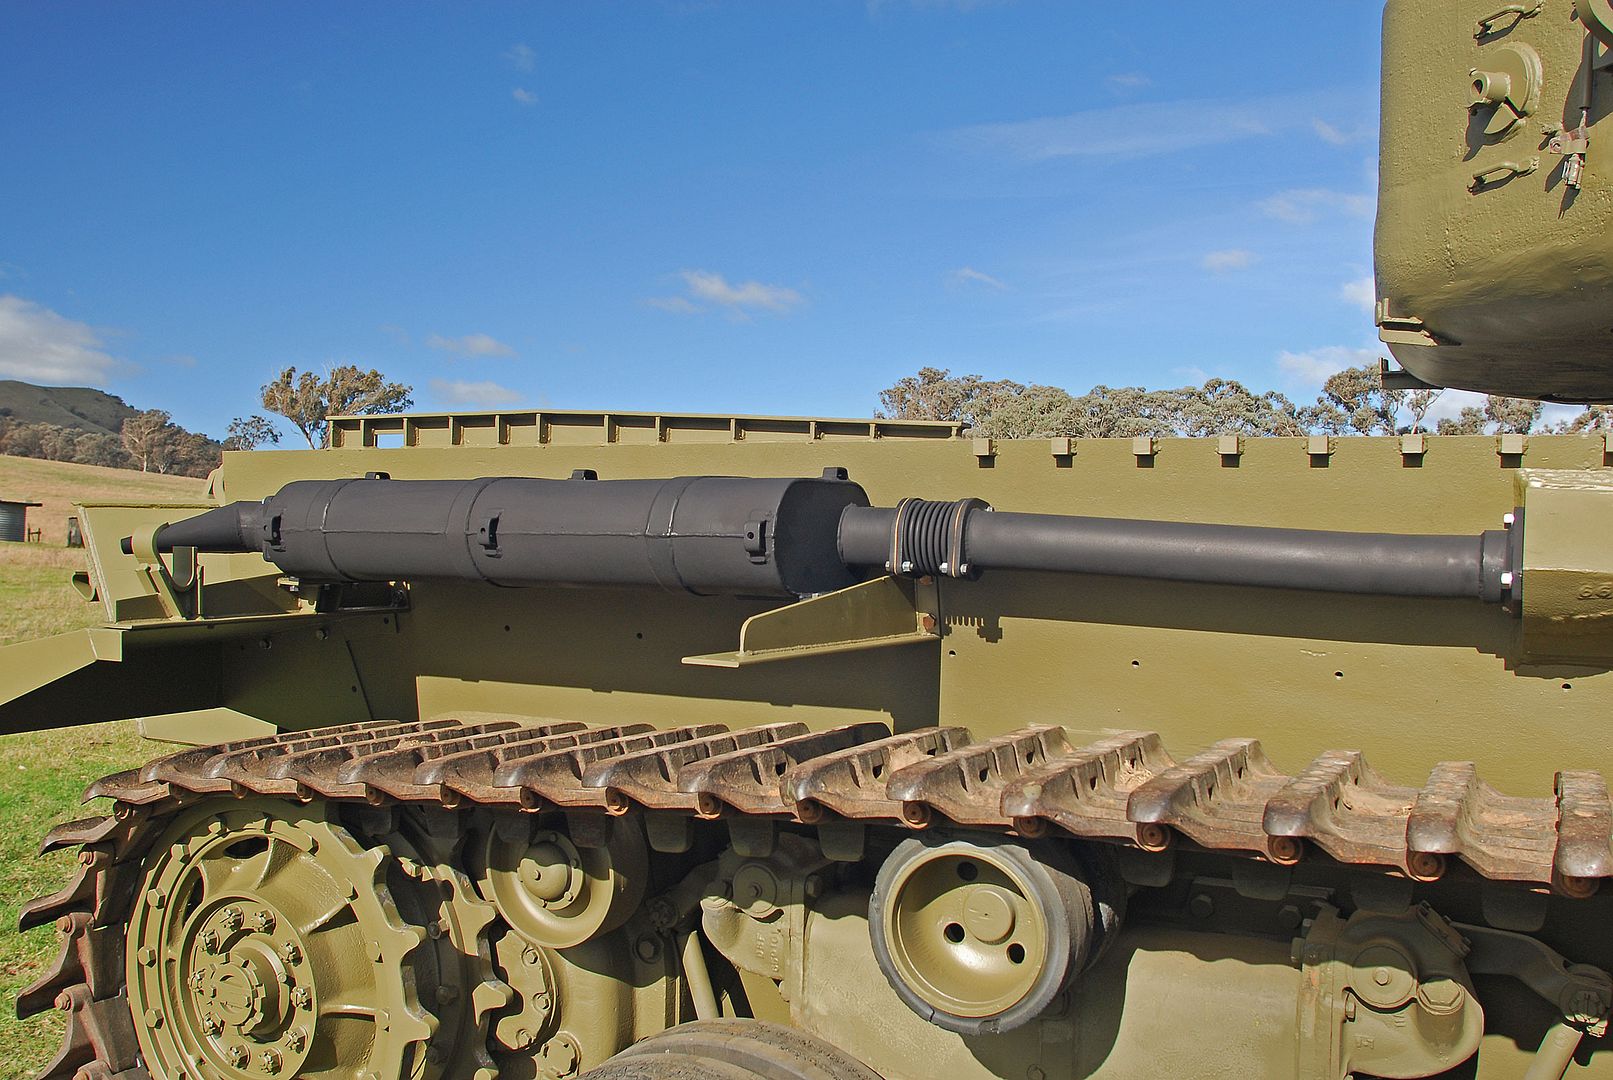
I've done that to establish the vertical displacement of the elbow from the manifold on the exhaust box (ie the exhaust box is higher than the exhaust elbow). The exhaust pipe between them isn't straight, it has two subtle bends and an expansion joint:
Image

Image

Next, I started fabrication of the exhaust boxes themselves:

Image

The boxes are slightly bigger than the kit boxes:

Image

I used the slip roller for the initial bending and then did the final radius by hand using a leather mallet:

Image

Image

Image

Having clamped up the assembly, I tacked the end plates and seam with a resistance soldering machine and then used a Proxxon torch to complete the silver soldering. That should now allow me to use soft solder to add the detailing.

Basic boxes done:

Image

Image

Image

Image


Regards

Stephen

Paul Morris
Posts: 1559
Joined: Thu Jul 12, 2007 4:44 pm
Location: North Lancs
Been liked: 68 times

Re: My Beaut Aussie Cent

Post by Paul Morris »

Hi Stephen.

Very good as always :)
Cheers Paul :wink:
Paul's Tank Workshop. Complete Tank builds and re builds zimmerit and paint to museum quality standard. pjtigerman@aol.com
01524 720977
https://www.facebook.com/PaulsTankWorkshop

simon_manning
Posts: 2019
Joined: Fri Nov 02, 2007 8:51 pm
Location: new forest,hampshire,u.k.
Been liked: 1630 times

Re: My Beaut Aussie Cent

Post by simon_manning »

i am getting confused now between the model and the photos of the real tank, superb. regards simon.

Iacopo Di Giampietro
Posts: 226
Joined: Fri May 11, 2012 9:14 pm
Been liked: 48 times

Re: My Beaut Aussie Cent

Post by Iacopo Di Giampietro »

simon_manning wrote:i am getting confused now between the model and the photos of the real tank, superb. regards simon.
It happens to me! :D
Bravo, Stephen!

Kevin Hunter
Posts: 558
Joined: Sat Nov 03, 2012 9:10 am
Location: Guernsey, Channel Islands
Has liked: 597 times
Been liked: 142 times

Re: My Beaut Aussie Cent

Post by Kevin Hunter »

Stephen, those exhaust boxes are just amazing. Superb work and attention to detail as always.
Regards
Kevin

Frank Breitenbach
Posts: 254
Joined: Sun Feb 12, 2012 8:52 am
Location: Grafenau, Germany
Has liked: 54 times
Been liked: 689 times

Re: My Beaut Aussie Cent

Post by Frank Breitenbach »

Hello Stephen
Great Job!
Regards Frank

Stephen White
Site Admin
Posts: 3108
Joined: Sat Oct 11, 2008 7:05 pm
Location: Dorset
Has liked: 1022 times
Been liked: 2091 times
Contact:

Re: My Beaut Aussie Cent

Post by Stephen White »

Thanks all for the encouraging comments. Onwards and upwards, now to the fishtails.

Firstly, the outlet pipes need a fillet to accommodate the offset:

Image

Next, I made a card template (well, several actually) before cutting brass. I gave up trying to draw the required pattern after a page of failed calculations and took the sensible way out, which was to shape the kit fishtail and use it as a template:

Image

The rest was a fairly straightforward silver soldering job:

Image

Image

Nothing is simple on the Cent. The fishtails sit at 30 deg to the centreline and they could be mounted with with either the top or bottom flush with the inlet tube, ie either pointing upwards or downwards. 064 had fishtails set upward, although I believe some crews chose to reverse them to minimise the intake of tropical rainwater:

Image

Image

Image

Image

Image


I then realised I'd forgotten the two flanges which join the fishtail and exhaust box pipes but that's for another day.

Regards.

Stephen

Kevin Hunter
Posts: 558
Joined: Sat Nov 03, 2012 9:10 am
Location: Guernsey, Channel Islands
Has liked: 597 times
Been liked: 142 times

Re: My Beaut Aussie Cent

Post by Kevin Hunter »

Great stuff Stephen.
Kevin

User avatar
Robert E Morey
Posts: 2295
Joined: Wed Jul 18, 2007 12:59 am
Location: Seattle, WA USA
Has liked: 118 times
Been liked: 753 times

Re: My Beaut Aussie Cent

Post by Robert E Morey »

Stephen, lovely work on the mufflers and end fittings. The result is superb. You never cease to amaze and inspire - great work.
Bob

davidwilkins
Posts: 312
Joined: Wed Jun 20, 2012 7:03 pm
Been liked: 213 times

Re: My Beaut Aussie Cent

Post by davidwilkins »

Stephen

Brilliant work on the mudguards and exhaust I have been looking forward to seeing how you would work your magic on these parts. Looking forward to seeing your cent close up in October.

David

Frank Breitenbach
Posts: 254
Joined: Sun Feb 12, 2012 8:52 am
Location: Grafenau, Germany
Has liked: 54 times
Been liked: 689 times

Re: My Beaut Aussie Cent

Post by Frank Breitenbach »

Wow! I can only say "Handwerksmeister".
Cheers
Frank

Stephen White
Site Admin
Posts: 3108
Joined: Sat Oct 11, 2008 7:05 pm
Location: Dorset
Has liked: 1022 times
Been liked: 2091 times
Contact:

Re: My Beaut Aussie Cent

Post by Stephen White »

Thanks again for the kind comments.

Now to add detail to the exhaust boxes and create the exhaust shields. Much of the detail will be covered by the shields but I enjoy making bits, so what the hell....

First the flanges for the forward exhaust pipe (eight off, to allow for the expansion joint):

Image

Image

Image

Then the bottom mounting plates and the banding strips:

Image

And finally, the captive nuts for the exhaust shields:

Image

The Shields are a simple bend and two flanges, the tricky bit is getting the bolt holes lined up with the captive nuts:

Image

Image

Image

Then to the base coats. For metallic, I swear by Alclad lacquers, which are now marketed by Ammo of Mig. They spray beautifully from the bottle and dry quickly to a fine, even and consistent finish:

Image

Image

Image

Regards.

Stephen

Fabrice Le Roux
Posts: 394
Joined: Thu Jul 12, 2007 8:57 pm
Location: London UK
Been liked: 14 times

Re: My Beaut Aussie Cent

Post by Fabrice Le Roux »

Hi Stephen,
Even as I sat trapped in the A30/M5 linear-car-park today, alas returning from a funeral in Cornwall, I wondered what artifice you were about.
Peachey Cent exhausts I see. Lovely job.

Only one question. I take it now that you are not planning to add a working smoker system in this case? I recall in the early days you discussed the merits of oil vs water vapour systems, but without a shorter pathway, or at least contained/constricting plumbing, it will prove difficult to spew vapour with convincing energy from such a large exhaust box.

Now just a hypothetical solution, as no longer having a Cent to build, I had the idea of running a pipe from the smoke generator (whatever type) through the hull, into the inner side of the silencer/muffler boxes, hidden by the exhaust shields, to provide the optimal efflux direct to the fishtails.

Anyone else thinking along those lines?

regards, Fabrice

Kevin Hunter
Posts: 558
Joined: Sat Nov 03, 2012 9:10 am
Location: Guernsey, Channel Islands
Has liked: 597 times
Been liked: 142 times

Re: My Beaut Aussie Cent

Post by Kevin Hunter »

More lovely work Stephen.

Fabrice, re the smoker, I asked a similar question a while back and Stephen had the same solution that you suggest (page 23 I think). Seems a shame now though to cut holes in those boxes. What's the answer Stephen?

Stephen White
Site Admin
Posts: 3108
Joined: Sat Oct 11, 2008 7:05 pm
Location: Dorset
Has liked: 1022 times
Been liked: 2091 times
Contact:

Re: My Beaut Aussie Cent

Post by Stephen White »

Fabrice, add mind reader to your many skills, Kevin, well remembered!

I did try various permutations of water vapour smokers but have reverted to the Armortek oil smokers, which are the most effective I've seen. The vapour ones are cleaner and easier to use but just don't produce the volume or persistence of smoke, especially in cold weather. Mind you, they do win indoors where there may be restrictions on using oil, such as at the Tank Museum.

Yes, it's the heavy duty drill I'm afraid. I've waited until the exhaust installation firmed up before committing to a new route for the smoke pipes, in order to map the runs with to make them as short and direct as possible. I'm intending to route via the T-piece to two tubes exiting the hull directly into the exhaust boxes, which, as you say, should be largely concealed by the shields. Now, if only Adrian could produce two mini fans to sit inside the exhaust boxes, linked to his fan controller.....

I'm going to use a smaller diameter pipe inside the exhaust boxes. This will create some back pressure and allow me to route it into the fishtails.

All the best.

Stephen

Post Reply