Hi all I'm John from Canada
I'm the new kid on the block so what questions I ask my seem fundamental but I would rather ask them than make a mistake on my 1st. tank I'm building. I hope to get better as I go so bare with me.
1) starting right at the beginning I've identified all the parts form pack 1 installation instructions and now I'm starting to install the parts
2) I've noticed that the suspension bushing fit the suspension bar perfectly but there is a recess on the pannier sides that would help align it to the suspension bar... should I indent the bushing to accommodate and fit into this recess?
3) the instructions also talks of fitting the suspension bars in position and fitting them to the fixed end bushing CE0270 & CE0271 ... Am I to fit these fixed bushing into the suspension bars? ... They are a very snug fit and I could press fit them in but if I do they will not come out again and I don't want to make a mistake right at the start ... should they be this snug?
4) when I do fix these bushings should the grub screws be positioned straight up or is it better on an angle?
Starting pack 1 of the Tiger 1 run of 2014
-
John Pissey
- Posts: 34
- Joined: Fri Sep 12, 2014 12:18 pm
- Location: Stoney Creek Ontario Canada
- Has liked: 1 time
-
Adrian Harris

- Posts: 5119
- Joined: Thu Jul 12, 2007 10:46 pm
- Location: Berkshire (UK)
- Has liked: 1475 times
- Been liked: 1674 times
Re: Starting pack 1 of the Tiger 1 run of 2014
Hi John and welcome to the Forum.
In regards to your questions:
2) I've noticed that the suspension bushing fit the suspension bar perfectly but there is a recess on the pannier sides that would help align it to the suspension bar... should I indent the bushing to accommodate and fit into this recess?
The bushes are installed so as to be flush with the sides of the suspension bars.
It's been a while since I've looked at a Tiger but I thought the recesses went on the outside faces, to accept the o rings which fit onto the suspension shafts
Are they on the same side as the machined Armortek serial number, which should go on the inside
3) the instructions also talks of fitting the suspension bars in position and fitting them to the fixed end bushing CE0270 & CE0271 ... Am I to fit these fixed bushing into the suspension bars? ... They are a very snug fit and I could press fit them in but if I do they will not come out again and I don't want to make a mistake right at the start ... should they be this snug?
They need to be snug as they take the forces from the torsion bars when the tank is moving, but they shouldn't be so tight as to prevent removal, as you'll need to be able to turn them to set the suspension angle later on in the build. I would give them a polish with some fine abrasive so that you can get them in and out without forcing them.
4) when I do fix these bushings should the grub screws be positioned straight up or is it better on an angle?
The angle will be set as part of the Pack 3 installation (Page 14 ?). When using them to assist with the installation of the suspension bars, their angle doesn't matter.
Adrian.
Contact me at sales@armortekaddict.uk for details of my smoker fan control module
-
martintakens
- Posts: 11
- Joined: Wed May 15, 2013 9:59 pm
- Location: The Netherlands
- Has liked: 1 time
- Been liked: 1 time
Re: Starting pack 1 of the Tiger 1 run of 2014
2) I've noticed that the suspension bushing fit the suspension bar perfectly but there is a recess on the pannier sides that would help align it to the suspension bar... should I indent the bushing to accommodate and fit into this recess?
Like Adrian said, All bushes should be flush with suspension bar (grind & break edges of any small protrusions).
But the pannier side recess should be inwards against susp bar. Rubber O-ring will be mounted in there during later stage with axle mounting.
PanzerIII + Tiger1 Mid
-
John Pissey
- Posts: 34
- Joined: Fri Sep 12, 2014 12:18 pm
- Location: Stoney Creek Ontario Canada
- Has liked: 1 time
Re: Starting pack 1 of the Tiger 1 run of 2014
Thanks for the info. I'm not sure of exactly how to work within the forum yet so I will reply this way.
In response to Adrian's help
2) The recesses in the side pieces are on the same side as the stamping identifying my tank. It makes sense that those recesses are for o-rings but the recesses are on the same side as the stamped identification for the tank.
Is there better schematics or detailed sections of these tanks other than what is offered that one can acquire or download? I really would like more detail than less when it comes to building this tank!
Thanks
John
-
colin fairweather
- Posts: 253
- Joined: Fri Aug 17, 2007 4:34 pm
- Location: athlone rep of ireland
- Been liked: 9 times
Re: Starting pack 1 of the Tiger 1 run of 2014
hi john
I would suggest you go to the tiger section and look up the build by john Fitz he has good close up photos of his build from the start you cant go wrong and as they say a picture tells a thousand words
regards
colin
I would suggest you go to the tiger section and look up the build by john Fitz he has good close up photos of his build from the start you cant go wrong and as they say a picture tells a thousand words
regards
colin
2003 first batch tiger 1 mid still fiddling with it
2006 222 SOLD
2009 pzr111 046 SOLD
-
John Fitzsimons
- Posts: 1861
- Joined: Tue Dec 14, 2010 3:11 pm
- Location: IRELAND,Dublin/Meath
- Has liked: 6 times
- Been liked: 797 times
- Contact:
Re: Starting pack 1 of the Tiger 1 run of 2014
John,
The stamping identifying tour tank is on the inside.
Here you see the bars with bushes in place.
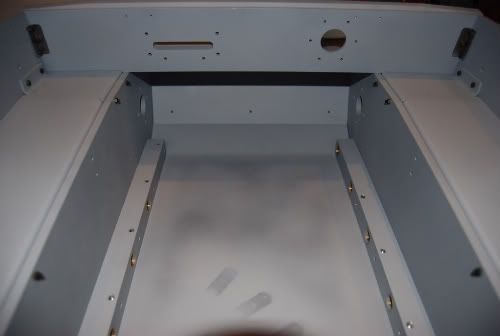
The rubber O rings go into the recess left between the bar and inner hull side later. They pop in later from the outside. I put some silicone grease on them.
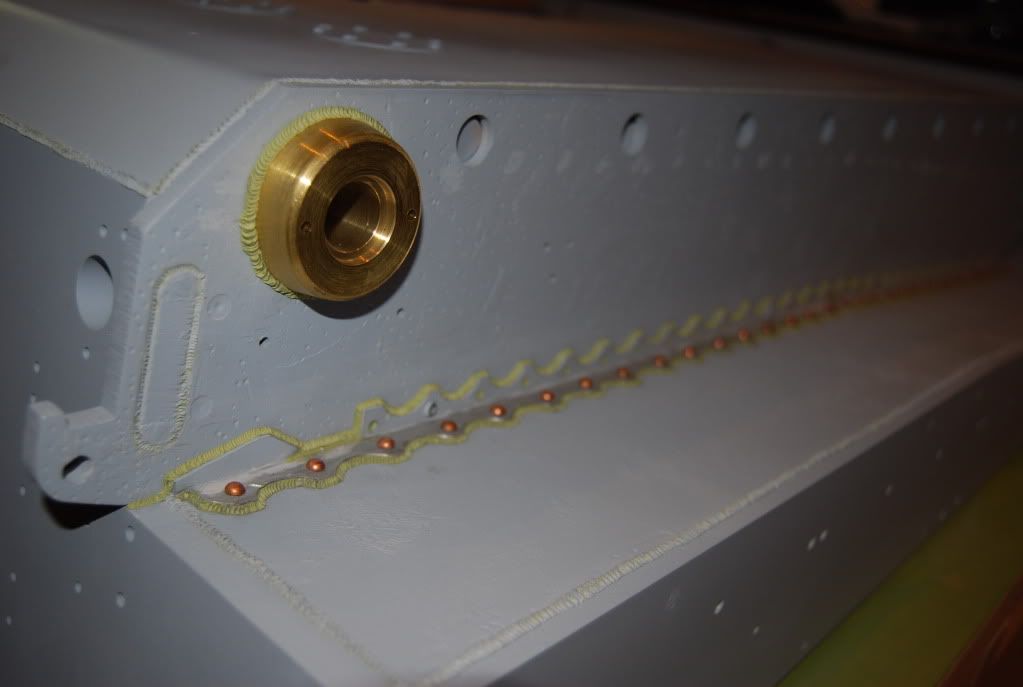
The holes were blocked with some cardboard circles I found during painting.
I have not posted anything for a while as I was off on the ski slopes for most of the last four months. Life is so tough. I hope to post some pictures of progress on my tigers later. Feel free to send a pm if you need any help or advice with the Tiger. I remember well my first tiger. I got lots of help on the forum.
If interested in any parts used in my builds contact me at johnfitzsimons@msn.com for a price list.
http://www.armortek.co.uk/Forum3b/viewt ... f=4&t=4770
https://youtube.com/@16rctankworkshop-y ... TlMwTalnX5
http://www.armortek.co.uk/Forum3b/viewt ... f=4&t=4770
https://youtube.com/@16rctankworkshop-y ... TlMwTalnX5
-
John Fitzsimons
- Posts: 1861
- Joined: Tue Dec 14, 2010 3:11 pm
- Location: IRELAND,Dublin/Meath
- Has liked: 6 times
- Been liked: 797 times
- Contact:
Re: Starting pack 1 of the Tiger 1 run of 2014
John, I would suggest you start posting on the tiger 1 forum. Nice to keep a record of your progress and the Tiger forum has been a bit slow lately.
If interested in any parts used in my builds contact me at johnfitzsimons@msn.com for a price list.
http://www.armortek.co.uk/Forum3b/viewt ... f=4&t=4770
https://youtube.com/@16rctankworkshop-y ... TlMwTalnX5
http://www.armortek.co.uk/Forum3b/viewt ... f=4&t=4770
https://youtube.com/@16rctankworkshop-y ... TlMwTalnX5
-
WilliamChan
- Posts: 7
- Joined: Sun Mar 01, 2015 3:58 am
Re: Starting pack 1 of the Tiger 1 run of 2014
Hi John,
I am from USA. I just basically put all parts together. There several things which have be careful. This is just my first tiger 1. I cannot say I am good, but just would like to share my experiences.
For the suspension, I didn't assemble the suspension arm, axle, suspension shaft, torsion bar and fixed end in one piece to fit into the suspension bar. It was because I had to make sure the suspension's fixed end have good contact with the shakeproof washer. Because of the motion of the suspension is clockwise, it just can make it loose. I didn't have to make extra screws to tighten the fixed end as someone did. They stay well. I Just put the torsion bar into the fixed end far enough for 2 grubs to fasten it. I didn't attack the other end until the final step to have the 35 degrees angle.
For the turret, it seems quite hard to turn. Instead of adding transfer ball bearing, I just put magic sliders things to make it turn smoother.
The front guards, I bought 2mm screws to attach them rather then pins.
For those turrets' hatches, i just bent some nails to make handles.
I added a sliding bolt lock($3) inside the escape hatch to lock it.
My build is not great, but I love it
-
WilliamChan
- Posts: 7
- Joined: Sun Mar 01, 2015 3:58 am