Page 1 of 1
Easy Access
Posted: Sun Apr 30, 2017 6:58 pm
by Oliver Brüninghaus
Hello,
Regarding the reports about the maintenance of the drives I finally decided to take a more convenient way.
The „Beutepanzer“ in my worksop got 4 „bullet holes“ on each side of the rear armor plates with 6 mm dia.
That provides direct access with the hex allen key to the mounts of the drives.
Adjusting is now a real fun and the armor plates never needs to be removed.

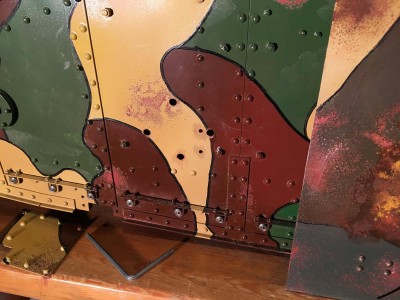
- four "bullet holes" on the right side
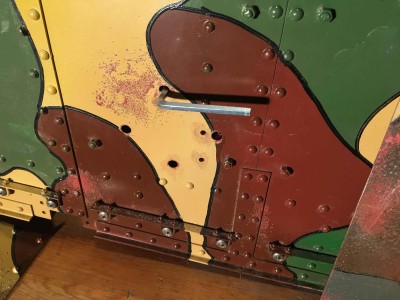
- easy handling
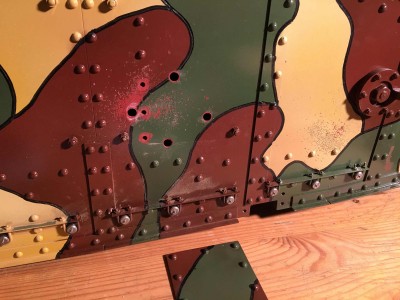
- the "bullet holes" on the left side
To cover the damages the refurbished Beutepanzer got additional armor plates in B.A.K.P. 20 to get the tanks back to service.
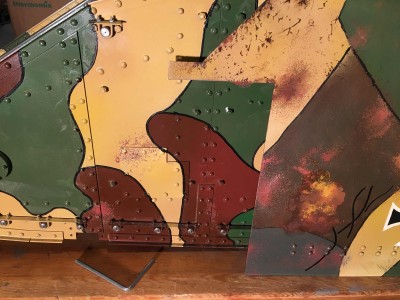
- repaired! right side
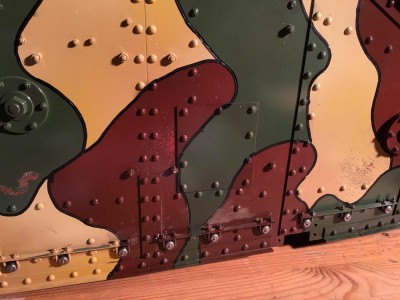
- covered! left side
To sheets of steel, a few rivet heads and some neodymium magnets did the job at my model.
Maybe for British tanks the holes could be covered with some painted and weathered adhesive foil.
Hope this could be an inspiration.
Regards
Oliver
Re: Easy Access (Mark IV)
Posted: Sun Apr 30, 2017 7:39 pm
by Chris Hall
Oliver -
Certainly a novel suggestion. However, won't the top, left and right holes need to be larger to allow for the motors being pushed down a bit as the drive chain stretches a bit ?
Your suggestion of a 'repair patch' certainly works for a Beutepanzer - I've got several pictures of such plates, clearly covering bullet or shell holes, fitted at 'BAKP 20'

. It's far less likely with a tank still in British service - I suspect the British would just have scrapped a tank with that degree of damage or, if it was still a runner, converted it for supply, or training. Remember that the Mark V was already in design by late 1917, so why bother to patch up an old model ?
This problem has been exercising my mind of late, with regard to
Flaming Fire II. I've been thinking of cutting that particular plate into three, with the middle plate bolted (rather than riveted) in. Then it could be unbolted for motor adjustment, while also allowing access for a flexible suction hose to clean out some of the crud from the track runs.
But I do agree it's an area that benefits from some original thinking. It'll be interesting to see if anyone else has a 'lightbulb' solution !
All the best,
Chris
Re: Easy Access
Posted: Sun Apr 30, 2017 9:14 pm
by Steve Stuart
Oliver, you have hit on a neat solution to an otherwise very long winded job, congratulations

Steve
Re: Easy Access
Posted: Mon May 01, 2017 8:17 am
by Daniel Scholefield
Having just taken the plates off mine to remount the motors I can appreciate your elegant solution to this problem. I would echo Chris in that the left/right holes might need to be enlarged as should the motor move the bolts would no longer line up. Nevertheless, well thought out.
Re: Easy Access
Posted: Tue May 02, 2017 1:04 pm
by Oliver Brüninghaus
Hello,
thank you for your heartening comments.
Chris,
Daniel,
You make an important point.
Removing the drives a few times, I saw that the hex allen keys provides you a little freedom to work in a slightly angled position. I could reach the screws in every position of the drives. So I never faced the need to enlarge the holes. But if this case occur, the holes can be optimized afterwards without any problem.
Steve,
The first time when the drill hits the intact armor plates, it was a disturbing moment.
Kind regards
Oliver
Re: Easy Access
Posted: Mon Apr 30, 2018 6:05 pm
by Adrian Harris
I am pondering this issue and have the basis for an internal solution but I would be interested to know how much the motors move from a tank fresh off the production line to one which has a few sorties under its belt.
Tensioning is done by pushing the motors down but the images of both Liesel and Lightning III seem to show the motors horizontal, so is that the limit of the adjustment ?
Adrian.
Re: Easy Access
Posted: Mon Apr 30, 2018 7:02 pm
by Daniel Scholefield
It would be more accurate to say (at least in my case) the motors are 'now' horizontal. On first install/tension they were 'not 'quite' horizontal so there was still some wiggle room to take up slack. Circumstances (my inexperience) meant my motors, particularly the left side got loose enough to lift causing the track slippage issues I had but since the re-fit have not needed any further attention. Checks on the chain tension recently showed no more slackening after more use thus far.
Re: Easy Access
Posted: Mon Apr 30, 2018 8:17 pm
by Chris Hall
+1 Daniel.
My original fit was also inadequate - in my case, the RH motor. But, since I've remounted and re-tensioned the whole thing, I haven't had any problems.
Mark told me that the drive chains would stretch a bit and then stop. This seems to have been the case -
Liesel did quite a lot of shows

in the first 2 years, after which I tightened everything up. No problems since. I don't think the motors would go much lower, though - hopefully they'll never have to !
As for Oliver's solution, it certainly works for the Beutepanzers as they often had extra plates bolted over damage. However, I adapted the idea on
Liesel (and will do on
Flaming Fire II) by drilling the holes, tightening through with an allen key and then gluing a thin piece of aluminium behind each hole, using filler to fill in the hole prior to repainting. Should I ever need to tighten again, I'll take the tracks off, put another piece of aluminium behind, refill and repaint.
All the best,
Chris
