My Mid PantherG #0035

Forum for discussion relating to the Panther
User avatar
Tim Page
Posts: 515
Joined: Wed Dec 03, 2014 10:45 am
Location: Milton Keynes
Has liked: 39 times
Been liked: 423 times

Re: My Mid PantherG #0035

Post by Tim Page »

Here are a few pix of some of the upgrades and improvements made in the last 18 months.
First are 2 pix of the original rear deck air intake that i detailed and fitted ages ago.
This part is correct for a Late ausf.G but not right on an early ausf.G.
IMG_1236s.jpg
IMG_1236s.jpg (191.42 KiB) Viewed 4607 times
IMG_1235s.jpg
IMG_1235s.jpg (185 KiB) Viewed 4607 times
Now here are 2 pix of the new Werkstatt part that has been primed and fitted.
This part is correct for ausf.A and early ausf.G Panthers.
IMG_3032.JPG
IMG_3031s.jpg
IMG_3031s.jpg (159.72 KiB) Viewed 4607 times
At some time when the weather gets a bit warmer i will get the airbrush out and get these last few parts painted and then do a bit more weathering to blend it all in.

Cheers
Tim
2008 Armortek Panther ausf.G (early) #0035
2012 Armortek Tiger 1e (Late) #001
2009 Armortek BefehlsPanzer 111 ausf.J #0011 (SOLD)
2010 Armortek A34 Comet #0031 (SOLD)

User avatar
Tim Page
Posts: 515
Joined: Wed Dec 03, 2014 10:45 am
Location: Milton Keynes
Has liked: 39 times
Been liked: 423 times

Re: My Mid PantherG #0035

Post by Tim Page »

The 4 rectangular radiator grills on the rear deck of the Panther G are open and you can see straight through inside the tank.
This look is improved if you add some mesh but you should still not be able to see the insides of the tank.
It is also an area of concern if you model is outdoors when it is raining as water could get in through these 4 large openings and potentially damage the electrics.

These 4 grills were part of the radiator cooling system for the engine and were boxed in with vanes inside to direct the airflow.
Several Panther builders have replicated this in metal and they look fantastic, but it almost seems a waste to do that amount of work when most of the detail is hidden.

I have been dabbling with various simple ideas recently and think I've now got a pretty good solution which stops rain from getting into the tank and gives a good impression of these radiator ducts.
Ive designed the 4 ducts in a CAD program and then 3d printed them. They are a firm push on fit onto the base of the 4 rectangular radiator grills and can be glued in place if required.

Here is a picture to show one of the 3d printed ducts.
IMG_3872s.jpg
IMG_3872s.jpg (180.97 KiB) Viewed 4397 times
This is where it fits from the underside.
IMG_2198s.jpg
IMG_2198s.jpg (99.21 KiB) Viewed 4397 times
The vertical side of the 2 ducts each side should face inwards towards the circular radiator fan housing.
IMG_3891s.jpg
IMG_3891s.jpg (186.03 KiB) Viewed 4397 times
IMG_3892s.jpg
IMG_3892s.jpg (123.77 KiB) Viewed 4397 times
I now need to get replace the hot glue fixing of the rad fans and cables and attach them properly.
This was only intended to be a temporary solution but has now been 3 years!

This is what it looks like with one of the ducts fitted.
IMG_3869s.jpg
IMG_3869s.jpg (244.74 KiB) Viewed 4397 times
IMG_3871s.jpg
IMG_3871s.jpg (242.54 KiB) Viewed 4397 times
I have just got to paint the last 2 ducts and then glue them all in place.
I know they are not 100% accurate but they will certainly do the job intended and look a lot better than before.

Next job will be to get the new cast exhaust housing and pipes fitted and painted.

Cheers
Tim
2008 Armortek Panther ausf.G (early) #0035
2012 Armortek Tiger 1e (Late) #001
2009 Armortek BefehlsPanzer 111 ausf.J #0011 (SOLD)
2010 Armortek A34 Comet #0031 (SOLD)

Vince Cutajar
Posts: 2148
Joined: Wed Nov 15, 2017 1:43 pm
Location: Malta
Has liked: 717 times
Been liked: 1700 times

Re: My Mid PantherG #0035

Post by Vince Cutajar »

I like that idea.

Vince

User avatar
Tim Page
Posts: 515
Joined: Wed Dec 03, 2014 10:45 am
Location: Milton Keynes
Has liked: 39 times
Been liked: 423 times

Re: My Mid PantherG #0035

Post by Tim Page »

Forgot to say. I can print off a full set of 4 ducts if anyone wants a set.
Please PM me for details.

Cheers
Tim
2008 Armortek Panther ausf.G (early) #0035
2012 Armortek Tiger 1e (Late) #001
2009 Armortek BefehlsPanzer 111 ausf.J #0011 (SOLD)
2010 Armortek A34 Comet #0031 (SOLD)

User avatar
Tim Page
Posts: 515
Joined: Wed Dec 03, 2014 10:45 am
Location: Milton Keynes
Has liked: 39 times
Been liked: 423 times

Re: My Mid PantherG #0035

Post by Tim Page »

Have now got all 4 of the radiator ducts fitted to the rear deck and this has really improved the look of the whole engine deck and is another step closer to completing this very long upgrade journey.

The next 2 jobs will be to complete the inner hatch detail for the Drivers and Radio Operator hatches which is now almost done.
I hope to get this done on Sunday and then upload a few more pix of them.

The Cast exhausts will be the next job and this will require a bit more work.
Mark from Werkstatt 5 supplied me with a drawing of one type of cast exhaust housings that were fitted to the Panther some ausf.A, early Ausf.G as well as some Jagdpanthers.

I have now produced a 3d CAD design for this and have printed off a couple on my Resin 3D printer.
These will be fitted to my Panther to replace the original Armortek welded type which was not used on the early and mid production Panthers.
I will also not be using the heat shields which i had used with the original exhausts.

This is what the exhausts were like originally.
IMG_1945s.jpg
IMG_1945s.jpg (191.11 KiB) Viewed 4327 times
This is sort of how it should look when done.
This is an Ausf.A but it is showing the same configuration.
Ausf.A Exhausts.JPG
Ausf.A Exhausts.JPG (71.36 KiB) Viewed 4327 times
Here is a pix of one housing straight off the printer.
IMG_3911s.jpg
IMG_3911s.jpg (222.88 KiB) Viewed 4328 times
Now with some 3.5mm casting numbers added.
IMG_3028s.jpg
IMG_3028s.jpg (110.16 KiB) Viewed 4328 times
Finally after an application of Mr Surfacer to add some casting texture to the surface and then a coat of red primer.
IMG_3913s.jpg
IMG_3913s.jpg (143.82 KiB) Viewed 4328 times
I have still got to make the exhaust mounting straps which will be made from brass but this should be fairly straightforward.
The repainting of the camouflage and then weathering again is the bit I am not looking forward to TBH.

Anyway, Time for Bed said Zebedee .....

Cheers
Tim
2008 Armortek Panther ausf.G (early) #0035
2012 Armortek Tiger 1e (Late) #001
2009 Armortek BefehlsPanzer 111 ausf.J #0011 (SOLD)
2010 Armortek A34 Comet #0031 (SOLD)

User avatar
Tim Page
Posts: 515
Joined: Wed Dec 03, 2014 10:45 am
Location: Milton Keynes
Has liked: 39 times
Been liked: 423 times

Re: My Mid PantherG #0035

Post by Tim Page »

Been a long time since i did a Panther update but thought it was about time (well overdue).
I have been doing a few bits here and there on the Panther but nothing really exciting until this week.

There is a short list of outstanding improvements that i want to do to the Panther but these never seemed to progress as I had no idea how to do them.
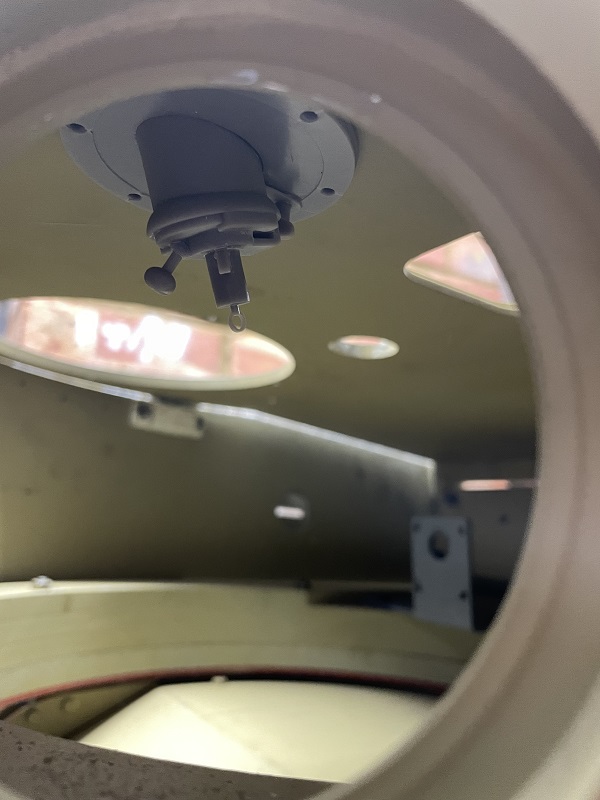
High on this list was adding some detail to the interior of the commanders cupola.

I have tried a couple of times over the last 2 years but nothing seemed to work well but i am now finally happy with the latest attempt.
It is certainly not perfect but is a pretty good representaion and a lot better than no detail at all.

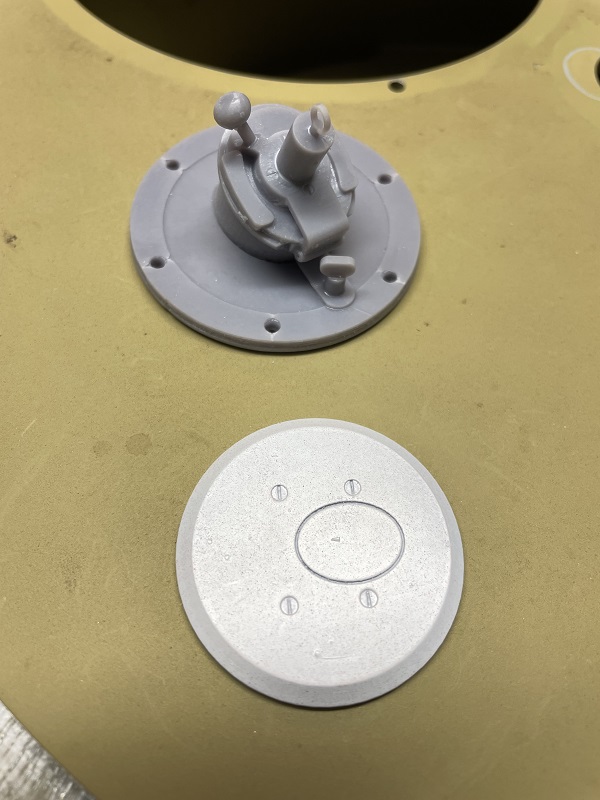
I designed the parts in Cad and printed in PLA then glued in place and added some casting effect and some casting numbers.
IMG-6491s.jpg
IMG-6491s.jpg (176.52 KiB) Viewed 2511 times
IMG-6488s.jpg
IMG-6488s.jpg (123.39 KiB) Viewed 2511 times
I have also done a simplified interior periscope panel which proved to be trickier than expected to design because i just could not get the scale right.
Anyway, I am pleased with the result but will look better when printed in resin.
IMG-6492s.JPG
IMG-6492s.JPG (37.7 KiB) Viewed 2511 times
Will post some more pix when it is completed and painted in a few days.
I will probably do a similar upgrade to the Tiger 1 cupola as well.

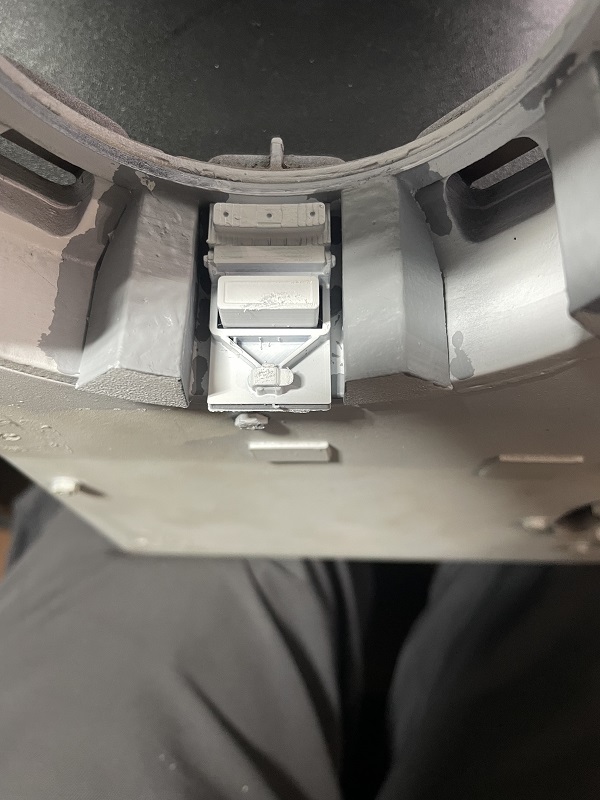
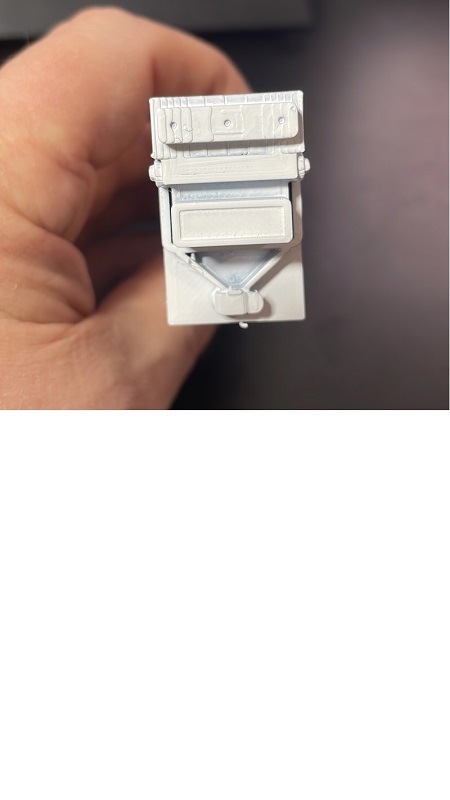
The other part that i am excited about is the close defence weapon (Nahverteidigungswaffe) which was fitted to late Panther ausf.A and Panther ausf.G as well as the late production Tiger 1 from March 44 onwards.
I was aksed if it would be possible to make the interior part of the close defence weapon for a friends Tiger 1 as it is very noticeable when the escape hatch is open. I then thought that if i could make one then it could be fitted to both my Panther and Tiger 1 as well as my friends Tiger.

So, I must have spent a couple of evenings messing about in CAD but eventually got something that I thought looked pretty good.
IMG-6457s.jpg
IMG-6457s.jpg (103.18 KiB) Viewed 2511 times
IMG-6458s.jpg
IMG-6458s.jpg (126.25 KiB) Viewed 2511 times
These 2 pix are on my Tiger 1 but you get the idea.
I also drew out a new design for the exterior part of the CDW as the ones fitted to my Panther and Tiger were open and I was wanting a closed one.
I will post more pix when the parts have been fitted to my Panther.

Cheers
Tim
Last edited by Tim Page on Sun Feb 05, 2023 10:28 pm, edited 1 time in total.
2008 Armortek Panther ausf.G (early) #0035
2012 Armortek Tiger 1e (Late) #001
2009 Armortek BefehlsPanzer 111 ausf.J #0011 (SOLD)
2010 Armortek A34 Comet #0031 (SOLD)

User avatar
Robert E Morey
Posts: 2253
Joined: Wed Jul 18, 2007 12:59 am
Location: Seattle, WA USA
Has liked: 103 times
Been liked: 701 times

Re: My Mid PantherG #0035

Post by Robert E Morey »

Periscope detail parts look great! Nice job!
Bob

User avatar
Tim Page
Posts: 515
Joined: Wed Dec 03, 2014 10:45 am
Location: Milton Keynes
Has liked: 39 times
Been liked: 423 times

Re: My Mid PantherG #0035

Post by Tim Page »

Thanks Bob, Much appreciated.
I am hoping it will look pretty good when complete and painted.
Cheers
Tim
2008 Armortek Panther ausf.G (early) #0035
2012 Armortek Tiger 1e (Late) #001
2009 Armortek BefehlsPanzer 111 ausf.J #0011 (SOLD)
2010 Armortek A34 Comet #0031 (SOLD)

User avatar
Tim Page
Posts: 515
Joined: Wed Dec 03, 2014 10:45 am
Location: Milton Keynes
Has liked: 39 times
Been liked: 423 times

Re: My Mid PantherG #0035

Post by Tim Page »

Hi guys, I have completed the cupola interior now and gave it a wash and then a drybrush prior to gluing the periscope panels into place.

I am really please with the way this came out.
Thanks to Mark Lawson for giving me the inspiration to pull my finger out and do this. He also made sure that i used the correct periscope mounting for the Panther G as the ausf.A looked very different. I have now done a design for the ausf.A type as well.
Now, my Panther was already fully assembled so was unable to make a set of accurate persicopes as I would not be able to fis them without breaking the cupola apart which I had no intention of doing. So, I designed the parts so that they would be easy to install and look good when installed. I realise that there are probably more accurate internals available but they would have cost many times what this cost me to produce and probably would not have fitted anyway.

Here are a few pix completed but on the bench.
IMG-6499s.jpg
IMG-6499s.jpg (201.77 KiB) Viewed 2202 times
IMG-6500s.jpg
IMG-6500s.jpg (212.15 KiB) Viewed 2202 times
IMG-6501s.jpg
IMG-6501s.jpg (176.33 KiB) Viewed 2202 times
The last 3 pix are of the outside of the tank with the turret roof replaced.
IMG-6502s.jpg
IMG-6502s.jpg (200.44 KiB) Viewed 2202 times
IMG-6503s.jpg
IMG-6503s.jpg (189.65 KiB) Viewed 2202 times
IMG-6504s.jpg
IMG-6504s.jpg (203.22 KiB) Viewed 2202 times
As you can imagine, this took me quite a bit of time to design the parts and my intention was to just make this for myself but if anyone wants a set printing off for their own Panther ausf.G or ausf.A then please give me a shout.

Just starting the next task which is to design and print off a set of the external faces of the cupola periscopes as all mine are currently empty.
IMG_1663s.JPG
IMG_1663s.JPG (191.73 KiB) Viewed 2200 times
Cheers
Tim
2008 Armortek Panther ausf.G (early) #0035
2012 Armortek Tiger 1e (Late) #001
2009 Armortek BefehlsPanzer 111 ausf.J #0011 (SOLD)
2010 Armortek A34 Comet #0031 (SOLD)

User avatar
Charles A Stewart
Posts: 491
Joined: Sat Oct 05, 2019 7:26 pm
Location: Cumbria
Has liked: 435 times
Been liked: 781 times
Contact:

Re: My Mid PantherG #0035

Post by Charles A Stewart »

Hi Tim.
Those periscopes look fantastic, well done. They certainly set the cupola off.

Taking orders????

Cheers Charles
Chieftain No.34, functional. PKW IV (2002), operational. Panther G No.18 (2022), started, well some of it is. Series 1 4x4 No.28 and a Bailey Bridge.

Steve Norris
Posts: 1201
Joined: Thu Jul 12, 2007 11:42 am
Location: Manchester
Has liked: 8 times
Been liked: 642 times

Re: My Mid PantherG #0035

Post by Steve Norris »

Tim
Really nice job you’ve done there with the Coppola.
Regards
Steve

User avatar
Tim Page
Posts: 515
Joined: Wed Dec 03, 2014 10:45 am
Location: Milton Keynes
Has liked: 39 times
Been liked: 423 times

Re: My Mid PantherG #0035

Post by Tim Page »

Have just fitted and painted the external part of the 7 periscopes into the cupola so i think i can call this bit now complete.

This must have been one of the quickest and simplest pieces to make and unlike most parts that i make fitted first time and did the job.
Normally i end up tweaking and adjusting parts to get them to fit or look the way i want.

I printed them in resin on my 3d printer and then primed in halfords grey primer. I then painted the body using a really good Games Workshop Contrast paint called Gore-Grunta Fur. All of their paints have odd names but I have found that using this over a light grey or beige undercoat gives a pretty good representaion of brown bakelite as used for the periscope bodies. These paints are very easy to use and 1 generous coat is all that is needed.
Unfortunately, you cant really see the effect now that they have been installed. I might have to paint another to show as an example.
IMG-6505s.jpg
IMG-6505s.jpg (156.89 KiB) Viewed 2152 times
I painted the lens with a Tamiya Chrome Silver, then sealed with a gloss varnish.
IMG-6506s.jpg
IMG-6506s.jpg (184.33 KiB) Viewed 2152 times
Then I used some thinned Tamiya X23 Clear Blue to make a blue tint and then another coat of gloss varnish to seal and give a nice shine.
IMG-6507s.jpg
IMG-6507s.jpg (178.38 KiB) Viewed 2152 times
Overall, i am very happy with the transformation of the cupola which i think turned out better than i hoped. Originally, i was planning to have a very basic interior because that is all i thought i would be able to achieve - guess i was wrong.

Need to start planning the next task which will be to finally get my cast exhausts housings installed.
That will be another big job as i will need to make new exhaust brackets and then paint everything and then try to weather it all yo match the existing weathered paintwork.
This will probably be a major PIA and at the same time, I have 4 other parts of the exterior that need the same treatment.
Really not looking forward to this on tbh.

Cheers
Tim
2008 Armortek Panther ausf.G (early) #0035
2012 Armortek Tiger 1e (Late) #001
2009 Armortek BefehlsPanzer 111 ausf.J #0011 (SOLD)
2010 Armortek A34 Comet #0031 (SOLD)

User avatar
Robert E Morey
Posts: 2253
Joined: Wed Jul 18, 2007 12:59 am
Location: Seattle, WA USA
Has liked: 103 times
Been liked: 701 times

Re: My Mid PantherG #0035

Post by Robert E Morey »

Scopes look great - look like armored glass! Nice work!
Bob

User avatar
Tim Page
Posts: 515
Joined: Wed Dec 03, 2014 10:45 am
Location: Milton Keynes
Has liked: 39 times
Been liked: 423 times

Re: My Mid PantherG #0035

Post by Tim Page »

Cheers Bob, the outside parts were really simple to design and fit but really finish it off.
I was sick of seeing 7 holes up there in the cupola every time i looked at it.

TBH, a task like this would never have been achievable for me without a 3d printer.

Cheers
Tim
2008 Armortek Panther ausf.G (early) #0035
2012 Armortek Tiger 1e (Late) #001
2009 Armortek BefehlsPanzer 111 ausf.J #0011 (SOLD)
2010 Armortek A34 Comet #0031 (SOLD)

User avatar
Tim Page
Posts: 515
Joined: Wed Dec 03, 2014 10:45 am
Location: Milton Keynes
Has liked: 39 times
Been liked: 423 times

Re: My Mid PantherG #0035

Post by Tim Page »

I have been asked about producing a Maybach HL230 part enginge for the Panther and decided to give it a try.
My plan was to create the top of the engine with just the air cleaners and ancilliaries in a block aprox 30mm high.
This will still allow you to have a representation of an engine but still have room for speakers and smoke unit etc in the pack of the tank.

I created a design for a mock engine bay to fit my own 2010 Panther ausf.G. This is an enclosed tray that simulates the engine bay that will attach to the underside of the top deck.
The Maybach and the coolant tanks and pipework will then fill out the space around the engine.

This was then printed on my brand new Creality K1 Max printer.
This is bigger and a lot faster than my old Ender 3 Pro.
I can now print parts upto 300mm by 300mm and i can print a part in 3 hours which would have taken 14 hours on the old printer.

Below are pix of the initial HL230 prototype design.
IMG-7616.jpg
IMG-7616.jpg (152.63 KiB) Viewed 1214 times
IMG-7617.jpg
IMG-7617.jpg (229.06 KiB) Viewed 1214 times
I have refined the design a bit more but it is still very much 'Work in Progress' and will upload some more pix tonight when i get home.

Cheers
Tim
2008 Armortek Panther ausf.G (early) #0035
2012 Armortek Tiger 1e (Late) #001
2009 Armortek BefehlsPanzer 111 ausf.J #0011 (SOLD)
2010 Armortek A34 Comet #0031 (SOLD)

Post Reply