Hi I have just ordered the new Sherman Firefly kit. Having never built a kit of this size, and material (metal), I would appreciate any advice before I take delivery!
I intend to finish the tank as 'BELVEDERE' T212680 of the Staffordshire Yeomanry in Normandy. (See Military Modeling Collectors' Edition 29th February 2008).
Firefly kit
-
John Wiggins
- Posts: 292
- Joined: Fri Jun 03, 2011 2:49 pm
- Location: North Staffordshire
- Has liked: 257 times
- Been liked: 147 times
-
robert michael hilton
- Posts: 377
- Joined: Sat Apr 03, 2010 3:23 pm
- Location: Welshpool, Powys
Hello John, I was a first time buyer about this time last year. I took the plunge and went for the A34 Comet.
Tomorrow all being well, my wife and I will attend our first 'Vintage Show' in Shrewsbury Shropshire. The Comet will be on display in the Military Section.
The A34 Comet is my first Armortek build....and without doubt the most interesting and challenging model build, todate.
I have built many boats and model aircraft, however the Armortek tanks are in a different league altogether. With plenty of help on the Forum you will have many enjoyable hours. Ask as many questions as you need, the members on here will have all your answers and be only to pleased to help.
Best wishes, Mick
-
Tim Bowman
- Posts: 1762
- Joined: Fri Jul 13, 2007 4:53 am
- Location: Northern California
- Been liked: 177 times
- Contact:
-
Adrian Harris

- Posts: 5130
- Joined: Thu Jul 12, 2007 10:46 pm
- Location: Berkshire (UK)
- Has liked: 1481 times
- Been liked: 1687 times
Welcome John.
Good to know another Firefly will be joining the forum
In preparation, you will need a selection of general metal working tools such as files, screwdrivers, set squares of various sizes. You will also need a good quality set of allen keys, or hex-head screwdrivers if you prefer.
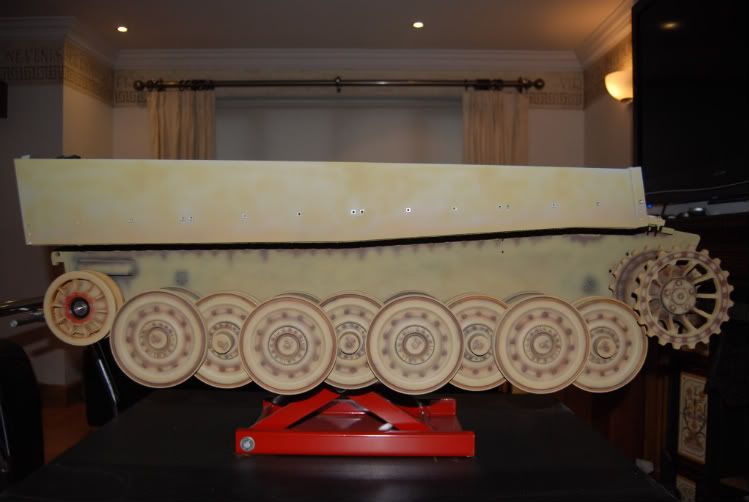
For moving the tank around, and for working on it, a hydraulic lifting table is very handy - various pictures in the Gallery show the sort of thing we tend to use.
What else you require will depend on how finely detailed you want to make the model. Some people make them up straight out of the box, some go to great lengths to replicate all the details of the original vehicles and others fall somewhere in between.
"BELVEDERE" seems to have been quite a photogenic tank, there seem to be quite a few pictures of her dotted around the Internet, so you should have good references for your model. Looks like you'll need to ask Gill to include a couple of extra roadwheels for the front stowage
I had started to convert one of the first run of Shermans to Firefly spec, but with Mark's machines now doing all the hard work I've decided to rethink this tank's future.
Adrian.
Good to know another Firefly will be joining the forum
In preparation, you will need a selection of general metal working tools such as files, screwdrivers, set squares of various sizes. You will also need a good quality set of allen keys, or hex-head screwdrivers if you prefer.
For moving the tank around, and for working on it, a hydraulic lifting table is very handy - various pictures in the Gallery show the sort of thing we tend to use.
What else you require will depend on how finely detailed you want to make the model. Some people make them up straight out of the box, some go to great lengths to replicate all the details of the original vehicles and others fall somewhere in between.
"BELVEDERE" seems to have been quite a photogenic tank, there seem to be quite a few pictures of her dotted around the Internet, so you should have good references for your model. Looks like you'll need to ask Gill to include a couple of extra roadwheels for the front stowage
I had started to convert one of the first run of Shermans to Firefly spec, but with Mark's machines now doing all the hard work I've decided to rethink this tank's future.
Adrian.
Contact me at sales@armortekaddict.uk for details of my smoker fan control module
-
John Grima
- Posts: 250
- Joined: Sun Jul 15, 2007 2:54 pm
- Location: USA
- Been liked: 48 times
- Contact:
Wlecome to the club John. I can tell you first hand that of all of the armortek models I have their M4 is still my favorite.
I also joined the firefly club, only Mark and Gill are hooking me up with the older 75mm turret so I can build my model as a standard US M4A4.

Now I just need to finish off some projects to make some shop room!
I also joined the firefly club, only Mark and Gill are hooking me up with the older 75mm turret so I can build my model as a standard US M4A4.
Now I just need to finish off some projects to make some shop room!
-
John Wiggins
- Posts: 292
- Joined: Fri Jun 03, 2011 2:49 pm
- Location: North Staffordshire
- Has liked: 257 times
- Been liked: 147 times
Thanks
Thanks to everyone for replies to my post. I have been trawling through the forum to look through all the photo's of the vehicles under construction, there sure is a lot of research and skill out there!
I have a couple of questions to start with, I know nothing about single pack etch primer, if someone could tell me where to obtain it and how to apply it ( and of course at what stage! Do I dry fit the parts , to make sure of a proper fit and then disassemble and paint ?). I have a compressor, but I have only used it for air tools, never used the spray gun . I have an airbrush for finer work but I think it will be an uphill struggle to prime large areas!
Secondly I'm intrigued to see the use of 'welds' applied to the tank seams. What material is used and how is it applied?
Sorry if these questions are very basic, me thinks I'm on a steep learning curve with this project
Regards
John
I have a couple of questions to start with, I know nothing about single pack etch primer, if someone could tell me where to obtain it and how to apply it ( and of course at what stage! Do I dry fit the parts , to make sure of a proper fit and then disassemble and paint ?). I have a compressor, but I have only used it for air tools, never used the spray gun
Secondly I'm intrigued to see the use of 'welds' applied to the tank seams. What material is used and how is it applied?
Sorry if these questions are very basic, me thinks I'm on a steep learning curve with this project
Regards
John
-
John Wiggins
- Posts: 292
- Joined: Fri Jun 03, 2011 2:49 pm
- Location: North Staffordshire
- Has liked: 257 times
- Been liked: 147 times
Add on armour
I have been looking through my books about Sherman tanks and the Firefly VC version in particular. I can only find one photo of a VC version with appliqué armour applied to the hull sides. Having spoken to Kirk Wiggins, he suggested I look at 'Sherman Firefly vs Tiger' by Stephen A Hart. On page 27 he states that the VC version had no appliqué armour on the front right hull.
All the photos show no appliqué on the left side either (apart from one).
Is this the case? Or does someone out there know better
This forum is a great place to be. I have spent my week off work going through as many builds as possible to try and equip myself with enough knowledge to begin building the Firefly kit when it is produced
Regards and thanks in advance for any light you can shed on the appliqué armour
John
-
Stephen White
- Site Admin
- Posts: 3114
- Joined: Sat Oct 11, 2008 7:05 pm
- Location: Dorset
- Has liked: 1038 times
- Been liked: 2111 times
- Contact:
Missing-lynx
John
Welcome!
If you haven't already found some of the websites which specialise in armour, you might have a look at Missing Lynx, Allied Discussion Group, here:
http://missing-lynx.com/dg.htm
You might find something with a simple search. I've found the forum community to be very helpful if you register.
All the best.
Stephen
-
John Wiggins
- Posts: 292
- Joined: Fri Jun 03, 2011 2:49 pm
- Location: North Staffordshire
- Has liked: 257 times
- Been liked: 147 times
-
John Fitzsimons
- Posts: 1867
- Joined: Tue Dec 14, 2010 3:11 pm
- Location: IRELAND,Dublin/Meath
- Has liked: 6 times
- Been liked: 812 times
- Contact:
Hi John, I was new to these models and have very little experience in RC vehicles and no experience in metal models until December 2010.
I got my etch primer in aerosols from Halfords. The brand was UPOL. It comes in cans for brush application also. I think I used about 5 or 6 aerosols although I was generous with it.
My first model was a Tiger 1 which I am still working on. As was mentioned earlier a very useful item will be a hydraulic lift. They come with with various lifting capacities. Before getting the Hydraulic table I got a motorcycle scissor lift. The two in combination work really well together.
Here is the scissor lift in action. Lots of these on ebay. I would recommend a different model to the one I have although it works well after a little modification.
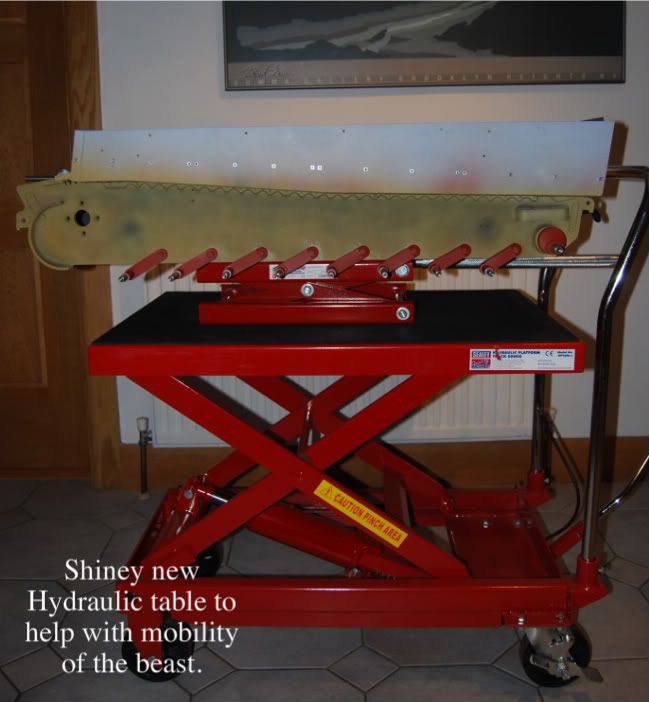
Here are the two in combination. I found that once the wheels were added I could no longer lift the hull without serious risk of spinal injury. The Sherman will be lighter though.
I have now ordered one of the new Panzer IV kits. The quality of these kits is excellent as is the aftersales service from Mark and Gill. I have received lots of help along the way from forum members.
A power file is also a very usefull tool. Wish I had got one at the start.
No 1 tool is a Dremell.
You can pretty much complete the model before you add any of the motion and sound kits so they can be bought later.
For welds you can use basic milliput. About 2 packs will do the job. You will need to make a couple of tools for application but it is easy. Just need some metal tube. I can provide photos of the tool I use.
I got my etch primer in aerosols from Halfords. The brand was UPOL. It comes in cans for brush application also. I think I used about 5 or 6 aerosols although I was generous with it.
My first model was a Tiger 1 which I am still working on. As was mentioned earlier a very useful item will be a hydraulic lift. They come with with various lifting capacities. Before getting the Hydraulic table I got a motorcycle scissor lift. The two in combination work really well together.
Here is the scissor lift in action. Lots of these on ebay. I would recommend a different model to the one I have although it works well after a little modification.
Here are the two in combination. I found that once the wheels were added I could no longer lift the hull without serious risk of spinal injury. The Sherman will be lighter though.
I have now ordered one of the new Panzer IV kits. The quality of these kits is excellent as is the aftersales service from Mark and Gill. I have received lots of help along the way from forum members.
A power file is also a very usefull tool. Wish I had got one at the start.
No 1 tool is a Dremell.
You can pretty much complete the model before you add any of the motion and sound kits so they can be bought later.
For welds you can use basic milliput. About 2 packs will do the job. You will need to make a couple of tools for application but it is easy. Just need some metal tube. I can provide photos of the tool I use.
-
John Wiggins
- Posts: 292
- Joined: Fri Jun 03, 2011 2:49 pm
- Location: North Staffordshire
- Has liked: 257 times
- Been liked: 147 times
Hi John
Thanks for the photos, they are much appreciated. I have been looking at Lifting tables, I need to protect my 'glass back' but as you say the Tiger is a big beast!
I can see a trip to the local Halfords is in order, to check out the primer.......and other useful goodies!
I would like to see any photos of the tool you use to create the welds. I have some Miliput in my modelling kit, so I can then have a practice, before the kit arrives.
Where are you building the Tiger? My wife is sitting next to me and she says I have no chance of building it indoors!
Regards and thanks for your help.
John.
-
robert michael hilton
- Posts: 377
- Joined: Sat Apr 03, 2010 3:23 pm
- Location: Welshpool, Powys
Hello John, as I received my Comet kit in September 2010, and with the Autumn approaching, I prepared an area in our spare bedroom in which to build the tank.
I already had a large computer desk in the corner. A plywood panel was laid on the desk to protect it, and a number of small plastic trays purchased to hold all of the packets of nuts bolts and screws.
You can keep a check on the many small items by leaving them in trays, and in their packets until needed. You will have to take care with the many parts, although they will be labeled. I retained these labels in situ until the very last moment. Neat and tidy is the order of the day.
I also used the etch primer UPOL, its brilliant. My topcoat of British Olive Drab was made up by my local car accessories dealer. I used approximately six 440ml cans. The table/motorcycle lifts are a must have, as are the many small hand tools.
Best wishes, as you have many enjoyable hours to come.....Mick
-
John Fitzsimons
- Posts: 1867
- Joined: Tue Dec 14, 2010 3:11 pm
- Location: IRELAND,Dublin/Meath
- Has liked: 6 times
- Been liked: 812 times
- Contact:
Hi, I started my build in a small spare bedroom that I use for my hobbies. I started out with a table made from some spate timber and MDF that was lying around. It could support my weight but eventually deleloped a wobble as the tank got heavier. It was fine until I got to the suspension stage then I knew it was time to move downstairs before it became a permanent upstairs resident. Temporary move to the kitchen but now I am putting in a new kitchen so it will not be allowed there. Currently residing in the living room as I am home alone for a while. Next stop is my partners study room as she finished college again last week so I threw her desk and chair on a skip to stop her from doing any more courses. Luckily she is very ubderstanding and supports my hobbies. She does not know yet that I ordered the Panzer IV and am looking for a !/6 Stuka also. Next thing to get will be some quad bike ramps. Then I have to see if I can drive it into the back of a mini.
-
John Wiggins
- Posts: 292
- Joined: Fri Jun 03, 2011 2:49 pm
- Location: North Staffordshire
- Has liked: 257 times
- Been liked: 147 times
-
Adrian Harris
- Posts: 5130
- Joined: Thu Jul 12, 2007 10:46 pm
- Location: Berkshire (UK)
- Has liked: 1481 times
- Been liked: 1687 times
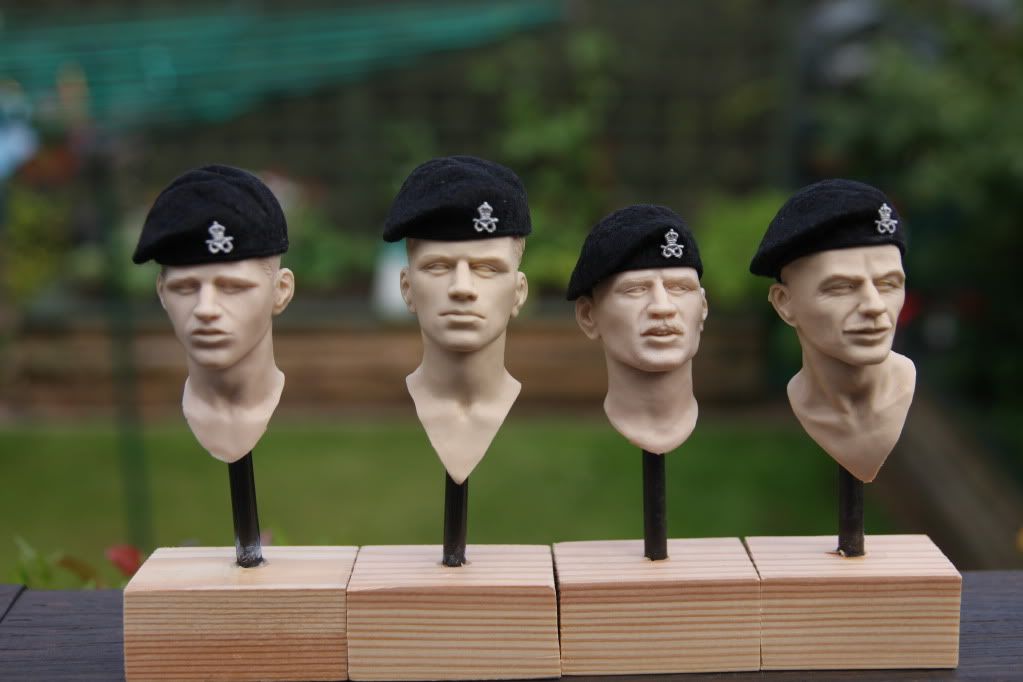
Are those all Tony Barton's headsculpts ?
Adrian
Adrian
Contact me at sales@armortekaddict.uk for details of my smoker fan control module