Page 60 of 74
Re: My Beaut Aussie Cent - Making Decals
Posted: Mon Jul 24, 2017 9:54 pm
by Stephen White
Thought I'd do a quick piece on making decals (or transfers as Airfix used to call them).
First task is to create the artwork. I use Powerpoint, where you can import photos of some of the original graphics and/or create new text and imagery. For the BCF extinguishers, it was difficult to get a flattened image of the cylindrical decals, so I decided to create them from scratch but import the graphic of the hand holding the extinguisher. I also used the colour picking tool ("eyedropper") to match the Deep Bronze Green colour.


Text boxes created and then this image cropped and imported:


To merge the imported photo of the hand holding the extinguisher with the text, I saved the Powerpoint graphic as a picture and imported it into Photoshop Elements. That's a cut down version which is powerful but easy to learn. In photoshop, I tidied up the image, merged the colours, then added some scratches and marks to simulate the use of the original. I then saved the graphic and re-imported it into PPT to scale it to fit the model extinguisher, printing it on paper to do a test fit. Once happy, I cloned the graphic to make the three copies I needed and a spare.

Imported image:

Re-touched and distressed image:

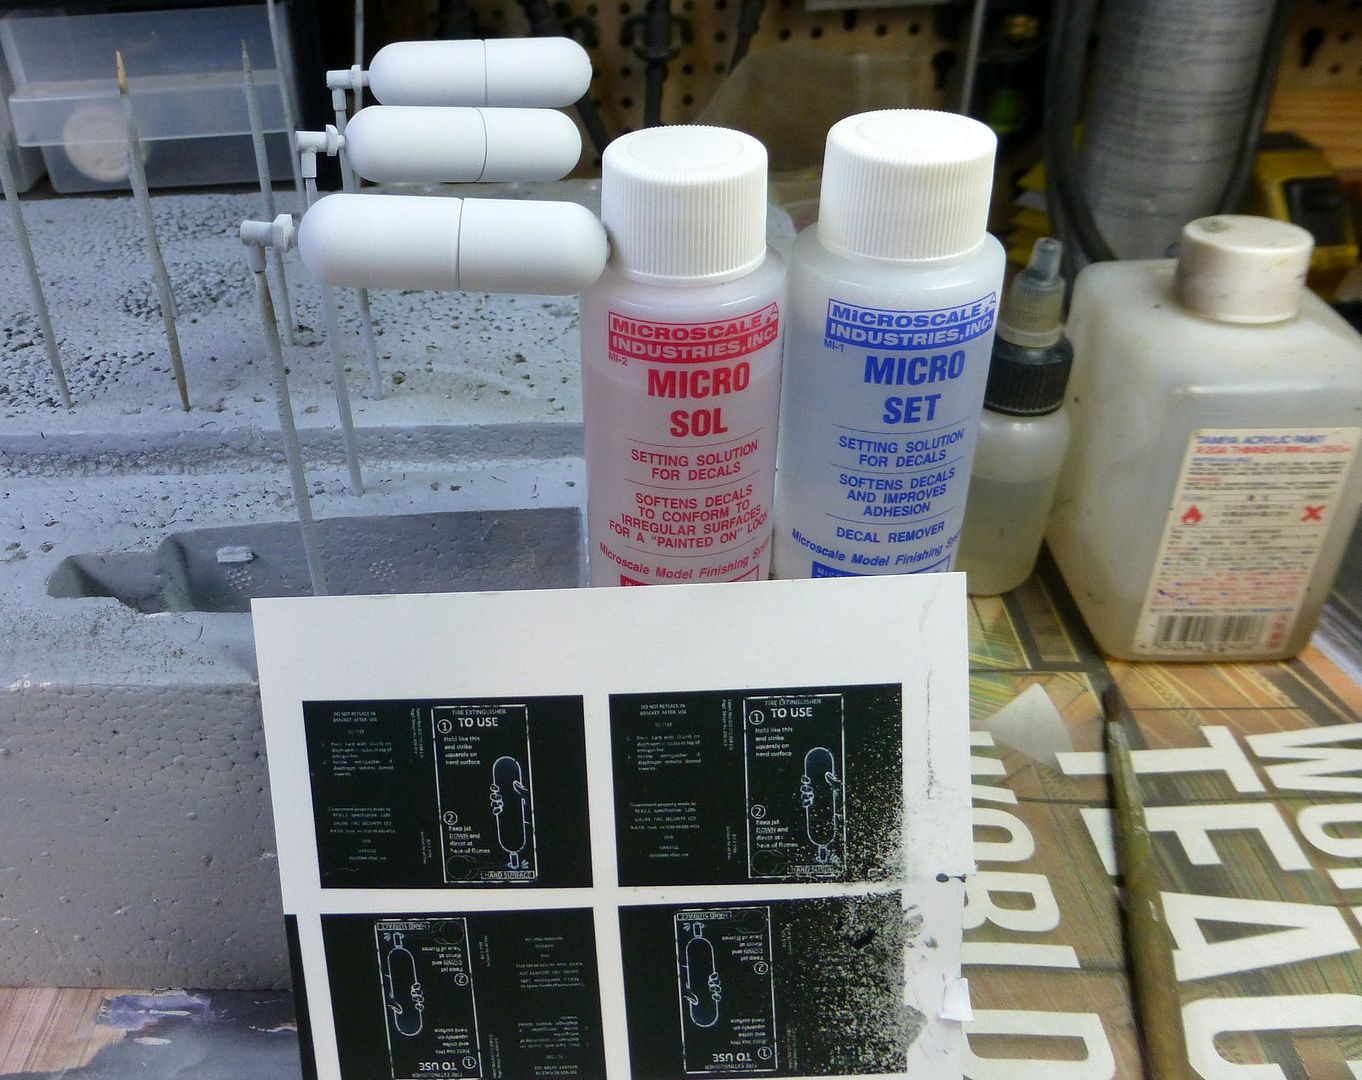
Final stage is to print it onto transfer paper. I use the one by "Experts Choice":
http://www.ebay.co.uk/itm/CLEAR-DECAL-F ... SwpRRWmnV3

The paper comes in clear or with a white background. Printers don't print white of course, so the white on my graphics would be transparent and would show the underlying colour. I've found the white decal sheets to be unreliably thin and they still allow the underlying colour to bleed through. I prefer to use the clear and give the surface on which the decal sits a coat of Tamiya XF-2 Flat White. If you use an ink jet, you must spray the decal sheet with at least two coats of satin acrylic varnish to protect the print and to give some body to the decal. (You can see how I smudged the print above before the varnish.) I also use Micro Set and Micro Sol to soften the decal, particularly if you need to set it over raised or sunken detail, such as the join in the middle of the extinguishers.
The rest is easy. Soak the decal, apply it, let it dry and spray again with satin varnish. Finally, I completed the paint with Deep Bronze Green and steel for the nozzle.


With many markings such as German Balkenkreunz, it's as easy to mask and spray but there are many markings which can only be done with artwork transferred to decals. Hope this is of interest.
Stephen
Re: My Beaut Aussie Cent
Posted: Tue Jul 25, 2017 7:53 am
by martin pitcairn
Fantastic post, thanks for the step by step instructions.
Martin
Re: My Beaut Aussie Cent
Posted: Tue Jul 25, 2017 2:08 pm
by davidwilkins
Stephen,
Your work is always of interest, unfortunately for me it all went over my head half way through your first paragraph. I am afraid computers and me do not get along I always having to be rescued by my other half when using a PC.
Stunning work just the right amount of fading on the transfers.
Regards
David
Re: My Beaut Aussie Cent
Posted: Tue Jul 25, 2017 6:06 pm
by Robert E Morey
Steven,
This would make a great tutorial for knowledge base. I mean it IS an excellent tutorial! Those extinguishers look great. Never thought about Powerpoint as a decal graphic tool. Thanks for the ideas!
Excellent job all round. I still do a double take every time I see your "Cent" - it looks like the real tank! Fantastic work!
Best regards,
Bob
Re: My Beaut Aussie Cent
Posted: Wed Jul 26, 2017 5:01 pm
by Stephen White
Thanks. Bob, got your message! I'll get around to it when I have a moment, combining it with the earlier one did, which is on the KB. I'll probably expand it slightly to cover all the methods of doing markings and insignia. All the best and thanks for reading. Stephen
http://www.armortek.co.uk/Forum3b/viewt ... =34&t=5793
Re: My Beaut Aussie Cent
Posted: Sun Jul 30, 2017 5:39 pm
by Stephen White
Re: My Beaut Aussie Cent
Posted: Wed Aug 30, 2017 6:59 pm
by Stephen White
I've just noticed that most of my previous photos have been cropped horizontally by the new Forum format, so I'll try direct uploading.
A few recent additions. An unknown number of Australian Cents in Vietnam were modified with a turret stowage bracket, to prevent the loss of loose items such as smoke grenades, ammunition liners, M79 grenade launchers, binoculars etc, which the commander needed to hand. It was of local manufacture and consisted of an L shaped bracket of angle iron welded to the gunner's sight brush guard and the crew commander's cupola:
064 didn't have it fitted at the time of Binh Ba (June 69) but it does appear on photos from A Sqn's tour in 1970:
Turret canopies evolved to protect the crews from the weather in static fire positions. In the wet, they minimised rain entering the turret and in the dry provided much needed sun shade. By late 1968, a common design had emerged. Four short sections of pipe were crimped at the bottom and welded to the turret lifting eyes. Metal rods were inserted to support an Australian "hoochie", a much prized groundsheet. I still have mine from my time with 1st Armd Regt.
Next the IR searchlight
Regards
Stephen
Re: My Beaut Aussie Cent
Posted: Wed Aug 30, 2017 7:20 pm
by Paul Wills
Lovely work Stephen, your attention to detail and eye for spotting it is superb. one question, is there I reason you decided to re-creating a Royal Australian Armoured Corps Centurion Mk 5/1 which served in Vietnam in 1969, or was it just random?
Paul.

Re: My Beaut Aussie Cent
Posted: Wed Aug 30, 2017 7:33 pm
by Stephen White
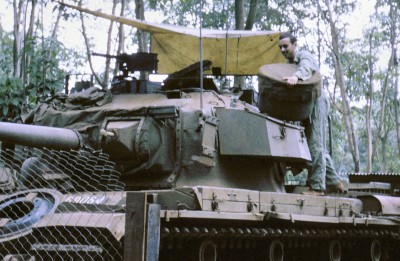
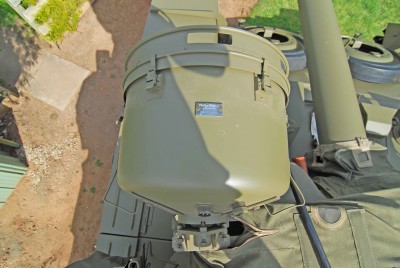
By the time of Vietnam, all Australian Centurion gun tanks were fitted with the IR modification package which provided IR sights for commander, gunner and driver, IR headlights and a 1000 watt searchlight with detachable lenses to provide both white light and IR capability. The white light capability was widely used in Vietnam to illuminate targets during night attacks. When not in use, the searchlight was stowed in special fittings in the turret basket. Here, David Hay is fitting the searchlight to 064 in the ATF base at Nui Dat:


I have to thank Frank Breitenbach for producing an exceptional 3D printed parts kit for the searchlight, using dimensions and reference photos I provided from Paul Scott in Australia. I couldn't have matched it in any way making it by hand and I was keen to see how 3D modelling/printing might provide us with a new approach. I was sceptical about "cheating" ie not making things by hand but I'm converted. His work is quite outstanding. Thanks Frank. Guenther Gabelein will produce the photo etch parts to complete the model.
3D printed parts do need some finishing to smooth the lined surface. Here, I'm using a scraper and sanding finish:
Body and mount assembled and painted:
Part 2 follows.
Regards
Stephen
Re: My Beaut Aussie Cent
Posted: Wed Aug 30, 2017 9:24 pm
by Stephen White
Hi Paul. I enjoy research. I served in 1st Armd Regt in Australia in the early Seventies when Vietnam was very fresh in peoples' minds and initially wanted simply to "do" my tank. I couldn't establish its identity and found instead that there was a stack of reference material available on specific tanks which had been in Vietnam. That lead me to making contact with members of the Regiment who had served there and thence to a surviving Cent in private hands, which turned out to have a surprising past. I did a few pieces on this earlier in this thread. I always select a specific tank to model and get a lot out of building a record of its crew and operational history. It adds to the challenge of "getting it right" which is at the heart of scale model making. Or you can just build them and drive them. Each to his own! All the best. Stephen
Re: My Beaut Aussie Cent
Posted: Wed Aug 30, 2017 9:39 pm
by Stephen White
IR searchlight Part 2. The reflector and lamp presented a challenge.
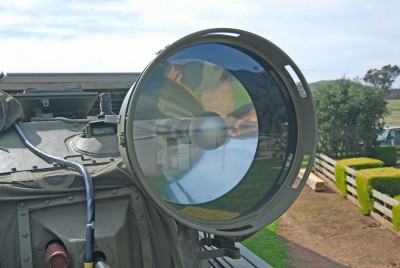
This searchlight is turning out to be a real Armortek collaboration. Steve Stuart very kindly turned his bicycle shop upside down for some oldfashioned, surplus lamps, which provided the answer. This lamp reflector is the perfect fit, once trimmed to size and polished:
I adapted the bike lamp bulb and airbrushed the top silvering which reflects the light back onto the reflector to create the searchlight beam:
Ready to assemble with the LED unit:
And trial fitting to the mounting beam:
Guenther Gabelein will add the photo etch in due course for the clamps securing the lens holding ring and the stiffening strips on the back of the body. I now need to secure the lens, work out the electrics, relay, cable, battery etc. Then job done.
Thanks for looking and above all, thanks to Frank, Guenther and Steve.
Stephen
Re: My Beaut Aussie Cent
Posted: Wed Aug 30, 2017 9:42 pm
by mark lawson
Beyond doubt the finest 1/6 scale tank to date, the detail level you achieved would embarrass 1/35 scale modellers with its crispness, every time you add a new part no matter how small or seemingly uncomplicated you always build the part to exact dimensions, it will be interesting to see what detail you find to add to the Comet, when the Cent is completed
Re: My Beaut Aussie Cent
Posted: Wed Aug 30, 2017 9:50 pm
by Adrian Harris
Wonderful to see all the steps that have gone into making such a clever reproduction of the real thing


Well done to all involved


Adrian.
Re: My Beaut Aussie Cent
Posted: Thu Aug 31, 2017 10:47 am
by simon_manning
i love to see this type of building, 3d here we come! marvelous, regards simon.
Re: My Beaut Aussie Cent
Posted: Sat Sep 02, 2017 7:16 pm
by Paul Wills
Stephen White wrote: ↑Wed Aug 30, 2017 9:24 pm
Hi Paul. I enjoy research. I served in 1st Armd Regt in Australia in the early Seventies when Vietnam was very fresh in peoples' minds and initially wanted simply to "do" my tank. I couldn't establish its identity and found instead that there was a stack of reference material available on specific tanks which had been in Vietnam. That lead me to making contact with members of the Regiment who had served there and thence to a surviving Cent in private hands, which turned out to have a surprising past. I did a few pieces on this earlier in this thread. I always select a specific tank to model and get a lot out of building a record of its crew and operational history. It adds to the challenge of "getting it right" which is at the heart of scale model making. Or you can just build them and drive them. Each to his own! All the best. Stephen
Hi Stephen. Yes I can see you like to research and it is great to see you putting so much into your models. I have done the same with all of my Armortek models, I just don't like to share

Well apart from the Heinrich Schmeermann bio I did, I was quite proud of that.
Great work on the the searchlight, it looks so realistic. A good photographer and in the right setting, it would be hard to distinguish it was a model.

Paul.


