Page 2 of 3
Re: New build Tiger 1
Posted: Sun Mar 05, 2017 11:56 am
by davidwilkins
Hi Phil,
A standard M3 bolt and nuts is 5.5mm this equals 33mm so I used these for the outer wheels. For the first set of double wheels I used small headed M3 bolts which have a head size of 4mm which equals 24mm.
As regards the flange bolts I used small headed 2.5mm bolts which have a 3.5mm head size which equals 21mm, the main reason that I used to slightly different size bolts to replicate the 22mm bolts was the availability and cost of the bolts.
As regards a centre bolt in the Hub I did not see one on tiger 131.
Hope this makes sense.
Regards
David
Re: New build Tiger 1
Posted: Sun Mar 05, 2017 2:55 pm
by Uwe Gerstenmayer
Hello Phil,
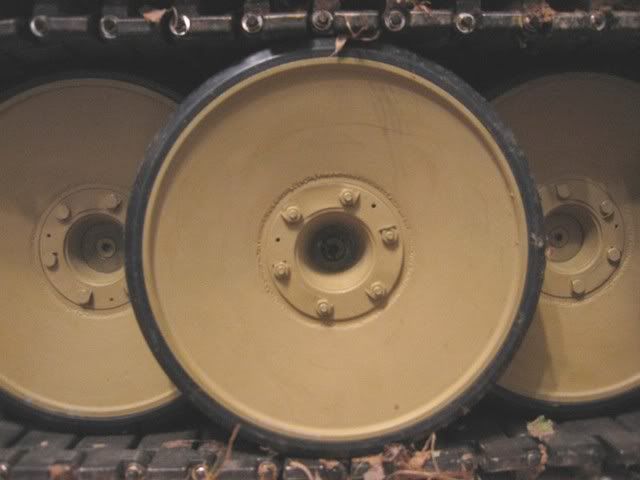
maybe of use for your build some pics of the wheels on Tiger 131 I've taken at TankMod 2016.
Regards from the Cologne Area,
Uwe
Re: New build Tiger 1
Posted: Sun Mar 05, 2017 3:46 pm
by Phil Woollard
Thanks again David, I always wondered whether the m3 hex was a tad to big for the outer but you have put my mind at rest, I will sort through my nuts and bolts box to find the closest I can for the others, I have spent the day taking the backlash out of the cross slide on my lathe as I want to turn smaller more delicate components(like the hex heads) without it chattering and ruining the surface finish.
Thanks Uwe for the photos of 131, always good to see the old girl in detail, they will help the cause.I havent really noticed the tooling/press manufacturing marks in the road wheels before, they sure show up in that light, I wont worry to much about the casting texture of my wheels so much now.
Regards Phil
Re: New build Tiger 1
Posted: Mon Mar 06, 2017 6:11 pm
by Phil Woollard
A little more progress PM as weight training AM

I am having a break from the wheels for a bit.
Re: New build Tiger 1
Posted: Fri Mar 10, 2017 8:57 pm
by Phil Woollard
A little more progress on the new build including some work on the running gear improvements.
I can go into detail of the improvements to the wheel assemblies for anyone that would like to have a go regards Phil.
Re: New build Tiger 1
Posted: Sat Mar 11, 2017 9:22 am
by Phil Woollard
Close ups for David and Paul of the one piece wheel assembly, the once separate bobbin/spacer is now bonded to the wheel with a disc to cover the threaded holes and form part of the hub, this is then held by a machined lip on the spacer and the ID interference fit to the same , then bonded right up to the bearing (taking care not to contaminate the bearing) and a fake weld added just like the full size Tiger.
For those using a double inner bearing the spacer/bobbin would need to be machined down accordingly, the bearings should not bind on the spacers or the end of the axles so you would need to factor in some essential "end float" or it will just not run smoothly.
Its a lot of work and each axle assembly/component needs its own careful fitting ("fitting" as in mechanical term) to run smoothly, and as I have said before..... its not necessary to do any of this machining and fitting with your own Tiger, I just want this to be special
Re: New build Tiger 1
Posted: Sun Mar 12, 2017 10:26 am
by Phil Woollard
Not to dissimilar to the original.
Re: New build Tiger 1
Posted: Mon Mar 13, 2017 9:09 am
by davidwilkins
Hi Phil,
Nice work it's really interesting for me to see how the early Armortek tiger kits were designed and built, keep up the good work.
Regards
David
Re: New build Tiger 1
Posted: Mon Mar 13, 2017 8:30 pm
by Liam Mahoney
Hi Phil
Yes indeed, a most excellent solution, very cunning.
Liam
Re: New build Tiger 1
Posted: Sat Mar 25, 2017 5:55 pm
by Phil Woollard
I have been slacking of late as have farming to do but I have finished the Tiger wheel assembly,well as much detail as I think is necessary anyway like the hub weld and the double wheel rim bolts, and a bit to the back plate.
Re: New build Tiger 1
Posted: Mon Apr 03, 2017 8:15 pm
by Paul Wills
Wow Phil, great looking wheels, sounds kind'a kinky saying that in my own head!!

Great explanation on how to do the alterations. I will struggle to achieve it with my pillar drill and Dremel
should never have sold my lathe and mill, hindsight is a wonderful thing

The BA bolts can be a useful. I found the 7Ba is far closer scale than an M3 and they look more like an engineering bolt. I used them on my KT build and on everything since. A few of us got EKP to make an BA headed bolt with and M3 thread, 2.5mm long. the only down side was that you had to order a minimum of 1000 bolts, but I have used more than that on my 6 builds/rebuilds.
https://www.ekpsupplies.com/standard-st ... crews.html
Paul.
Re: New build Tiger 1
Posted: Tue Apr 04, 2017 1:19 am
by Mike Kasputis
Hate to bring this up now but I just noticed it, on the outer wheels the hub should be recessed.
Here is what I did on mine.
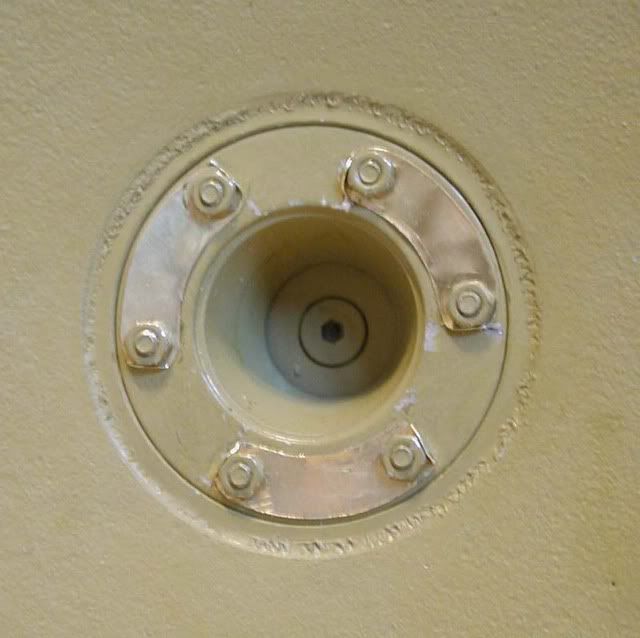
Here it is completed and after running the tank for a while, compare this with the pics above of Tiger 131.
Re: New build Tiger 1
Posted: Tue Apr 04, 2017 8:47 am
by Phil Woollard
Nuts to you Paul! That's nuts and bolts
, good advice on the BA sizes and thanks for the positive comments on me wheels.
Hi Mike, yes I agree the hubs will need recessing to look correct, I thought I could get away with bringing the weld bead right up to the hub but im not happy with the look, so I shall turn a recess for the hub and a shallow groove to take the weld bead (its almost impossible to make a weld bead look right in and arc) out to a more correct position, and then apply as small a weld bead as is humanly possible with milliput.....Phil
Re: New build Tiger 1
Posted: Tue Apr 04, 2017 9:46 am
by Stephen White
Milliput is widely used but I find it has disadvantages:
- it's messy
- the weld detail is crude, however fine the scribing tool
- it's fragile and will fracture if knocked
- the working time is limited
- too little water and everything sticks, too much and it doesn't adhere to the surface
- it's relatively expensive
I've Fabrice Le Roux to thank for suggesting an alternative, 3D fabric paints. I did a piece on my Cent thread here:
http://www.armortek.co.uk/Forum3b/viewt ... &start=360
and have used it a lot since. It does remain flexible when dry and so won't fracture but it can be damaged and I'd only use in in protected positions. It's easy to use straight from the bottle. The detail is as fine as you wish to make it, especially if you add detail with a cocktail stick and it can be worked for some time. It comes in metallic colours and is cheap.
I had a lot of success with a brand called "Anita's 3D dimensional paint" (
www.anitasPaint.com). Unfortunately, it looks as though it's discontinued. In UK, paint by a company called Tulip is readily available. I've used it and it works but it's a bit thin to hold the finest detail. I'd like to try an alternative, here:
http://jacquardproducts.com/lumiere-3d.html
I firmly think 3D paint is the way to go but it needs some more research.
Stephen
Re: New build Tiger 1
Posted: Tue Apr 04, 2017 11:12 am
by Phil Woollard
But I like the taste of milliput
Im willing to try something new....Phil

