Page 2 of 3
Re: DB Chieftian build
Posted: Sun Jun 02, 2024 10:35 pm
by David Brady
Thanks John, probably a glitch...please do post a pic of where I need to add some additional, I'm pretty sure it's at the ends of the deck cuts, but it would be good to see what I need to do.
Cheers
Re: DB Chieftian build
Posted: Tue Jun 04, 2024 1:13 pm
by John Clarke
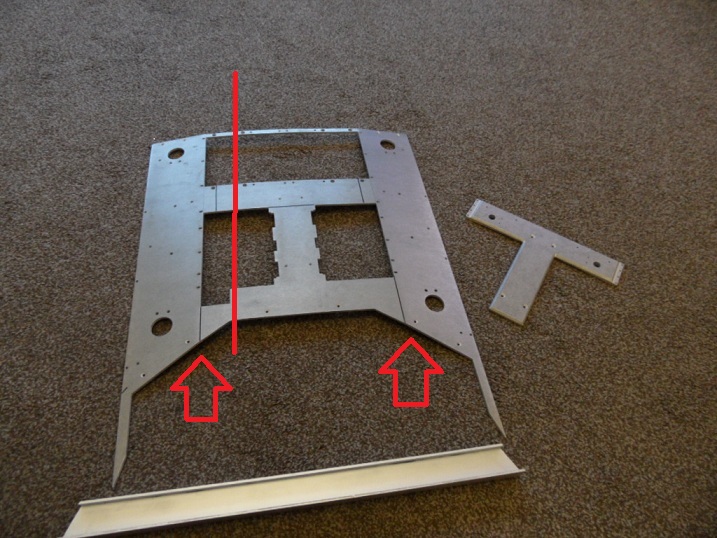
When my rear deck turned up it had a shallow bend along the red line as in the first picture, it didn't matter so much because the Tee piece cut out mod would take care of it. But the saw cuts arrowed, needed filling in with something. Hence the thin plate.
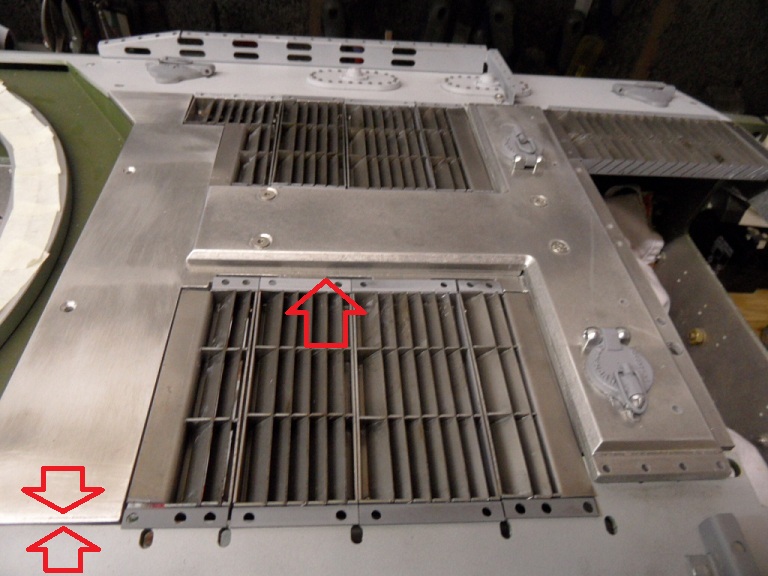
The second picture shows the Tee piece in place with a sandwich plate to a) raise it a little b) allows the flattening of the deck between the angled sides. This allows the deck covers to appear to lie flat as on the original. It's a bit nit picking, but I felt it important to emphasize the flatness of the eight deck covers as opposed to the hump backed four at the rear.
Arrowed is the filler plate to close the saw gap both sides. Not seen at the other end as it is covered by the Tee cross plate. If you have a very fine cut you may not need or want it.
- SAM_35861.jpg (230.77 KiB) Viewed 1585 times
- SAM_36841.jpg (196.46 KiB) Viewed 1585 times
Re: DB Chieftian build
Posted: Wed Jun 05, 2024 5:53 am
by David Brady
Just what the doctor orderd! Many thanks John, most appreciated.
DB
Re: DB Chieftian build
Posted: Wed Jun 05, 2024 4:36 pm
by Mark Heaps
An anecdote about the Chieftain T-Piece. In my experience it was marked with the VRN of the tank using weld bead, and if my memory serves me correctly it was in the area I have marked in black and legible (right side up ) when viewed from the rear of the tank.
Due to manufacturing tolerances of the hull, they were not a universal fit but machined to be bolted to the specific hull.
Found this out in early 1987 when attached to the QRIH and the Chieftains were being backloaded a couple at a time to be replaced with Challenger 1. All the T-pieces had been removed from the squadrons 14 tanks and placed outside on the tankpark so work could be done on the power packs.
First tank had to be backloaded and it had snowed heavily. One T-piece dug out of the snow, incorrect VRN but fitted and tank backloaded. Same procedure for the next 7 to go.
Got down to the last six tanks, all work on the packs done so fit the T-pieces, 5 fitted, the last one didn´t. We had to try all possible permutations of tanks and T-pieces till we found a combination that worked.
Re: DB Chieftian build
Posted: Wed Jun 05, 2024 4:36 pm
by Mark Heaps

- teepiece.jpg (106.13 KiB) Viewed 1498 times
Re: DB Chieftian build
Posted: Wed Jun 05, 2024 7:26 pm
by David Brady
Thanks Mark - Great info.
Cheers
Re: DB Chieftian build
Posted: Wed Jul 24, 2024 11:08 pm
by David Brady
Hi All,
I've not done anything for a few weeks due to other hobbies taking up my time, and Ive been putting of making a bracket to support the turret due to the only piece of metal that was suitable was steel ( 1st generation tiger deck support) this required some serious work with the hacksaw!
I'm really enjoying this build and have started to think about the new leopard....where is my medication! back to rehab for me.
 Viewed 1211 times")
- Support cut to a height of 35mm
 Viewed 1211 times")
- Support installed
 Viewed 1211 times")
- Turret bearing with support
 Viewed 1209 times")
- Next was to reduce this bracket by 2mm, doing this will allow the turret to turn without hitting the rear deck - the funny thing is without the support and a bearing that was not level, turret had clearance
 Viewed 1207 times")
- I'm a little undecided if I will keep the T piece removable - I think the space is sufficient and I could just blend the cut lines in with some filler and fasten down
 Viewed 1202 times")
- Looking good
Cheers
Re: DB Chieftian build
Posted: Thu Jul 25, 2024 9:21 am
by Steve Norris
Hi Dave.
Looking good, make the T piece removable and add an engine.
Regards
Steve
Re: DB Chieftian build
Posted: Thu Aug 01, 2024 8:13 pm
by David Brady
Thanks Steve - engine is way to fiddly for me.
Some more progress.
 Viewed 1030 times")
- Reduced the hatch
 Viewed 1030 times")
- Hatch top was reduced with a large file,then hinge detail was cut with a dremel.
 Viewed 1030 times")
- More to do, but I need a to go and lie down
 Viewed 1030 times")
- Steve Winstone Bollards fitted - superb!
Cheers
Re: DB Chieftian build
Posted: Fri Aug 02, 2024 12:01 pm
by John Clarke
Great to see the super detailing coming along David. Don't forget to keep the offcut for a hole host of parts you could make from it. Dozer plate and countless tripping hazards on the turret.

I'm with you on the engine, too fiddly, Maintenance nightmare, but going down the mighty great Mick Hilton path of taking a photograph and slipping under the deck grills, now that is very appealing.
Micks Grant

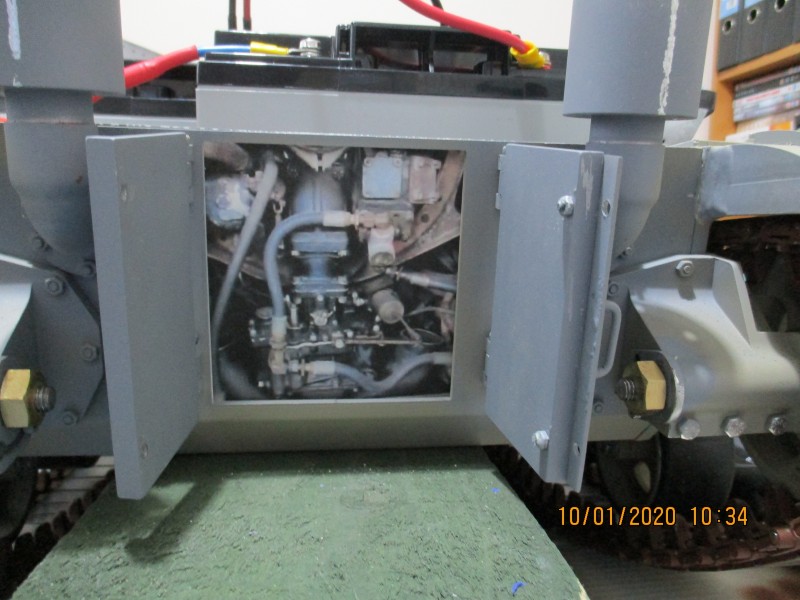
- IMG_1711.JPG (99.74 KiB) Viewed 947 times
Re: DB Chieftian build
Posted: Fri Aug 02, 2024 2:39 pm
by Damon Resch
Love the idea of using a photo. I bet someone could even wire up an iPad or tablet or old phone with the correct screen size to play live video of a motor running plus I’m guessing the audio could be routed into the sound cards too.
The quality of these phone and tablet screens plus the incredible videos of AFV’s on YouTube I think it could be done.
Re: DB Chieftian build
Posted: Tue Oct 01, 2024 10:12 pm
by David Brady
Hi All,
T piece has now been fixed in place permanently, brackets made and fitted to secure.
Cheers
Re: DB Chieftian build
Posted: Wed Oct 02, 2024 10:30 pm
by John Clarke
Nothing like a good rub down
I thought you'd be leaving access to the engine bay after the cut and shut of the rear deck

Easier than lifting the turret.

Re: DB Chieftian build
Posted: Thu Oct 03, 2024 1:02 pm
by David Brady
Hi John,
This was the easiest option, now I can move on with something else. As you mentioned I can remove the turret if needed.
now I need to find the enthusiasm to build the grills.
Cheers
Re: DB Chieftian build
Posted: Thu Oct 03, 2024 10:17 pm
by John Clarke
Certainly the way forward with a firm fixed fit, did you put any extra support for the rear of the turret ring after cutting the rear deck?
I'm always interested to see how others tackled the job.
Rear decks, a rare treat, well it is Halloween month.
I had three goes, instructions a must, those louvers can be fitted the wrong way round apparently whoops

First go.
Second go, add frames, third go, fit fine mesh that will stop fake brass entering the engine bay. (That what it's for after all)
It's very tempting to remove material from the deck hinges, (done that) don't, it will setup.... eventually.
Be patient.
Recessed magnets help to hold down the unhinged rear deck covers to give you a true BL bonnet closure effect.
Have fun.