Shims don't seem to be needed on this latest Tiger kit. Just set it up as per instructions although once I know the angle is correct I'll remove the grub screws on the underside of the hull and drill a little pit in the arm seat to make sure they don't slip.
Here is where I got the Green Stuff from. Comes in a zip lock bag but can't tell the difference between it and the stuff in the regular retail packaging. Seems to be easier to get the finish you want compared to Milliput as well as being nicer to use.
http://www.ebay.co.uk/itm/162214443724? ... EBIDX%3AIT
John
2025 ARMORTEK KIT SURVEY
Over the last few years we have brought out a whole series of kits as a direct result of your feedback - kits like the Pershing, JagdPanther, Hetzer, Leopard 2A4, and more recently the Sd Kfz 7, 88mm Flak 36 and the upcoming Challenger 2.
So, in keeping with what has become and annual tradition, here is your opportunity to once again influence our future production plans.
We have added in some "guide pricing" next to the names of the models. This is a rough estimate of the price at the current rates.
Thanks in advance for your input and we look forward to the results.
Early Tiger 1 No: 214
-
John Heath
- Posts: 166
- Joined: Tue Jul 07, 2015 6:23 pm
- Has liked: 4 times
- Been liked: 102 times
-
Phil Woollard
- Posts: 4279
- Joined: Mon Mar 01, 2010 4:48 pm
- Location: Cornwall
- Has liked: 2280 times
- Been liked: 7192 times
Re: Early Tiger 1 No: 214
Interesting with the shims or lack of them on the newer Tiger 1, maybe the double torsion bar system on the panther that I'm putting together requires them as there are more joints and thus more room for error, it's working out that three shims are needed ,give or take the odd one ,to align the arms for 30 degrees . Give them a good hard twist so they seat nicely and remove some of the slack ,then nip them up tight  ....Phil.
Mechanical engineer.
2 Youtube channels, Phil Woollard and Magpiespyro. Facebook/ Phil Woollard.
Commission builds considered. Pm for my email.
2 Youtube channels, Phil Woollard and Magpiespyro. Facebook/ Phil Woollard.
Commission builds considered. Pm for my email.
-
John Heath
- Posts: 166
- Joined: Tue Jul 07, 2015 6:23 pm
- Has liked: 4 times
- Been liked: 102 times
Re: Early Tiger 1 No: 214
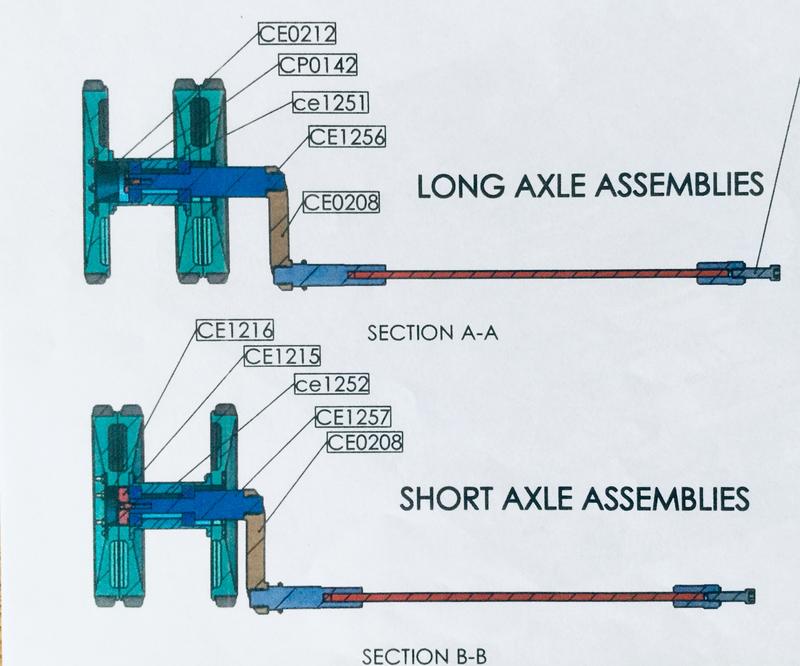
Page from the manual.
John
John
Last edited by John Heath on Wed Aug 07, 2019 7:57 pm, edited 2 times in total.
-
Phil Woollard
- Posts: 4279
- Joined: Mon Mar 01, 2010 4:48 pm
- Location: Cornwall
- Has liked: 2280 times
- Been liked: 7192 times
Re: Early Tiger 1 No: 214
Ah interesting, it's a completely different set up now, the next build for me uses the new system and it looks much more convient ....Cheers Phil.
Mechanical engineer.
2 Youtube channels, Phil Woollard and Magpiespyro. Facebook/ Phil Woollard.
Commission builds considered. Pm for my email.
2 Youtube channels, Phil Woollard and Magpiespyro. Facebook/ Phil Woollard.
Commission builds considered. Pm for my email.
-
John Heath
- Posts: 166
- Joined: Tue Jul 07, 2015 6:23 pm
- Has liked: 4 times
- Been liked: 102 times
Re: Early Tiger 1 No: 214
Well it’s been quite awhile since I last did anything on the Tiger. Retiring and redoing the “new” house has kept me a bit busy. 
But it’s time to get going on it again.
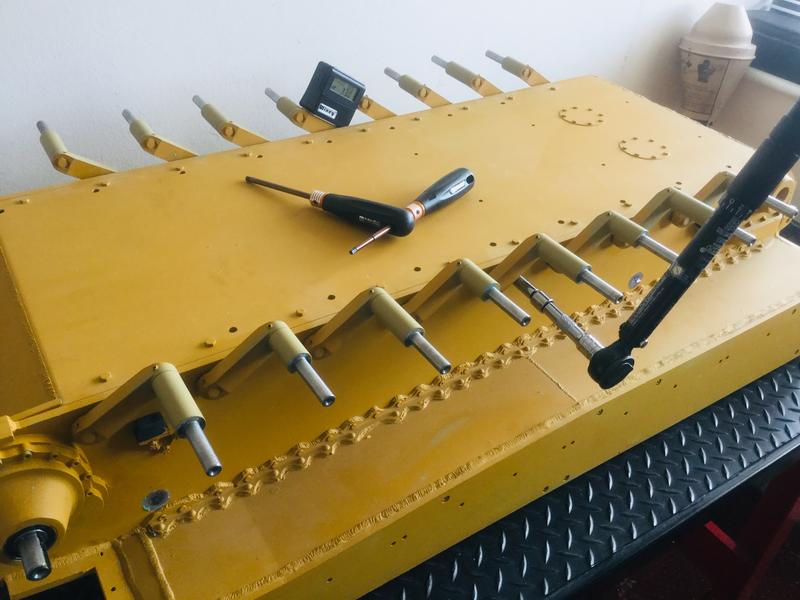
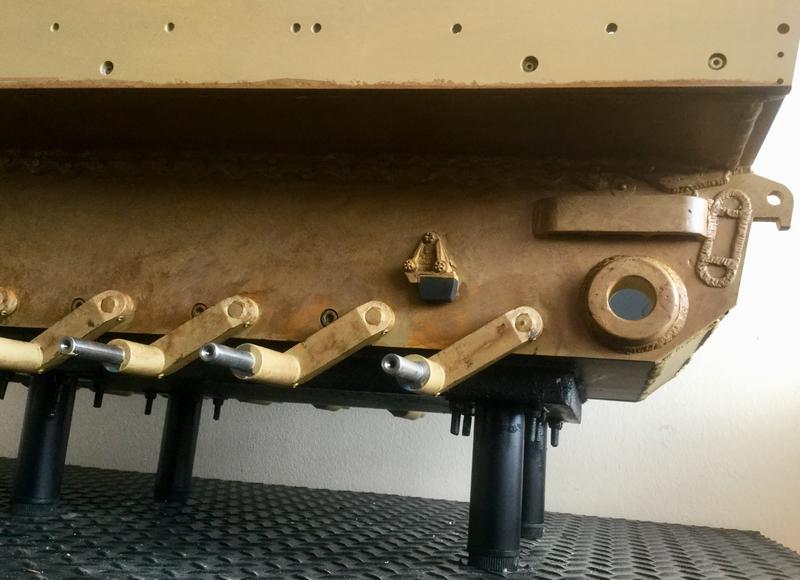
Set the suspension angle to just over 30 degrees and torqued the bolts to 15 nm. Not quite sure of the strength of the bolts so assumed they were 10.9. Using a digital angle gauge made setting the angle quite easy.
Redid the shock plugs on the hull as further research showed they barely protruded outside the hull and no signs of welding. Used plastic discs with a brass rivet in the centre with the head turned into a cone shape.
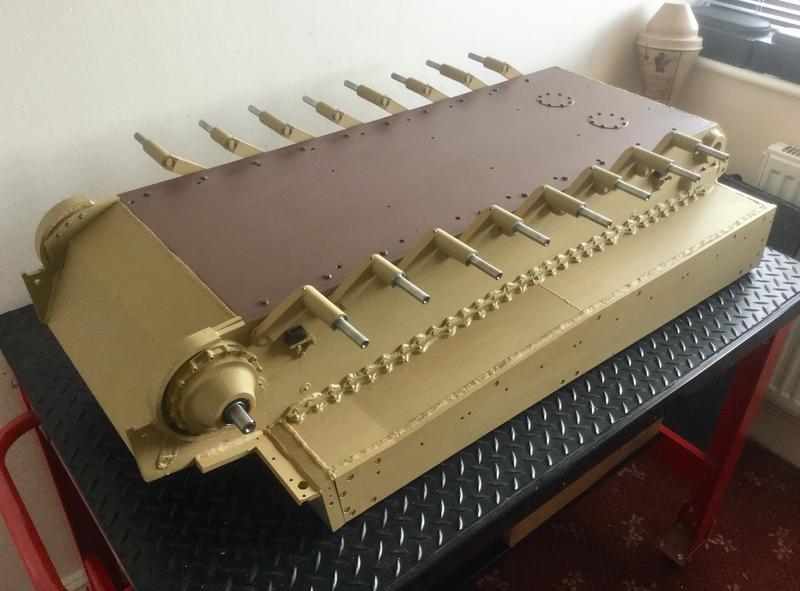
Painted the hull in Dunkelgelb and the bottom of the hull in German red oxide which is actually a red brown unlike todays red oxide paint.

But it’s time to get going on it again.
Set the suspension angle to just over 30 degrees and torqued the bolts to 15 nm. Not quite sure of the strength of the bolts so assumed they were 10.9. Using a digital angle gauge made setting the angle quite easy.
Redid the shock plugs on the hull as further research showed they barely protruded outside the hull and no signs of welding. Used plastic discs with a brass rivet in the centre with the head turned into a cone shape.
Painted the hull in Dunkelgelb and the bottom of the hull in German red oxide which is actually a red brown unlike todays red oxide paint.
-
John Heath
- Posts: 166
- Joined: Tue Jul 07, 2015 6:23 pm
- Has liked: 4 times
- Been liked: 102 times
Re: Early Tiger 1 No: 214
Paint Colours
Came across a bit of research done at a university in I think Belgium where they had used spectroscopy to analyse original German WWII paint chips and worked out the formula for mixing Tamiya acrylic paints to be a very close match. I think it’s down to a research scientist with an interest in model making but very useful for any modeller of WWII German armour.
On the subject of colours I assume that most realise that some of the WWII RAL colours are not the same as todays RAL colours. They reused the RAL numbers for some new shades which can lead to confusion when trying to duplicate an old paint.
Dunkelgelb (Dark Yellow)
- XF-60 Dark Yellow
- XF-59 Desert Yellow
- 4 parts of XF-60 to 1 of XF-59
Olivegrun (Olive green)
- XF-58 Olive Green
- XF-65 Field Grey
- 8 parts of XF-58 to 1 part of XF-65
Rotbraun (Red Brown)
- XF-64 Red Brown
- XF-1 Black
- 6 parts XF-64 to 1 part of XF-1
German Red Oxide
- XF-64 Red Brown
- XF-9 Hull Red
- 3 parts XF-9 to 2 parts XF-64
Came across a bit of research done at a university in I think Belgium where they had used spectroscopy to analyse original German WWII paint chips and worked out the formula for mixing Tamiya acrylic paints to be a very close match. I think it’s down to a research scientist with an interest in model making but very useful for any modeller of WWII German armour.

On the subject of colours I assume that most realise that some of the WWII RAL colours are not the same as todays RAL colours. They reused the RAL numbers for some new shades which can lead to confusion when trying to duplicate an old paint.

Dunkelgelb (Dark Yellow)
- XF-60 Dark Yellow
- XF-59 Desert Yellow
- 4 parts of XF-60 to 1 of XF-59
Olivegrun (Olive green)
- XF-58 Olive Green
- XF-65 Field Grey
- 8 parts of XF-58 to 1 part of XF-65
Rotbraun (Red Brown)
- XF-64 Red Brown
- XF-1 Black
- 6 parts XF-64 to 1 part of XF-1
German Red Oxide
- XF-64 Red Brown
- XF-9 Hull Red
- 3 parts XF-9 to 2 parts XF-64
Last edited by John Heath on Fri Aug 09, 2019 5:27 pm, edited 4 times in total.
-
John Heath
- Posts: 166
- Joined: Tue Jul 07, 2015 6:23 pm
- Has liked: 4 times
- Been liked: 102 times
Re: Early Tiger 1 No: 214
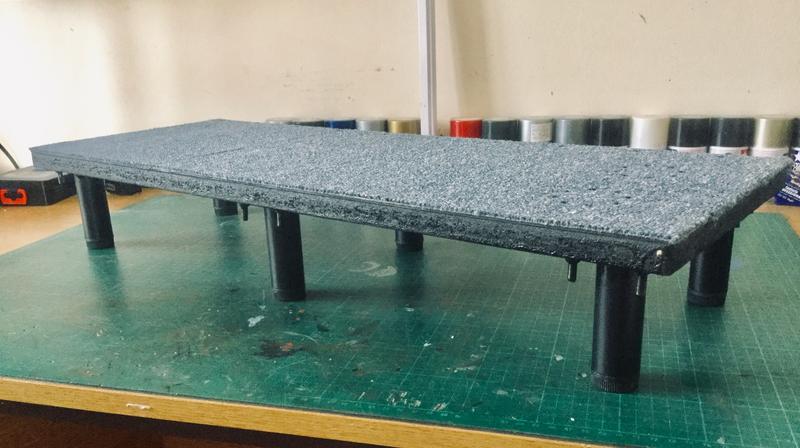
Made up a stand for the tank using mdf and steel furniture feet. The feet are very srurdy with a welded top with four bolts on each one, Glued some carpet tile to the top. Simple but effective stand.
-
John Heath
- Posts: 166
- Joined: Tue Jul 07, 2015 6:23 pm
- Has liked: 4 times
- Been liked: 102 times
Re: Early Tiger 1 No: 214
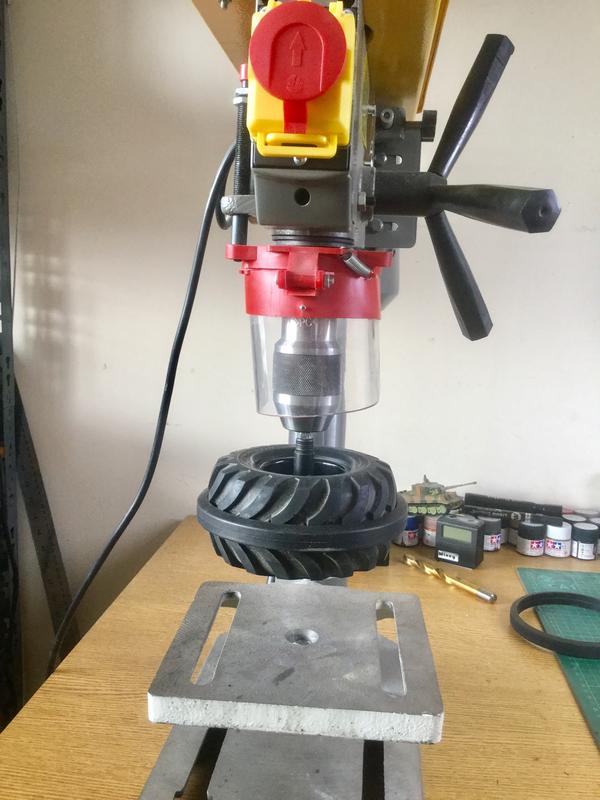
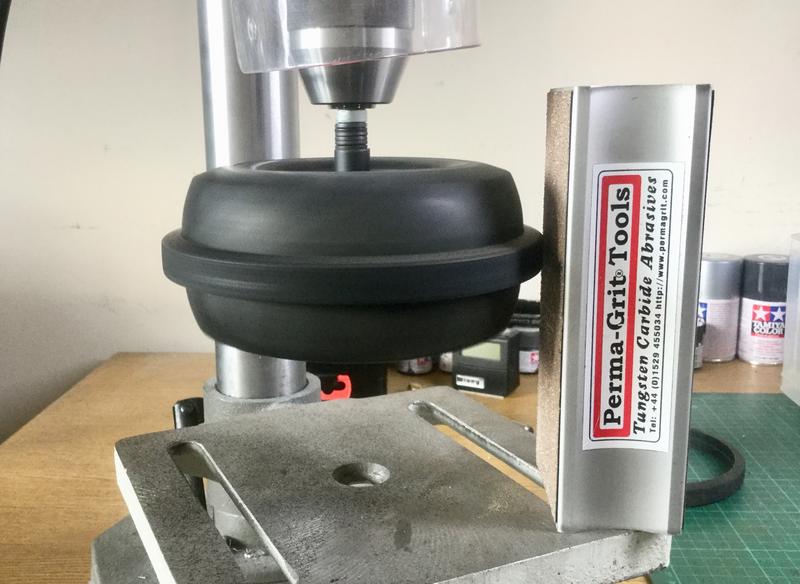
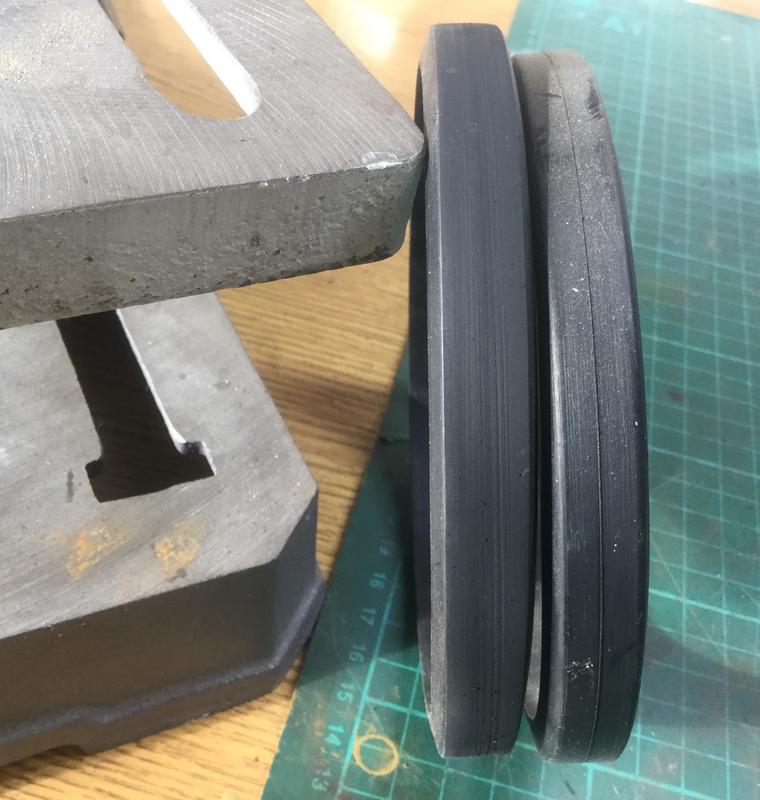
Tyre scuffing machine.
With lots of tyres to remove the moulding line from and make them look used didn’t fancy doing it by hand so came up with the pilar drill method. Found an RC tyre and wheel exactly the right diameter to hold the Tiger tyre. Fitted a bolt through and mounted the whole thing in the pilar drill. Then using a tungsten carbide sanding block took the moulding line off the tyre finishing off with some medium sandpaper. Takes about a minute for each tyre but easy work.
With lots of tyres to remove the moulding line from and make them look used didn’t fancy doing it by hand so came up with the pilar drill method. Found an RC tyre and wheel exactly the right diameter to hold the Tiger tyre. Fitted a bolt through and mounted the whole thing in the pilar drill. Then using a tungsten carbide sanding block took the moulding line off the tyre finishing off with some medium sandpaper. Takes about a minute for each tyre but easy work.
-
Phil Woollard
- Posts: 4279
- Joined: Mon Mar 01, 2010 4:48 pm
- Location: Cornwall
- Has liked: 2280 times
- Been liked: 7192 times
Re: Early Tiger 1 No: 214
Love this kind of thing John!  I had to do this with the Cruiser tyres and it sure does make a lot of black dust.
Mechanical engineer.
2 Youtube channels, Phil Woollard and Magpiespyro. Facebook/ Phil Woollard.
Commission builds considered. Pm for my email.
2 Youtube channels, Phil Woollard and Magpiespyro. Facebook/ Phil Woollard.
Commission builds considered. Pm for my email.
-
John Heath
- Posts: 166
- Joined: Tue Jul 07, 2015 6:23 pm
- Has liked: 4 times
- Been liked: 102 times
Re: Early Tiger 1 No: 214
Dirtied up the hull sides and under the panniers with a mottled grubby look before I fit the wheels and tracks.
-
John Heath
- Posts: 166
- Joined: Tue Jul 07, 2015 6:23 pm
- Has liked: 4 times
- Been liked: 102 times
Re: Early Tiger 1 No: 214
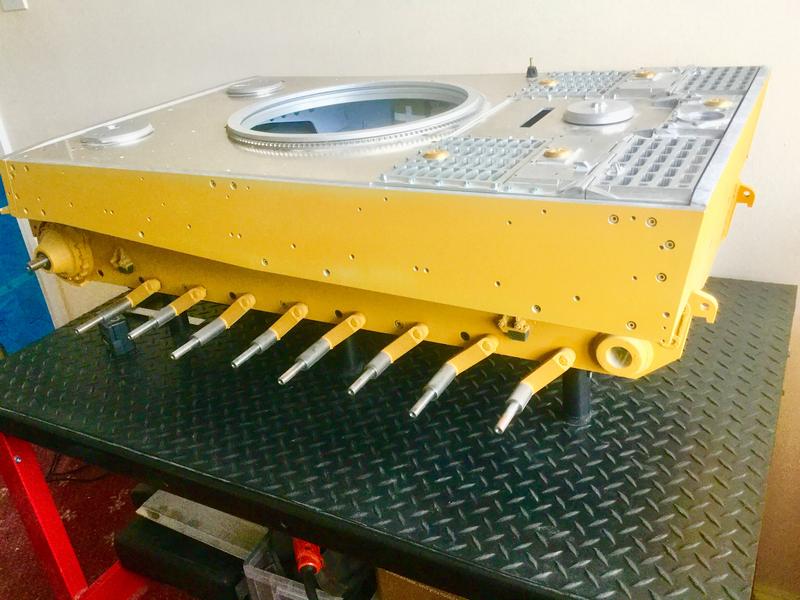
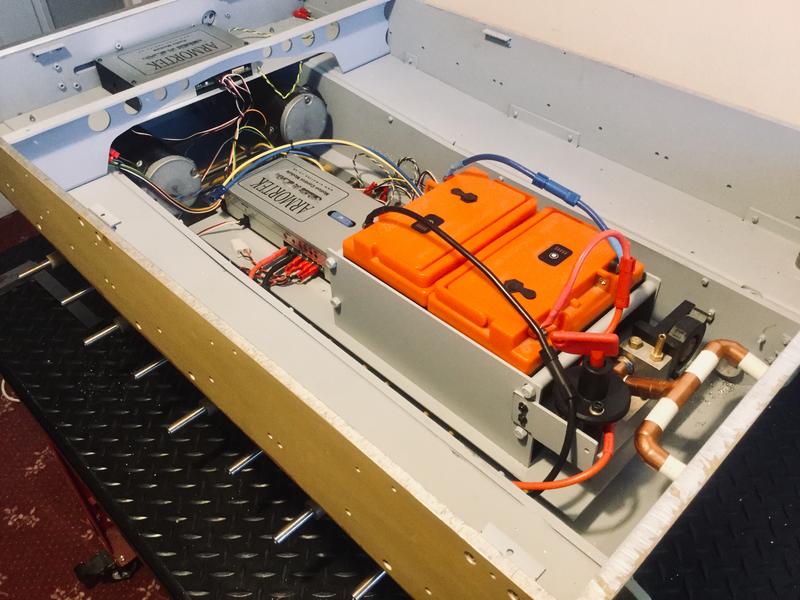
Built the tray for mounting the batteries, smoker and electronics. Had built a battery box already but decided to get rid of it favour of one long tray that would hold everything.
Used a piece of 3mm thick aluminium 600mm by 200mm fastened in place with 8 brass standoffs. Battery holder has sides made from aluminium angle with 12mm aluminium tube crosspieces. Simple but does the job. Batteries drop through the engine hatch so easy to remove them or swap for fresh batteries if needed. Smoker bolts onto rear of tray. Whole thing was sprayed with a couple of coats of etching prime then given a matt clear coat.
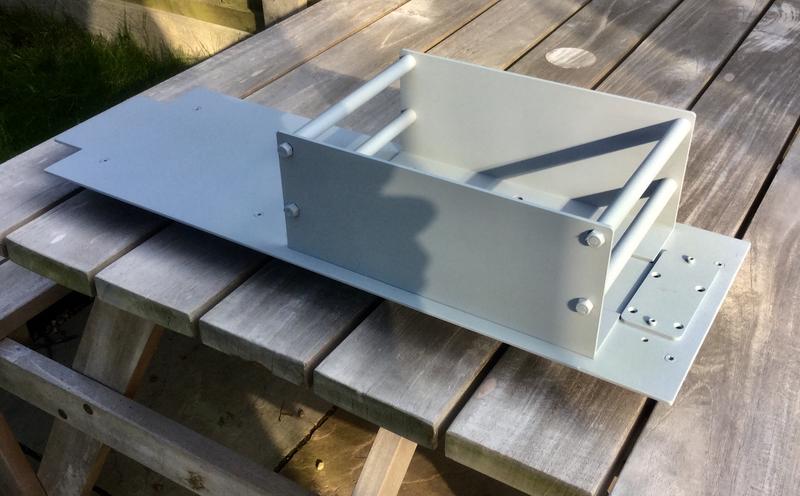
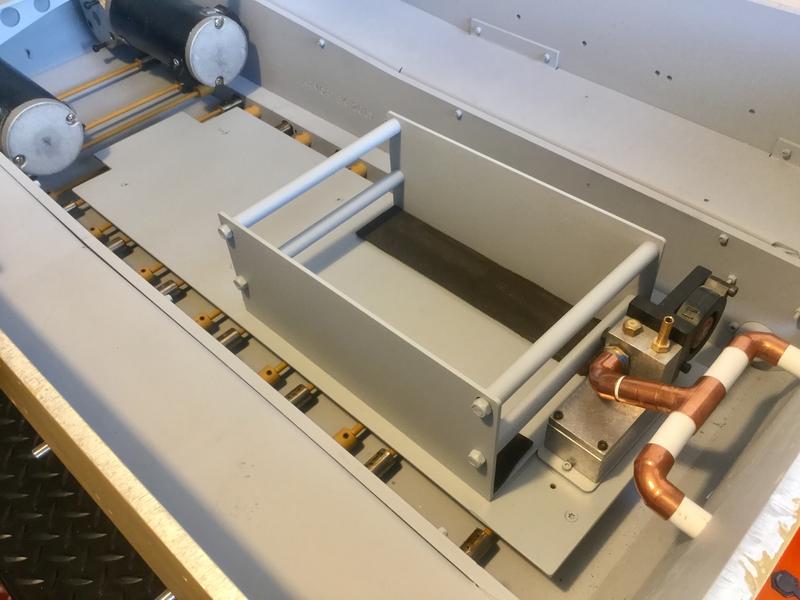
Used a piece of 3mm thick aluminium 600mm by 200mm fastened in place with 8 brass standoffs. Battery holder has sides made from aluminium angle with 12mm aluminium tube crosspieces. Simple but does the job. Batteries drop through the engine hatch so easy to remove them or swap for fresh batteries if needed. Smoker bolts onto rear of tray. Whole thing was sprayed with a couple of coats of etching prime then given a matt clear coat.
Last edited by John Heath on Wed Aug 14, 2019 12:28 am, edited 1 time in total.
-
John Heath
- Posts: 166
- Joined: Tue Jul 07, 2015 6:23 pm
- Has liked: 4 times
- Been liked: 102 times
Re: Early Tiger 1 No: 214
The micro lathe comes in handy for little jobs like making the tube crosspieces for the battery holder. When I bought it I had the control board upgraded from the Chinese one to an American made one. Not given me a single problem in ten years. Have a bigger lathe but that doesn’t get used as much.
-
John Heath
- Posts: 166
- Joined: Tue Jul 07, 2015 6:23 pm
- Has liked: 4 times
- Been liked: 102 times
Re: Early Tiger 1 No: 214
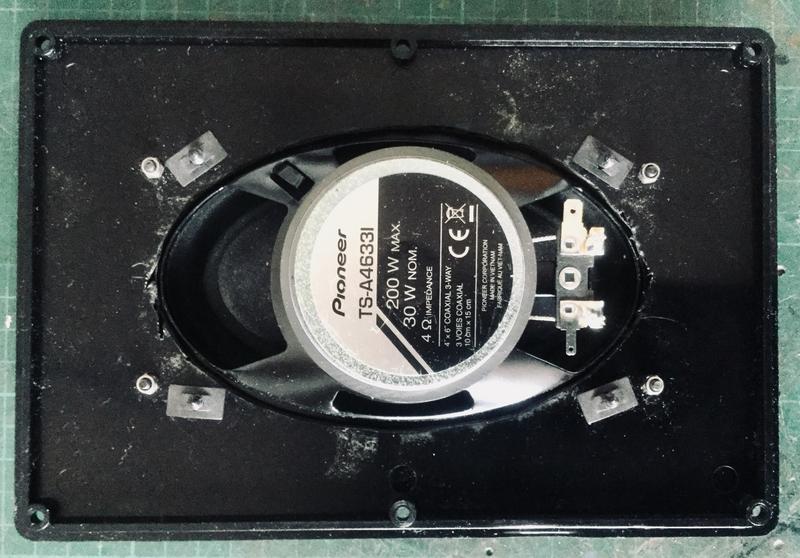
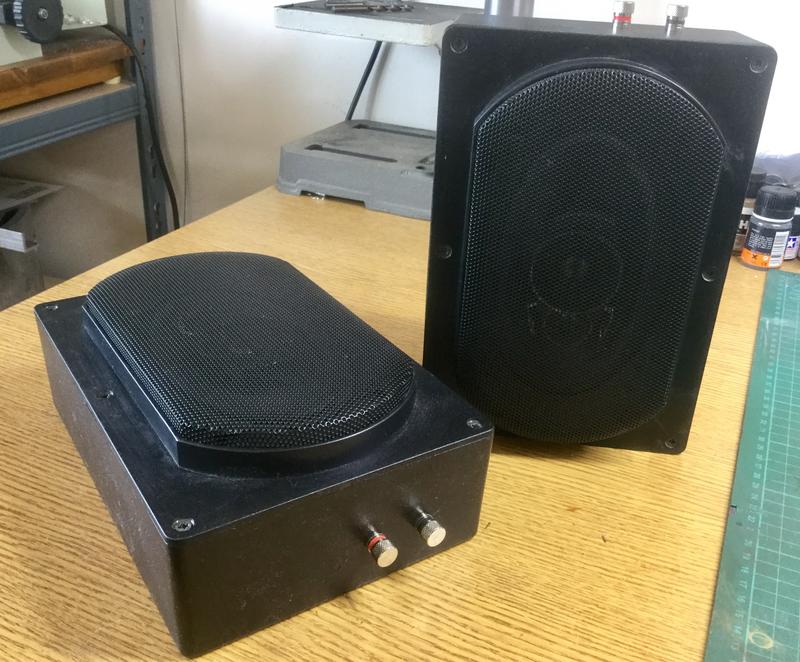
The Speakers
Decided to,build my own speakers for the Tiger. Found some plastic enclosures that were the biggest that would fit in the available space. Also found some car speakers that would work with the stock sound module and would fit in the enclosures. They are three way speakers which isn’t really needed as two way would have been fine but it was a case of not being able to find suitable two way ones.
Cut out the openings in the enclosure lids to suit the speakers and fitted the grille mountings. Fitted binding posts and wired them to the speakers. Then filled the enclosures with acoustic wadding to dampen vibration and increase bass.
Pleased with the way they turned out and should be a vast improvement over the stock speakers.
-
Robert E Morey

- Posts: 2348
- Joined: Wed Jul 18, 2007 12:59 am
- Location: Seattle, WA USA
- Has liked: 158 times
- Been liked: 830 times
Re: Early Tiger 1 No: 214
Nice work John. I like your battery keeper box and custom speakers. Looking good and will sound excellent.
Best regards,
Bob
Best regards,
Bob
-
John Heath
- Posts: 166
- Joined: Tue Jul 07, 2015 6:23 pm
- Has liked: 4 times
- Been liked: 102 times
Re: Early Tiger 1 No: 214
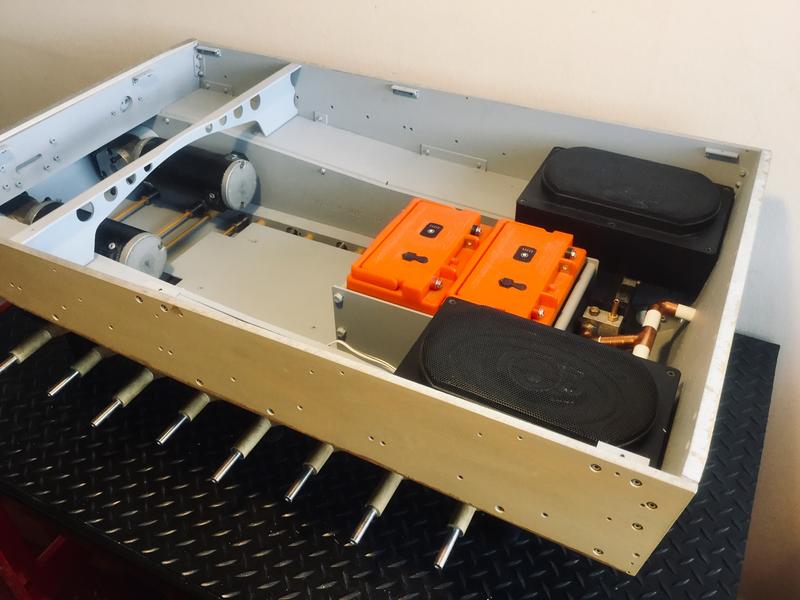
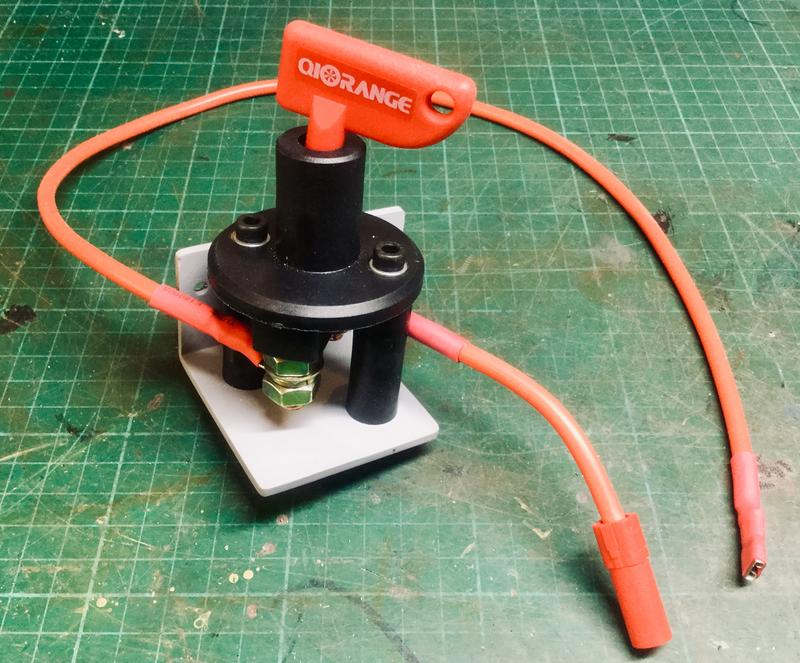
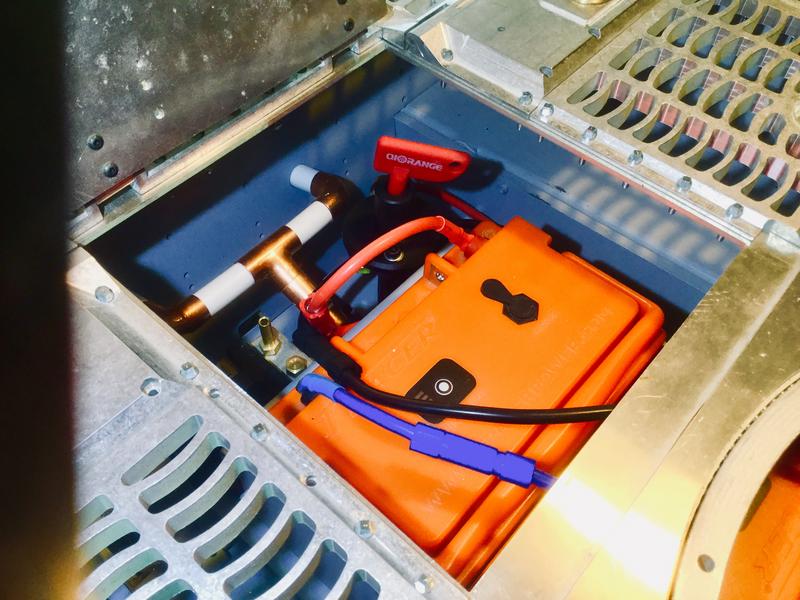
Sorted out the battery wiring and fitted a battery isolator.
Used 10awg silicone wire and XT150 connectors. Higher rating than the tank needs but I’d rather have something with some excess capacity. Although a much thicker wire it’s more flexible and easier to run. The XT150 connecters at a 150A continuous rating aren’t going to give any problems.
The car battery isolator has a key that can be removed to make sure it isn’t accidentally left on. Made a little bracket out of a scrap bit of aluminium angle.
Have enough of the silicone wire left to make up motor leads as well. The batteries will normally be removed for charging as it will only take seconds to disconnect them and lift them out. Also could have a spare set of batteries for a quick change.
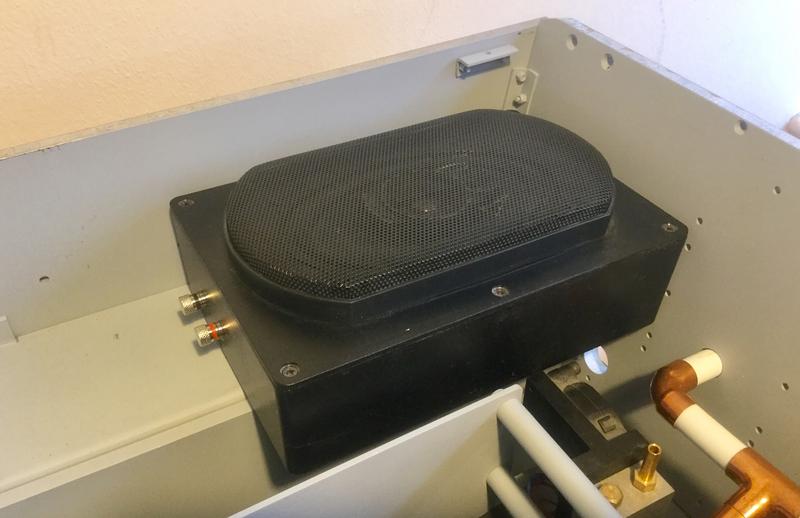
Fitted a shelf above the motors to hold the audio module.

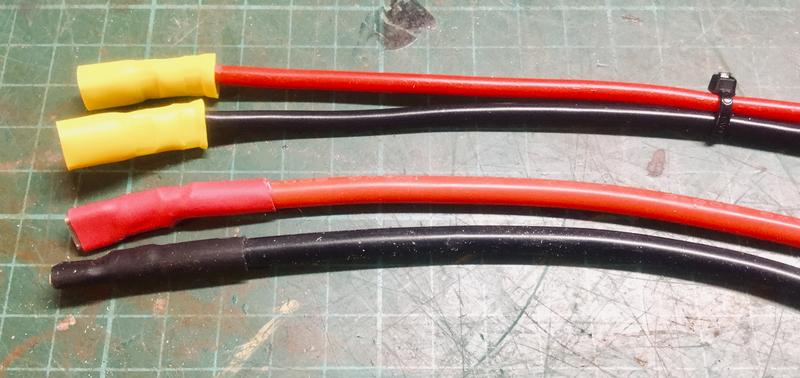
Used 10awg silicone wire and XT150 connectors. Higher rating than the tank needs but I’d rather have something with some excess capacity. Although a much thicker wire it’s more flexible and easier to run. The XT150 connecters at a 150A continuous rating aren’t going to give any problems.
The car battery isolator has a key that can be removed to make sure it isn’t accidentally left on. Made a little bracket out of a scrap bit of aluminium angle.
Have enough of the silicone wire left to make up motor leads as well. The batteries will normally be removed for charging as it will only take seconds to disconnect them and lift them out. Also could have a spare set of batteries for a quick change.
Fitted a shelf above the motors to hold the audio module.