Steves Panther A

Forum for discussion relating to the Panther
Post Reply
Kent Wiik
Posts: 425
Joined: Sat Dec 04, 2010 11:18 am
Location: Northern Sweden
Has liked: 6 times
Been liked: 194 times

Re: Steves Panther A

Post by Kent Wiik »

Hi Phil,

Panzer Tracts are ok and best buy for the money but beware as some of the drawings has errors.
Regarding the rear plate the need for corrections was also on the Ausf G kit.
No big deal and here is how my own turned out.

Image

The Ausf A and G configuration is the same regarding where the items are placed.
Got my measurments from the booklet "Panzers in Saumur no2"

Image

The measure is in 1:35 so just convert them into 1:6.

Kind regards
Kent
Last edited by Kent Wiik on Wed Apr 19, 2017 8:51 pm, edited 1 time in total.
It´s all in the details!

User avatar
Paul Wills
Posts: 1043
Joined: Thu Jul 19, 2007 7:56 pm
Location: The Lake District
Has liked: 646 times
Been liked: 143 times

Re: Steves Panther A

Post by Paul Wills »

Steve, you, Yves and Kent are starting to make me wish I have never sold my Panther! :lol: Great attention to detail, keep it coming. :D

Paul :wink:
9 kp pz gren div grossdeutschland Tiger A23, Sd.Kfz. 7 half-track Artl Reg 146 (mot), 16.Infanterie-Division (mot). Flak 36 88mm, Erg-Zug Flak-Stammbatterie Augsburg. King Tiger & Pak41

Kent Wiik
Posts: 425
Joined: Sat Dec 04, 2010 11:18 am
Location: Northern Sweden
Has liked: 6 times
Been liked: 194 times

Re: Steves Panther A

Post by Kent Wiik »

Hi all,

Found this on my hard drive, it might be of use for all you lucky Panther builders.

Image

The Canadian Camp Borden Ausf A before the restoration.

Kind regards
Kent
It´s all in the details!

Phil Markham
Posts: 122
Joined: Tue Jul 17, 2007 4:35 pm
Been liked: 22 times
Contact:

Re: Steves Panther A

Post by Phil Markham »

Kent,

Thanks for posting the book information and pictures, very helpful.

Regards
Phil

User avatar
Tim Page
Posts: 523
Joined: Wed Dec 03, 2014 10:45 am
Location: Milton Keynes
Has liked: 40 times
Been liked: 471 times

Re: Steves Panther A

Post by Tim Page »

Hi Kent, I know that the ausf.G is also in need of some alterations but mine was already built when i bought it which would have made things more difficult.
I decided to leave mine alone and concentrated on other areas that were more accessible.
Cheers
Tim
2008 Armortek Panther ausf.G (early) #0035
2012 Armortek Tiger 1e (Late) #001
2009 Armortek BefehlsPanzer 111 ausf.J #0011 (SOLD)
2010 Armortek A34 Comet #0031 (SOLD)

Steve Norris
Posts: 1231
Joined: Thu Jul 12, 2007 11:42 am
Location: Manchester
Has liked: 8 times
Been liked: 701 times

Re: Steves Panther A

Post by Steve Norris »

Hi And thanks for all the interest.
I must apologise for not replying sooner but I have been out of the country for a couple of days.
Firstly the references I have used are the Panzertracts ausf a book as Tim stated plus the Panzer in Saumor booklet that Kent mentioned, I also referred back to my earlier ausf G build where Kent kindly supplied some of the required dimensions.
As for the modifications they are reasonably easy to achieve with basic hand tools, no fancy laths or milling machines required.
As for accuracy, the components are being positioned as close as possible to their correct locations allowing for some error in the dimensions of the plate itself.
Kent, thanks for the photo of the rear plate, it's interesting to note that the starter crank cover on the access hatch is at a different angle from that shown in some reference drawings.
Regards
Steve

mark lawson
Posts: 721
Joined: Tue May 14, 2013 9:14 pm
Location: Solihull
Has liked: 2519 times
Been liked: 444 times
Contact:

Re: Steves Panther A

Post by mark lawson »

The picture Kent shown is an MNH built Panther, don’t forget they in-turn were supplied armour from various other factory’s so don’t be surprised if there are slight differences in the location of parts in this case the angle of the starter handle cover.
Werkstatt - 5, 1/6 Panzer parts. werkstatt.five@gmail.com
RAG Militärmodellbau
IG Militärmodellbau

Kent Wiik
Posts: 425
Joined: Sat Dec 04, 2010 11:18 am
Location: Northern Sweden
Has liked: 6 times
Been liked: 194 times

Re: Steves Panther A

Post by Kent Wiik »

Hi Steve,

Well, that Engine access hatch with its cover for a motorized help starter is how they all looked like no matter if it was an NMH, DB, MAN or Demag build Panther. If any drawings says otherwise they are just another victim of artistic license.
Please look at Panzer Tracts 5-135.

However the engine access hatch later on was equipped with a tow coupling and then got a different help starter cover. Late Ausf A and all Ausf G had such.

The Weatcroft Demag Ausf A that have been the inspiration for the Armortek kit (hence the letter box MG port) have now the later tow coupling hatch but was originally equipped with a same hatch as the Camp Borden Panther. The switch most probably took place during her post war service with the French army.

Kind regards
Kent
It´s all in the details!

mark lawson
Posts: 721
Joined: Tue May 14, 2013 9:14 pm
Location: Solihull
Has liked: 2519 times
Been liked: 444 times
Contact:

Re: Steves Panther A

Post by mark lawson »

I don’t think the Wheetcroft Demag ever saw service with the French army least ways it never went through the AMX factory as it still has the original Fahrgestellnumer, Panther that went through the AMX factory had the original numbers removed and replaced with French AMX numbers.
Werkstatt - 5, 1/6 Panzer parts. werkstatt.five@gmail.com
RAG Militärmodellbau
IG Militärmodellbau

Steve Norris
Posts: 1231
Joined: Thu Jul 12, 2007 11:42 am
Location: Manchester
Has liked: 8 times
Been liked: 701 times

Re: Steves Panther A

Post by Steve Norris »

Repositioning of the various covers and access panels is now complete, I am reasonably happy with the outcome knowing that all the components are much closer to their correct locations. I think looking at Kents previous photo it looks pretty close, it's even the same colour.
Attachments
image.jpg

Steve Norris
Posts: 1231
Joined: Thu Jul 12, 2007 11:42 am
Location: Manchester
Has liked: 8 times
Been liked: 701 times

Re: Steves Panther A

Post by Steve Norris »

The hull is now assembled and detailing of the lower side plates has been started.
Suspension torsion bar covers and internal fitting attachment bolts have been added
Rear idler mount to be added and detailed.
Regards
Steve

User avatar
Tim Page
Posts: 523
Joined: Wed Dec 03, 2014 10:45 am
Location: Milton Keynes
Has liked: 40 times
Been liked: 471 times

Re: Steves Panther A

Post by Tim Page »

that is starting to look very nice Steve.
2008 Armortek Panther ausf.G (early) #0035
2012 Armortek Tiger 1e (Late) #001
2009 Armortek BefehlsPanzer 111 ausf.J #0011 (SOLD)
2010 Armortek A34 Comet #0031 (SOLD)

Steve Norris
Posts: 1231
Joined: Thu Jul 12, 2007 11:42 am
Location: Manchester
Has liked: 8 times
Been liked: 701 times

Re: Steves Panther A

Post by Steve Norris »

A quick mod to the right EMD mount,
As standard if the forward right torsion bar should come loose access to the retaining grub screw is impossible without a major strip down. As this grub screw is below the EMD mount it would be necessary to remove the right track,gear case,motor and EMD mount for access to the grub screw so I came up with this simple mod. It is only required on the right motor mount as the left mount does not block access to the forward torsion bar mount screw. Another bonus is that the grub screw can be replaced with a M6x20 cap head bolt like the rest of the torsion bar mounts.
All that is required is the drilling of a 13mm hole in the EMD mount above the torsion bar grub screw position .
To gain access in service the motor is now the only item that needs to be removed.
Left and right EMD mounts withe the new access hole drilled in the right one
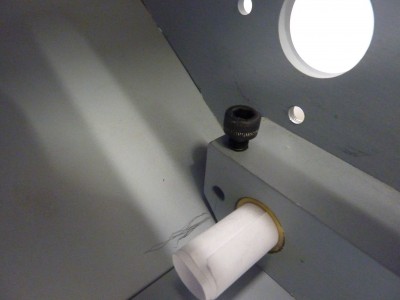
The right forward inner hull with a M6x20 cap head bolt in place of the standard M6 grub screw
The moded EMD mount in position showing how the cap head can be accessed when the motor is removed
Regards
Steve

simon_manning
Posts: 2061
Joined: Fri Nov 02, 2007 8:51 pm
Location: new forest,hampshire,u.k.
Been liked: 1767 times

Re: Steves Panther A

Post by simon_manning »

i've used this method before steve, its a good idea, i think i got it from you last time, i'll have a look at my sturmtiger. thanks for the refresher, regards simon.

Christoffer Ahlfors
Posts: 702
Joined: Sun Feb 14, 2010 5:19 pm
Location: Stockholm, Sweden
Has liked: 746 times
Been liked: 360 times

Re: Steves Panther A

Post by Christoffer Ahlfors »

I just used an ordinary hex bolt there on my tiger. It can be reached with a wrench from the side. Don't remember if the motor needs to be removed? There might not be room for it on a Panther, though.

Cheers,
/Chris
A little too much is about right...

Post Reply