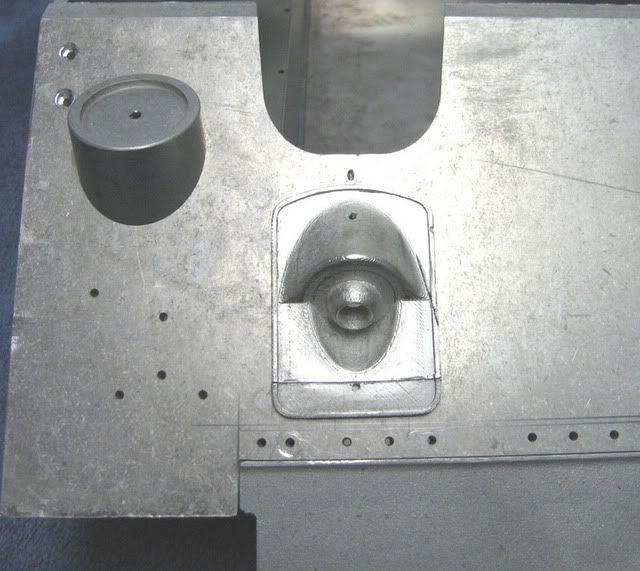
Well I finally started to work on my Sherman. While test fitting the lower and upper hull I noticed that the hull MG looked like it was sitting too high, so after looking at some pictures of the real thing I was right. I decided to move it to the correct spot, I moved it down about a 1/2".
Here are some pictures so you can see what I did.
First the MG in its original spot.
Next my fix - I trimmed it and used JB weld to attach it, reshaped the hump some also.
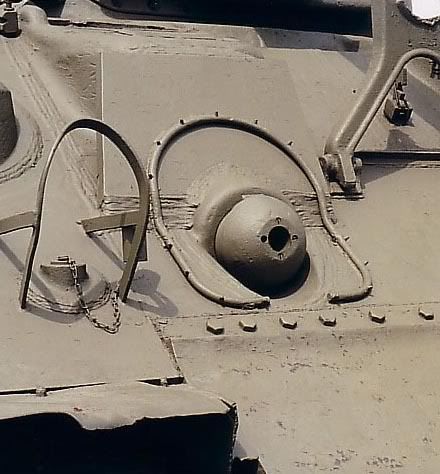
And finally the real thing
I have a lot of work to do to catch up with everyone else.
Thanks Mike . I have been waiting for someone to show me the right way to do this Modifacation , as I did not like the way that armorteks just sat on top of the front plate . Mike are you going to add extra armour plate over the front of the drivers hoods??. Dale
Yes I will be adding the extra armor on the hoods. I will be adding a lot of other details. I want to do my engine deck like yours which is very nice and gives good access to the inside.
Mike I use 25mm x10mm alloy bar for the side engine deck supports . Because I don't own a milling machine . I cut and filed the angles for the engine deck supports for the sides by hand , not much fun but it work out fine in the end lots of drilling and taping. The engine deck lid I hand made out of 3mm styrene .This way you can get the templete for the hatch to fit nice and tight . As My engine deck hole was not quite square . This way when the metal shop cuts out your new engine deck hatch It will fit spot on!! The rear deck support was 10mm x 20mm I was also cut filed to match the rear plate angle . .Dale
There are lots of little details to get right on the Sherman. I found that my front hatch mouldings sat a little too high in the hull also. I wasn't too bothered about the MG as I've covered mine with armout plate as per the Firefly The other detail that need to be worked on is the antenna mount next to the MG, this needs to be cut and fitted "deeper" into the glacis plate so its top edge is almost part of the glacis plate.
Almost the first mod I did was to machine a recess to drop the MG casting into to make the surface flush with the glacis, the raised rim needs to be sanded away too. It makes a big visual improvement On the "To Do List", the MG cover wire "hoop" looks like a fun item with 17 press-stud pins!
The hull aerial mount shows some variation in actual photos and if given a generous putty "weld fillet", the gap behind it disappears.
Another small detail which helps the front end is to move the mud guards forward so that they extend outwards and meet the very edge of the glacis as per original. This will entail mounting a small plate under the pannier floor to fill the gap. The front edge of the mudguard almost ends up above the front edge of the track. There was a slightly fuzzy pic in my old gallery showing the underside. I fabricated new side panels based on the Bovington examples and welded/silversoldered the parts to make the whole item stronger. Each guard is discreetly bolted to the main casting with mushroom head m3 socket screws. My remaining task is to fabricate the 40mm square clamping plates, unique to the M32 ARV, which held, on the right mudguard , an anvil, and on the left one, a big old vice. Of course I then have to make these items too, etc etc. If anyone needs a pic, I can supply ( but have not got round to tackling the DIY gallery yet!).
I found as you did that he front mud guards needed some work to get them to fit right. I moved them forward but also found tha their curviture was not right anf the front needed bending down to get the right height above the track. I also made new side peices and soldered a bit of copper tube, filed in half lengthways to represent the raised stiffening rib. Theres a picture of the fitted mud guard in my gallery.
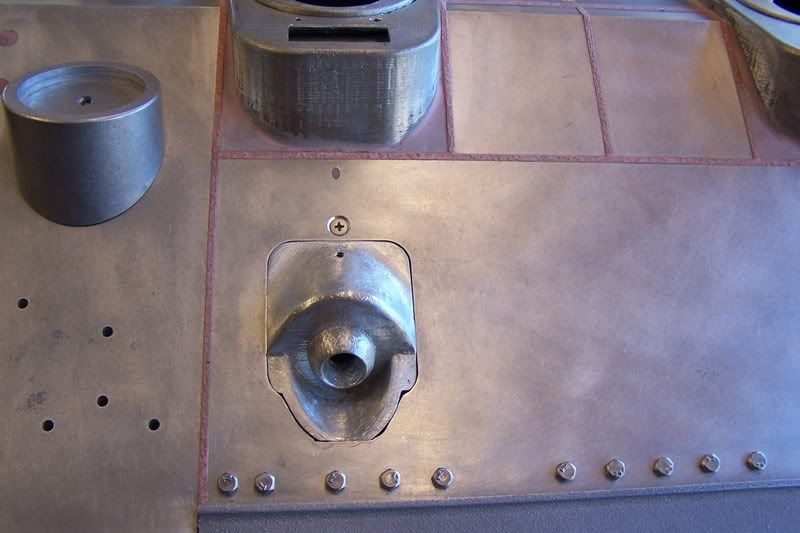
Thanks Mike K . For the idea , and how to!!! This is what I did yesterday on my day off . All I need to do now is to fill , and then add the extra armor . Can one of you guys tell me how thick is the extra armor plate that goes over the drivers hoods ?? . Dale
Looks good Dale. Don't forget to scribe the line just above the bolts and below the MG, that is part of the diff case (ED0103). You can see the line in my second picture and on the real thing. The thickness of the extra armor plate on the hoods should be the same thickness as the applique armor on the hull sides (ED0611 & 612) supplied with the kit.
Thanks Mike . I was just about to ask about the line between the diff case and glasic plate . So I will scribe a line . That will make the extra armor about 3mm . I have look at my photos from stich's CD and it looks like there is a weld around the bottom of the MG mount which will help cover up the joint between the front plate. Dale
I thought the MG mount didn't look quite right.
Now I have some more work to do including adding the armor in front of the hoods which I think I will do now.
I am not sure if just scribing a line above the bolts between the final drive housing and glacis plate will produce the full effect for the model. If you look at the picture below in Dave Ward's gallery you will see tha the final drive housing actually bolts on top of the glacis plat not underneath it as per the model. Also on the majority of Shermans I'vve seen the bolt heads are a little recessed in the final drive housing, although the picture earlier in the thread disproves this slightly. Mind you there are lots of variations on the Sherman. For my model I have fitted some thin plasticard strip to give the overal effect to this joint which is just visible in the last photo.
That's a good idea Allan . I have just scribed the line and it does look good . When I go home to night I will try your way, I have a thin peace of alloy which is 12mm wide . I will try and post some photos soon of my extra armor templates for the drivers hoods to see what you think. Dale.