I wonder if my boss will let me have next week off
arrival
-
David Pengelly
- Posts: 129
- Joined: Tue Jul 31, 2007 4:48 pm
- Location: South Wales ( the old one )
- Been liked: 2 times
arrival
My Jagdpanther arrived today  . already starting to sort out the various box 1 parts onto my clear workbench.
I wonder if my boss will let me have next week off
I wonder if my boss will let me have next week off
Was die Hölle das war
-
leesellars
- Posts: 934
- Joined: Thu Jul 12, 2007 11:19 am
- Location: Nottingham
- Has liked: 2 times
- Been liked: 15 times
Hello Dave
Ive just had a word with him and he says thats OK by him.

lee
Ive just had a word with him and he says thats OK by him.
lee
http://www.Facebook.com/newthorpemodels
Dont hit me so early in the morning with those negative waves.
Listen carefully i shall say this only once.
If its not broke dont fix it.
Ich Hatt Einen Kameraden
Dont hit me so early in the morning with those negative waves.
Listen carefully i shall say this only once.
If its not broke dont fix it.
Ich Hatt Einen Kameraden
-
Allan Richards
- Posts: 743
- Joined: Thu Jul 12, 2007 10:34 am
- Location: Kent
- Been liked: 10 times
-
willie leonard
- Posts: 52
- Joined: Sat Apr 05, 2008 11:32 pm
- Location: metro-chicago, IL U.S.A
- Been liked: 11 times
arrival
Excellent news Dave,hopefully I'll soon be sorting thru boxes myself,although I live further away than you so it might still be awhile. Good Luck on your build.
-
Justin Day
- Posts: 4
- Joined: Sat Mar 08, 2008 4:50 pm
- Location: California USA
-
David Pengelly
- Posts: 129
- Joined: Tue Jul 31, 2007 4:48 pm
- Location: South Wales ( the old one )
- Been liked: 2 times
I have now built the lower hull, and everything went together nicely.
The suspension bushes are a very good fit in the bores of the 2 suspension arms . Not wanting to push them in out of square i turned up a small headed mandril that was a loose fit in the bores of the bushes . I used this to bush the bushes in to the bores useing my vice with some alloy jaw protectors.
I used a 3 mm tap to clean out some of the tapped holes in the thin section of the lower side plates and in the thin section of the front and rear plates . I found that some of the 3 mm cap head bolts bottomed in the holes before tightening on the plates. A little wd 40 or similar on the tap helps to lubricate .
Was die Hölle das war
-
David Pengelly
- Posts: 129
- Joined: Tue Jul 31, 2007 4:48 pm
- Location: South Wales ( the old one )
- Been liked: 2 times
Following the instructions in the build manual, all the parts that make up the lower and upper hull were bolted together but not tightened . I found that the pannier sides need to be filed where the dovetail mates with the front glacis plate. The corners need to be squared out and the small pip removed left behind from the machining
The2 x 3 mm holes for the hull bracket D, needs to be countersunk on the outer face of the rear hull plate .
I slightly elongated the 3 mm holes in the pannier floor plates to give a snug fit when bolting up the pannier sides .
I would like to point out at this juncture that any comments that i may make on this build are in no way intended to detract from the quality of the model kit that Armortek have produced . To say its brilliant is an understatement, and i am very pleased that i have baught it.
My comments are purely to help others who may be building the Jagdpanther, there by saveing them time .
With regard to tools , i would strongly suggest that the allen keys that are used for the build be of the best quality as they are used more than most other tools . I personally use "Bondhus" which are made in the USA, and are gaurenteed for life if they break. .The packaging says they are gorilla proof
Was die Hölle das war
-
David Pengelly
- Posts: 129
- Joined: Tue Jul 31, 2007 4:48 pm
- Location: South Wales ( the old one )
- Been liked: 2 times
I have now tightened up the main hull, including the pannier floors and the pannier sides. The rear deck has been fitted and i found the corners nearest the rear compartment needed to be rounded to make a snug fit.
Some detailing parts were added to the rear deck, but i am now going to add the weld lines and do some extra detailing work.
Some detailing parts were added to the rear deck, but i am now going to add the weld lines and do some extra detailing work.
Was die Hölle das war
-
Allan Richards
- Posts: 743
- Joined: Thu Jul 12, 2007 10:34 am
- Location: Kent
- Been liked: 10 times
David,
Glad to hear that you are making good progress with the build. I think the fitting you are doing is typical of the sort of things that have to be done to put one of these models together well. It would be a tall order to expect the kit to just bolt together with no adjustment here or there.
I woud say that it is a good idea to get the basic model together and working, if yor are fitting the option kits before detailing.
enjoy
Allan Richards
-
David Pengelly
- Posts: 129
- Joined: Tue Jul 31, 2007 4:48 pm
- Location: South Wales ( the old one )
- Been liked: 2 times
I would agree entirly with your comments Allan, anyone who thinks that these kits go together without some fitting and filing should look elsewhere for a model to build.
Knowing that steel plate is normally prepared on the edges proir to welding i am now removing metal from the edges where the weld lines will be , this will give a good fillet of weld around the dovetail joints.
Out of interest does anyone know if the germans used the continuous weld process, or was it all stick welded , when building thier tanks .
I know they had jigs for welding the turrets , as there are lots of pictures showing these.
Was die Hölle das war
-
David Pengelly
- Posts: 129
- Joined: Tue Jul 31, 2007 4:48 pm
- Location: South Wales ( the old one )
- Been liked: 2 times
welding
I browsed the net hoping to find information on welding techniques during WW2, had no luck.
While speaking to Mark recently, i asked if he knew anything about it .
He tells me that at that time there were no fluxed rods , and that the rods were shorter than those used nowadays .
It seems that the flux had to be applied to the bare rod as the welding was done .
This of course means that the welds were not as we know them today and uniform long runs of weld were not possible .
I saw on another thread on this forum a close up pic of some welding on the side of a mantlet , i think there was a comment about russian welding.
Seems that all welding was the same in those days .Just depended on the skill of the welder, who were quite often women.
Was die Hölle das war
-
David Pengelly
- Posts: 129
- Joined: Tue Jul 31, 2007 4:48 pm
- Location: South Wales ( the old one )
- Been liked: 2 times
crew heater covers
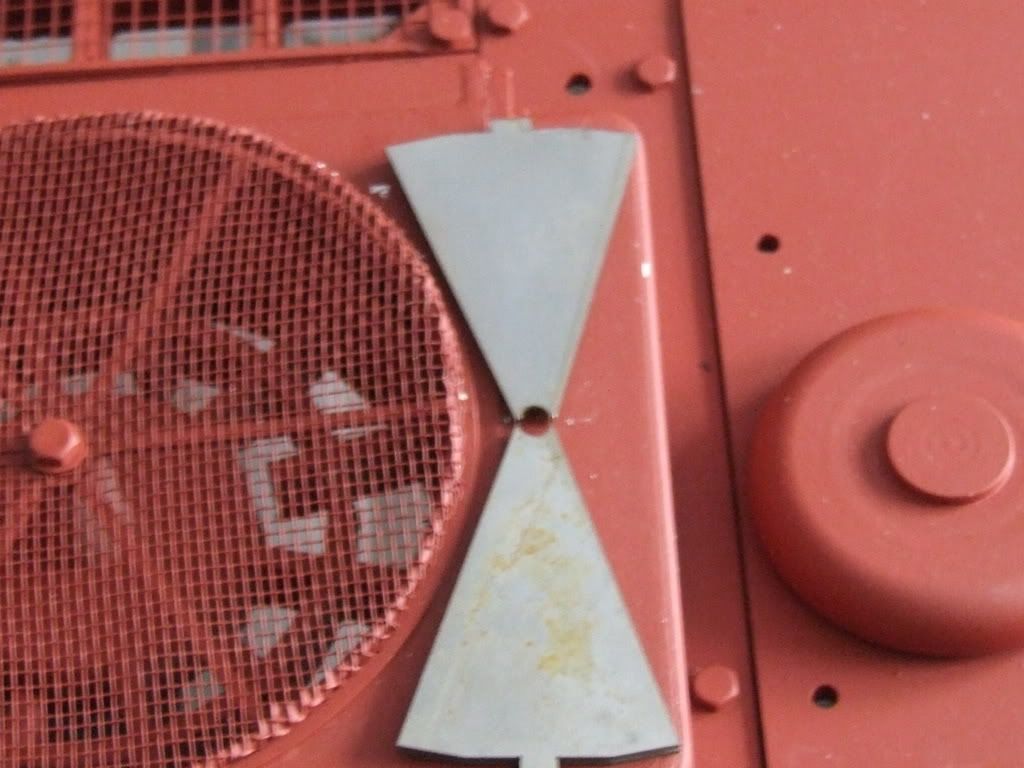
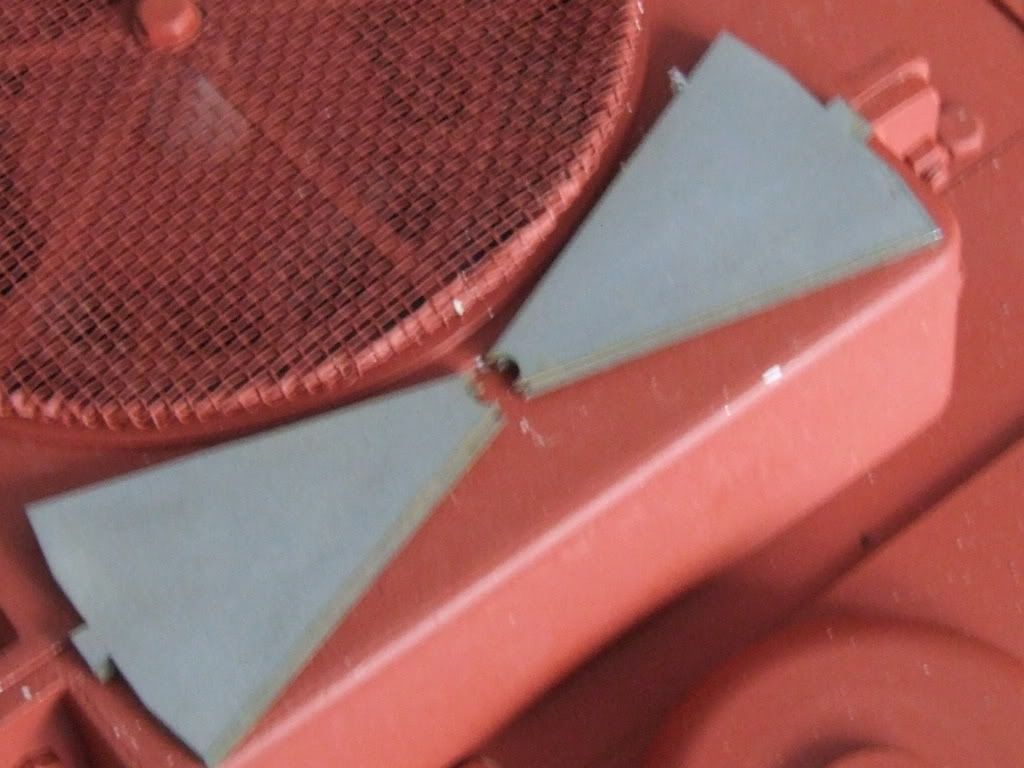
I wanted to make some covers for the crew heater, but found that trying to get 6 small metal items all exactly the same by hand tools extreamly difficult. So i cheated , i pinched some time on our cnc wire eroding machine , results were just what i wanted . There are 6 of them all cut out of .06 mm sheet steel. Now i need to make the clamps to hold them down on top of the crew heater casing
I just hope the links works
http://i152.photobucket.com/albums/s172 ... CF0044.jpg
http://i152.photobucket.com/albums/s172 ... CF0046.jpg
I have also made my own grills for the 2 fan housings , as i thought the etched brass parts supplied were to good .
I just hope the links works
http://i152.photobucket.com/albums/s172 ... CF0044.jpg
http://i152.photobucket.com/albums/s172 ... CF0046.jpg
I have also made my own grills for the 2 fan housings , as i thought the etched brass parts supplied were to good .
Was die Hölle das war
-
Tim Bowman
- Posts: 1762
- Joined: Fri Jul 13, 2007 4:53 am
- Location: Northern California
- Been liked: 177 times
- Contact: