Brown's T34 85 #008
-
Brown Hawkins
- Posts: 204
- Joined: Sat Aug 01, 2009 12:34 am
- Location: Denver, Colorado
- Been liked: 33 times
Brown's T34 85 #008
The T 34 86 has arrived! It's #008. I'm not sure how I’ll finish this tank other than with a weathered green base. I hope mine goes together as fast as Phil's. The experience of partially assembling my KT should help with building this guy. I will break with the actual tank color scheme by painting the inside a bright white.
Now to finish readying the Tiger 1 and Tiger 2 parts for shipment so I can build something!
Cheers,
Brown
Now to finish readying the Tiger 1 and Tiger 2 parts for shipment so I can build something!
Cheers,
Brown
-
Brown Hawkins
- Posts: 204
- Joined: Sat Aug 01, 2009 12:34 am
- Location: Denver, Colorado
- Been liked: 33 times
Re: Brown's T34 85 #008
I couldn't help myself as I was inventorying T 34 parts:
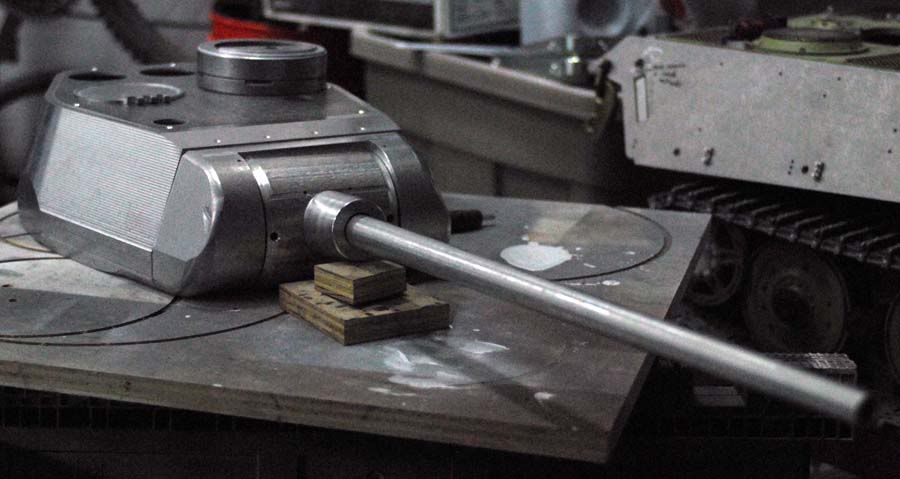
This looks like a quick build, relatively speaking.
A lot of Mr Surfacer and some Milliput will be needed to fill in the tooling marks on the turret. Still waffling on if I'm going to round out the flat spots on either side of the turret; probably:
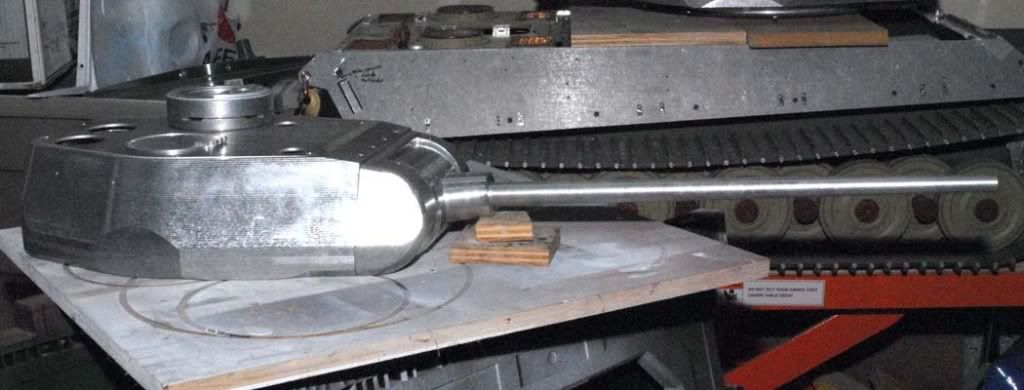
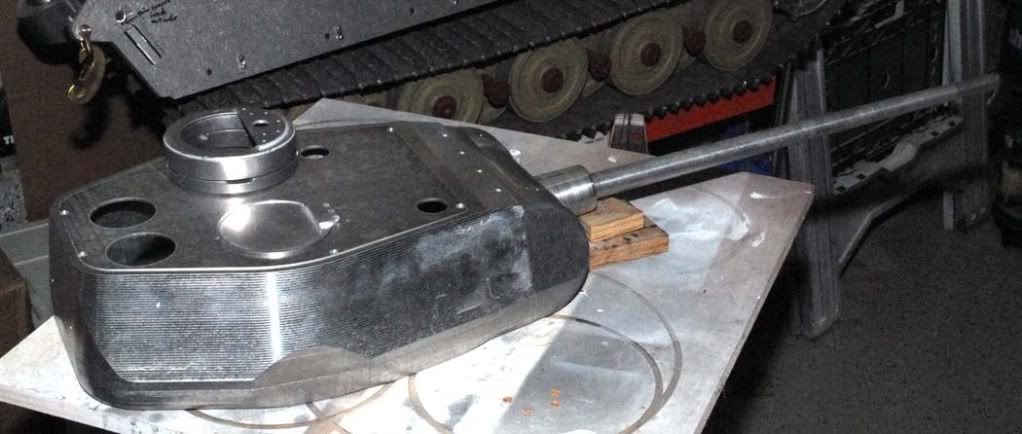
Achieving the rough cast look of the WW2 turrets is going to be a job.
Thank goodness Phil has sorted out some important build issues early on.
Brown

This looks like a quick build, relatively speaking.
A lot of Mr Surfacer and some Milliput will be needed to fill in the tooling marks on the turret. Still waffling on if I'm going to round out the flat spots on either side of the turret; probably:


Achieving the rough cast look of the WW2 turrets is going to be a job.
Thank goodness Phil has sorted out some important build issues early on.
Brown
-
phil fitzpatrick
- Posts: 2020
- Joined: Sat Dec 12, 2009 3:38 pm
- Location: Sambourne uk
- Been liked: 223 times
Re: Brown's T34 85 #008
Nice to see you have your T34 Kit safe and sound,I liked the pic's.
looks like a tank factory
Cheers
Phil
looks like a tank factory
Cheers
Phil
- Robert E Morey
- Posts: 2352
- Joined: Wed Jul 18, 2007 12:59 am
- Location: Seattle, WA USA
- Has liked: 161 times
- Been liked: 844 times
Re: Brown's T34 85 #008
Hi Brown,
You can sand, file and smooth the turret flat spot some. I would recommend it. Then coat the whole turret with a thin coat of miliput to achieve the cast texture. There are other putty that will work-Bondo. The good news is the russian tanks are pretty rough, so it should be fairly easy to achieve the right look.
Good luck.
Bob
-
John Davie
- Posts: 114
- Joined: Wed Jan 13, 2010 8:55 am
- Location: Ampthill, Bedfordshire
- Been liked: 15 times
Re: Brown's T34 85 #008
That's an understatement!!The good news is the russian tanks are pretty rough
I use body filler (your bondo I guess) and drag it as it starts to set to get the Russian 'course cast' effect. You can always sand it out a bit if you think it's tooooo rough, but I would suggest you colour it first is it always seems to look less rough than you thought it was after a coat of paint!!
John.
ARMORTEK: SdKfz 7, 88mm Flak36, 222, Sherman, Comet, T34, Firefly, Centurion, MarkIV, Limber, 25 Pdr, Pak 43, 17 Pdr.
Plus others!
ARMORTEK: SdKfz 7, 88mm Flak36, 222, Sherman, Comet, T34, Firefly, Centurion, MarkIV, Limber, 25 Pdr, Pak 43, 17 Pdr.
Plus others!
-
Brown Hawkins
- Posts: 204
- Joined: Sat Aug 01, 2009 12:34 am
- Location: Denver, Colorado
- Been liked: 33 times
Re: Brown's T34 85 #008
Trying to get the wheel bolt sizes worked out. Here is my first try compared to a scaled down actual wheel (1 of several comparisons actually):
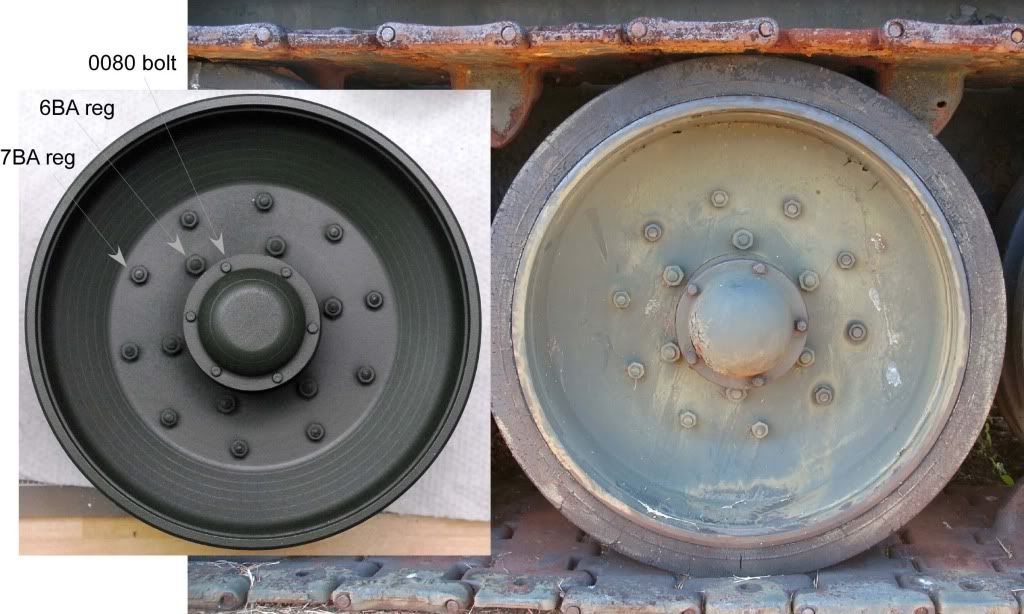
I'm thinking I'll try a 1/2" 5BA bolt with a 5BA small nut on the inner ring and a 1/2" 6BA bolt with a 6BA small nut on the outer ring which will keep the outside nut dimensions the same while making the bolt shaft bigger. The 0-80 bolts are simply cut shallower than the hole depth in the hubcap and superglued on. No way was I going to drill and tap all those bolt holes! Note that the center hub is not quite to scale. The wheel is painted Tamiya TS-2 Dark Green.
I'm painting the inside of the tank parts white before assembly as I go and it seems to be working well:

I have to go back and do this to my KT!
The side skirts are welded on the actual tanks so I'll use 1/2" 2-56 flathead bolts to attach them. Need to counter sink the nuts on the inside of the pannier armor because of limited clearance.

OK. Who wants the funky T34 85 tow hooks?
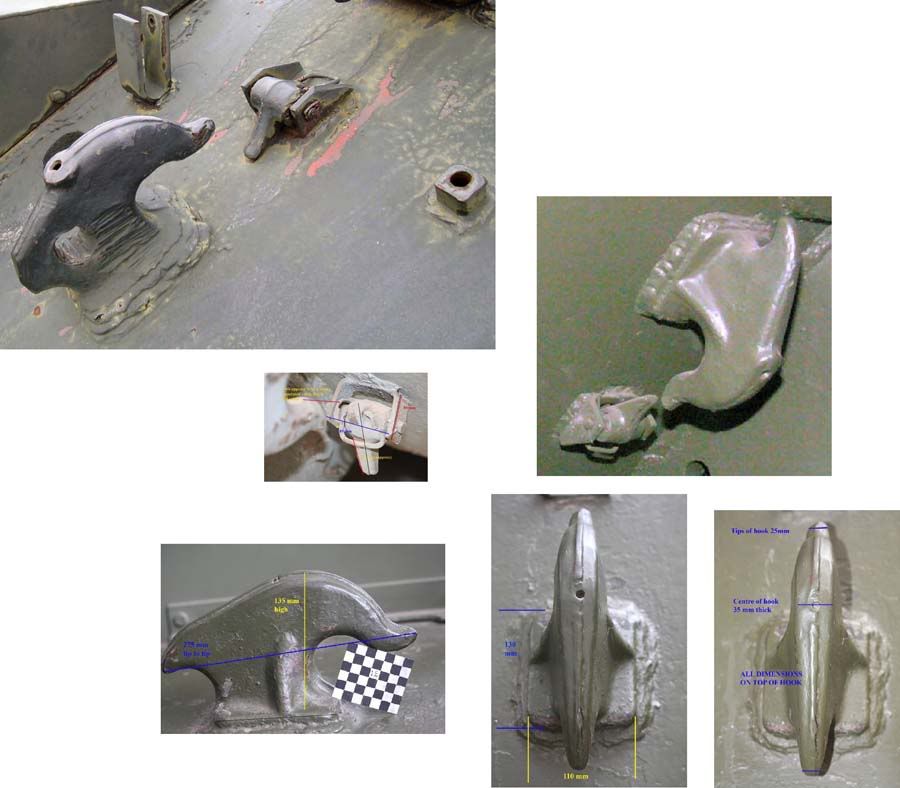
I have a caster that will do them in brass and the rough estimate just for casting is $150. When it's all said and done I'm thinking a set of 4 hooks and keepers will run $200 assembled and ready to bolt on. I'm planning on these being working tow hooks not just for show. I'll put this on the Craftsman page too.
We need the later tow hooks to be able to mount the extra track link on the glacis plate. I just have the track link loosely on for show, not in the actual lower location. Note that the track link covers 2 of the current 4 tow bracket bolt holes:

Still working on the 6 mounting brackets for the track link.
Really having fun with this tank and it's giving me ideas of how to redo things to make my King Tiger better.
After only a week of work:

Brown

I'm thinking I'll try a 1/2" 5BA bolt with a 5BA small nut on the inner ring and a 1/2" 6BA bolt with a 6BA small nut on the outer ring which will keep the outside nut dimensions the same while making the bolt shaft bigger. The 0-80 bolts are simply cut shallower than the hole depth in the hubcap and superglued on. No way was I going to drill and tap all those bolt holes! Note that the center hub is not quite to scale. The wheel is painted Tamiya TS-2 Dark Green.
I'm painting the inside of the tank parts white before assembly as I go and it seems to be working well:

I have to go back and do this to my KT!
The side skirts are welded on the actual tanks so I'll use 1/2" 2-56 flathead bolts to attach them. Need to counter sink the nuts on the inside of the pannier armor because of limited clearance.

OK. Who wants the funky T34 85 tow hooks?

I have a caster that will do them in brass and the rough estimate just for casting is $150. When it's all said and done I'm thinking a set of 4 hooks and keepers will run $200 assembled and ready to bolt on. I'm planning on these being working tow hooks not just for show. I'll put this on the Craftsman page too.
We need the later tow hooks to be able to mount the extra track link on the glacis plate. I just have the track link loosely on for show, not in the actual lower location. Note that the track link covers 2 of the current 4 tow bracket bolt holes:

Still working on the 6 mounting brackets for the track link.
Really having fun with this tank and it's giving me ideas of how to redo things to make my King Tiger better.
After only a week of work:

Brown
- Armortek
- Site Admin
- Posts: 2936
- Joined: Tue Jul 10, 2007 10:30 am
- Location: Winchester, England
- Been liked: 3704 times
Re: Brown's T34 85 #008
Hi Brown
Your assembly looks to be going great. Just one note. The flats on the turret are not an error. They are correct for the tank we chose to model. Many types of turret were cast, fabricated and pressed for these tanks. some with flats, some without.
Mark
Your assembly looks to be going great. Just one note. The flats on the turret are not an error. They are correct for the tank we chose to model. Many types of turret were cast, fabricated and pressed for these tanks. some with flats, some without.
Mark
Armortek
-
Brown Hawkins
- Posts: 204
- Joined: Sat Aug 01, 2009 12:34 am
- Location: Denver, Colorado
- Been liked: 33 times
Re: Brown's T34 85 #008
Mark,
Yes, I figured out the ignorance of my question after looking at many subsequent turret pictures. It can be hard to notice the flats when they are obscured by the rough casting texture and cut by a big, nasty mold seam that's then been ground off incompletely! I'm still working on how to simulate this rough texture correctly.
Brown
-
Fabrice Le Roux
- Posts: 394
- Joined: Thu Jul 12, 2007 8:57 pm
- Location: London UK
- Been liked: 14 times
Re: Brown's T34 85 #008
Hi brown,
The cast texture is a serious challenge on the T-34, as it is so pronounced on full size vehicles! I played around with bunch of materials to get a roughcast look for parts of the Sherman. A fairly extreme result was achieved by stippling carbody filler over smooth plate, leaving it to harden overnight then sanding off the high points. Then several grades of Artists Texturing media (an acrylic base with various grades of crushed garnet, sand or pumice) were dabbed over. Once dry, a harmonizing layer of car underbody antichip spray (not the bituminous sealer!) was added to backfill the pitting.
The problem with the surface texturing products produced for 1/35th scale models, apart from the high unit price, is that they are too fine. Or at least too fine for the 1/6th rough cast finish you need.
You can save even more money by purchasing unmixed Acrylic Medium and experimenting with your own grades of sand and grit. Empty aluminium drinks cans make good test pieces as you can immediately see how the result catches the light.
Good luck.
Fabrice
-
Stephen White
- Site Admin
- Posts: 3114
- Joined: Sat Oct 11, 2008 7:05 pm
- Location: Dorset
- Has liked: 1040 times
- Been liked: 2111 times
- Contact:
Re: Brown's T34 85 #008
Brown
I've had good results from a Upol product called a "high build primer". It sprays on and remains workable for a few minutes. Once I've covered a small area, I use a stubby paint brush to stipple and drag. You then sand the result when dry. Here's a link to their UK website. Not sure if it's available in the States (although the page below is from the US site) but they're an international company and I'm sure there will be an equivalent.
http://www.u-pol.com/product-cat/121/hi ... primer.htm
Best regards
Stephen
-
Brown Hawkins
- Posts: 204
- Joined: Sat Aug 01, 2009 12:34 am
- Location: Denver, Colorado
- Been liked: 33 times
Re: Brown's T34 85 #008
The proper scale sized bolts on the rear armor should be 5BA Regular. A big thank you to John Wiggins for the photo and measurement!
I just ordered some of these bolts from:
http://www.ba-bolts.co.uk/index.html
Here is a link to a BA chart of dimensions and measurements:
http://www.ba-bolts.co.uk/faq.html
Brown
I just ordered some of these bolts from:
http://www.ba-bolts.co.uk/index.html
Here is a link to a BA chart of dimensions and measurements:
http://www.ba-bolts.co.uk/faq.html
Brown
-
Bodo Langbehn
- Posts: 109
- Joined: Wed Jan 06, 2010 11:07 am
- Location: Germany Black Forest
- Been liked: 25 times
Re: Brown's T34 85 #008
Hello,
my solution to copy the cast texture is to spray several thick coats of carfiller on the surface and let them dry. After a few hours I start to sandblaster some patches away. It`s necessary to play a bit with the pressure and the distance.
Bodo
my solution to copy the cast texture is to spray several thick coats of carfiller on the surface and let them dry. After a few hours I start to sandblaster some patches away. It`s necessary to play a bit with the pressure and the distance.
Bodo
- Attachments
-
- CIMG0862kl.jpg (80.35 KiB) Viewed 11890 times
-
- CIMG0861kl.jpg (94.26 KiB) Viewed 11890 times
-
- CIMG0859.jpgkl.jpg (101.76 KiB) Viewed 11890 times
-
Brown Hawkins
- Posts: 204
- Joined: Sat Aug 01, 2009 12:34 am
- Location: Denver, Colorado
- Been liked: 33 times
Re: Brown's T34 85 #008
Thanks everyone for the cast texture how-to suggestions. I'm going to have to experiment first on somethng besides the tank for sure!
Brown
Brown
-
Fabrice Le Roux
- Posts: 394
- Joined: Thu Jul 12, 2007 8:57 pm
- Location: London UK
- Been liked: 14 times
Re: Brown's T34 85 #008
Hi Bodo,
Super effect. Can you give us a mini tutorial on how you make the carfiller sprayable? What do you mix it with or is a special pre mixed product?
Thanks,
Fabrice
Super effect. Can you give us a mini tutorial on how you make the carfiller sprayable? What do you mix it with or is a special pre mixed product?
Thanks,
Fabrice
