Page 1 of 2
Wading Rail
Posted: Sun Jul 18, 2021 1:31 pm
by Greg Clement
Considering the number of photos I took and notes I made on my last visit to a Chieftain I should know the answer to this question but for some reason I don’t.
Can anyone tell me what fills the gap between the wading rail and the front casting? I don’t think it’s a weld, is it some sort of mastic? Does anyone have close up photo’s they are willing to share?
Also, how thick is the driver hatch is? I have a figure of 60mm but the hatch was closed on the Chieftain I looked at so now doubt its accuracy.
Thanks in advance for any help given.
Re: Wading Rail
Posted: Sun Jul 18, 2021 2:05 pm
by John Clarke
Hi Greg.
Thin sheet metal on the inside, seems to seal the wading rail to the glacis plate, but beware the given shape is not correct, it took me a couple of hours to get it something like. If you go that way, be careful not to crease the rail.
My hatch is 6mm thick now, (Hacksaw job) it looks ok open or closed, if you make the open slotted "parking post" you'll have to do a Banksy to clear all the other items on the glacis plate.
- dux_chieftain_26.jpg (99.66 KiB) Viewed 4952 times
Re: Wading Rail
Posted: Sun Jul 18, 2021 2:51 pm
by Mark Heaps
I stand by to be corrected by more knowledgable people but I believe the wading rail did have gaps to allow water out.
The rail acted as a bow-wave deflector when fording to divert water away from the drivers hatch, an attached screen would have allowed deeper waters to be forded. Chieftain was not a DD tank
Re: Wading Rail
Posted: Sun Jul 18, 2021 6:57 pm
by Greg Clement
John, thanks for the Berlin camo photo, I’ve not seen that one before. It clearly shows the inside face of the rail, just what I was after. Is that water pooling at the front?
I reduced the hatch to 10mm and its till looks too “clunky”. I will take another 2mm off and see what that is like and if need be go down the 6mm.
I understand what you mean with having to do a “Banksy”. I think the problem is the wading rail itself, I may have a go a scratch building one.
Mark, I think you must be right, if you look at John’s top photo its easy to see how the water level could extend to within a few inches of the drivers hatch.
Thank you both. Hopefully someone will confirm or not if there were drainage gaps.
Re: Wading Rail
Posted: Sun Jul 18, 2021 7:39 pm
by Stephen White
The driver's hatch is 2.25 inches, 57.15mm thick on Chieftain. The cast armour around the driver's hatch was a lot thicker.
The wading rail had a port at the front to allow water to drain. Our drivers always kept a piece of wire in their cabs and at every opportunity they poked any debris through to keep it open. The hole might have been intended for water but for that it was wholly inadequate. The real reason they kept it clear was to avoid a neck full of diesel in the not uncommon event that there was spillage on the back decks, which would find its way forward.
Mark, the wading rail was again wholly inadequate to act as a bow-wave deflector. For that reason, a more substantial plate was introduced, fitted between the headlight clusters, probably around the time the Mk 3 was introduced although my memory is a bit hazy on timescales.
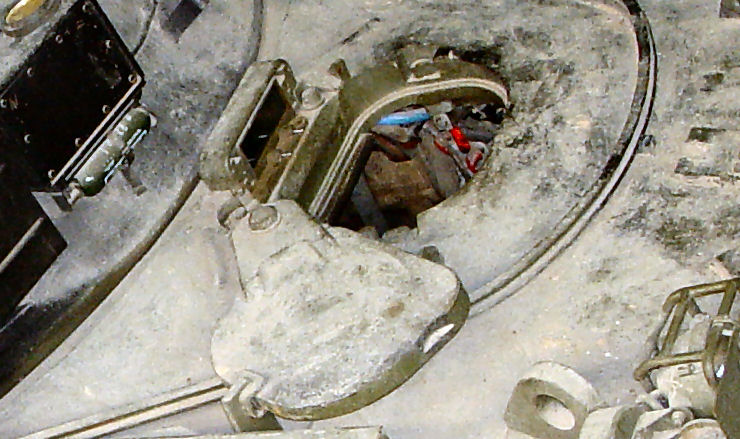
The wading rail was welded to the hull structure. Where a gap would have been formed, a fillet plate was added, as can be seen in this photo of the transition plate at the rear of the glacis casting.
This photo shows the drainage hole and how the wading rail was raised above the glacis casting with a small fillet piece. That is going to be a challenge to replicate.
Re: Wading Rail
Posted: Mon Jul 19, 2021 5:30 am
by John Clarke
The rail given is a little too thick/big and and mine with shaping mods is a little too short. But chucking it and getting the right size rail is a Cat4.
It'll do.
I'm not doing the screw mounts either.
- SAM_3554.JPG (181.76 KiB) Viewed 4854 times
Re: Wading Rail
Posted: Mon Jul 19, 2021 10:52 am
by Greg Clement
Stephen, thanks for the hatch dimensions and the photo with the storage bin removed, very useful.
I’m now thinking scratch building the wading rail may be a bit ambitious, but I will give it go and if all fails revert back to the supplied item.
Thanks for the help.
Re: Wading Rail
Posted: Mon Jul 19, 2021 1:07 pm
by John Clarke
I think you can make a pretty decent job with the rail supplied. My front section curve is flattened somewhat to mimic the original. It allows the detail parts to fit well within the hatch area. But it will shorten the length. Making a couple of short sections along the straight edge to make up shouldn't be a problem. Although according to Stephen large sections we're removed to allow for "diesel drainage" on the rear deck, so this could be used else where. The model does not include the rear section which I've only seen on one other tank.
The hatch thickness at around 6 to 7mm is good Banksy. Other wise everything else gets bigger/deeper. It makes easy to swing open and park. The cut outs and locking levers don't get out of proportion. Look forward to seeing more of your Cheiftain.
Re: Wading Rail
Posted: Mon Jul 19, 2021 4:03 pm
by Greg Clement
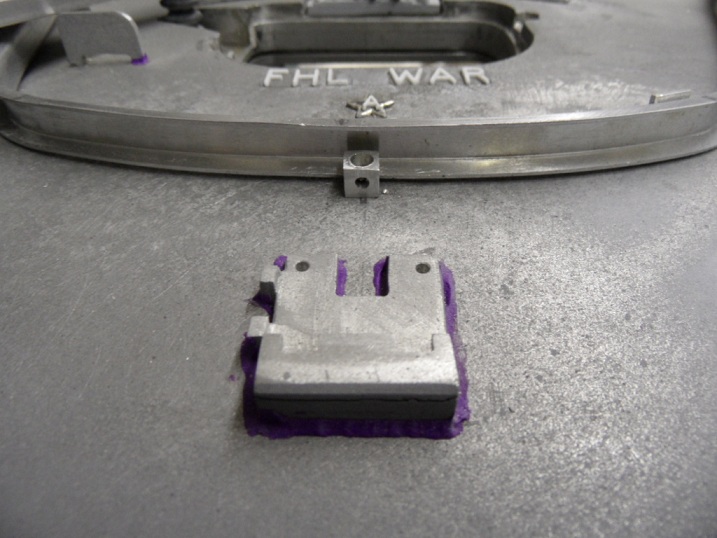
Found a bit of scrap alloy and decided to have a go at making a replacement wading rail. It’s a bit rough but good enough for a prototype. The important thing is it is pliable enough to enable bending to the required shape. I will get some more stock material and have a proper go tomorrow.
Original.
Replacement.
Re: Wading Rail
Posted: Mon Jul 19, 2021 8:55 pm
by David Battson
Hi Greg,
Looks a great job on the Chieftain so far. The revised wade rail looks much closer to scale, is that an off the shelf profile or have you formed it yourself?
I think I measured real thing as being 38mm high by 25mm wide . The closest to scale thing I have been thinking about using is 6x6 brass channel, however that will need to be trimmed down to 6x4mm and I ‘m not sure how easy it will be to bend. Good luck with your alternative.
David
Re: Wading Rail
Posted: Mon Jul 19, 2021 9:22 pm
by Greg Clement
Hi David
Its off the shelf 6x6 profile from B&Q, it was a bit kinked and damaged but good enough to test a theory. Its not as malleable as the supplied part but its workable. It took a while to machine the whole length and I did consider making a jig out of timber and either filing or sanding it down to the required 6x4. I don't have any experience of working with brass so not sure if it would be easier to form into the desired shape. Hopefully someone will give advise on that shortly.
Greg
Re: Wading Rail
Posted: Mon Jul 19, 2021 9:49 pm
by John Clarke
Greg it does look so much better, far better scale, nice
Darn it, Cat 4 here we go again. Bagged three 1m lengths at B&Q tonight, more than enough hopefully
Grinders at the ready.
Re: Wading Rail
Posted: Mon Jul 19, 2021 10:24 pm
by Richard Goodwin
John Clarke wrote: ↑Mon Jul 19, 2021 9:49 pm
Grinders at the ready.
I think your grinders feeling overworked and underpaid John


Re: Wading Rail
Posted: Tue Jul 20, 2021 8:40 am
by John Clarke
Greg, thats a nice bit of sculpture work on the hatch. Took me along time to calve that bit out.
Dont know what your laughing about Richard. This will "route" any of your ideas on using the supplied parts too.
Hope you brought a new set of brushes.
You'll just might need them.
Re: Wading Rail
Posted: Wed Jul 21, 2021 8:15 am
by andymusgrove
Hi Guys
Just came across a photo which might prove useful for you at this stage..

keep up the good work