Sherman M4A3 HVSS Build
-
Andy Walker
- Posts: 100
- Joined: Mon Jul 20, 2015 4:38 pm
- Has liked: 63 times
- Been liked: 42 times
-
Robert E Morey

- Posts: 2253
- Joined: Wed Jul 18, 2007 12:59 am
- Location: Seattle, WA USA
- Has liked: 103 times
- Been liked: 701 times
Re: Sherman M4A3 HVSS Build
Nice Andy - I think you're the first to dive into this.
One minor suggestion before you get too deep - I suggest to wash all the parts in dish soap, warm water and lightly scrub with tooth brush to remove the white residue seen on the wheels and suspension arms. This is leftover "magic" dust from vibratory deburring process. Most times it will not cause an issue, but for tight fitting parts or threaded parts it can contribute to binding because it contains abrasive grit. Also for ideal paint adhesion clean parts are best.
Looking forward to this build myself.
Best regards,
Bob
-
Andy Walker
- Posts: 100
- Joined: Mon Jul 20, 2015 4:38 pm
- Has liked: 63 times
- Been liked: 42 times
Re: Sherman M4A3 HVSS Build
Hi Bob,Robert E Morey wrote: ↑Thu Jun 17, 2021 7:10 pmNice Andy - I think you're the first to dive into this.
One minor suggestion before you get too deep - I suggest to wash all the parts in dish soap, warm water and lightly scrub with tooth brush to remove the white residue seen on the wheels and suspension arms. This is leftover "magic" dust from vibratory deburring process. Most times it will not cause an issue, but for tight fitting parts or threaded parts it can contribute to binding because it contains abrasive grit. Also for ideal paint adhesion clean parts are best.
Looking forward to this build myself.
Best regards,
Bob
yes doing a 'dry' fit of parts at the moment. Had to fiddle with the threads on the axles as they didn't want to go into the supporting arms at all. Took a bit of work but got there in the end. Had to use fine sandpaper inside the wheel bearing housings to get bearings to fit snuggly ( just removed the white residue you mentioned ). Had to lightly sand and use a fine file on some of the axle stubs to get the bearings to slide all the way to the small step on the axle that stop them going too far. But so far I'm getting there
-
Robert E Morey
- Posts: 2253
- Joined: Wed Jul 18, 2007 12:59 am
- Location: Seattle, WA USA
- Has liked: 103 times
- Been liked: 701 times
Re: Sherman M4A3 HVSS Build
hi Andy
Axles and threaded parts generally need a small chamfer to deburr the end of thread. Likewise bearing holes may need a slight chamfer to deburr the opening so the bearings start easily. All general metalworking "things" but for someone new or first time kit -may be a bit disconcerting.
Hope all goes well in 4days. Looking forward to more progress on your kit.
best regards,
B
-
Andy Walker
- Posts: 100
- Joined: Mon Jul 20, 2015 4:38 pm
- Has liked: 63 times
- Been liked: 42 times
Re: Sherman M4A3 HVSS Build
The 12 individual wheel assemblies all dry fitted together now. Started on the 6 main suspension assemblies now. Deburring the holes for the shafts helped them slide into position nicely, but careful not to push fully home as I'll never get them out again  Some sanding and deburring has to be done on main body where the wheel assemblies fit in, as some wouldn't locate fully. I think it was mainly just some machining marks. A few minutes work and they rotate nicely.
- Attachments
-
-
-
-
GlenStenhouse
- Posts: 88
- Joined: Mon Aug 05, 2019 10:47 am
- Has liked: 17 times
- Been liked: 26 times
Re: Sherman M4A3 HVSS Build
I love that we all start from different points. I've some build pics here. n°8 Easy Eight. OCTO M4A3E8
-
Andy Walker
- Posts: 100
- Joined: Mon Jul 20, 2015 4:38 pm
- Has liked: 63 times
- Been liked: 42 times
Re: Sherman M4A3 HVSS Build
I had difficulty keeping the front armour plate square with the upper side plate, so manufactured two aluminium blocks to secure it at the bottom in a similar way to the supplied blocks fitted at the top.
- Attachments
-
-
Last edited by Andy Walker on Sat Aug 21, 2021 12:35 pm, edited 1 time in total.
-
Robert E Morey
- Posts: 2253
- Joined: Wed Jul 18, 2007 12:59 am
- Location: Seattle, WA USA
- Has liked: 103 times
- Been liked: 701 times
Re: Sherman M4A3 HVSS Build
Good idea on those blocks. My original Sherm glassis didn't fit so well down at bottom either (gap). I did similar to pull it in tight to hull sides.
Nice work.
B
Nice work.
B
-
Andy Walker
- Posts: 100
- Joined: Mon Jul 20, 2015 4:38 pm
- Has liked: 63 times
- Been liked: 42 times
Re: Sherman M4A3 HVSS Build
After some advice from those who have already assembled the 'return roller A' on page 05 of manual. When I tighten up the M4 x 8 CSK screw onto CP0142 it stops the roller EU0250 moving completely. I noticed that the thinner shaft of EU0253 doesn't go all the way through the outer bearing that CP0142 is tightened onto...it is slightly recessed. Is this normal? It appears that CP0142 squashes the bearing and that this stops the rotation.
At the moment the only way round this that I can see is to put a small spacer washer between CP0142 and the bearing....small enough that it fits tightly onto the end of the shaft of EU0253 but doesn't let CP0142 'squash' onto the bearing.
Anybody else had this problem, or any ideas?
At the moment the only way round this that I can see is to put a small spacer washer between CP0142 and the bearing....small enough that it fits tightly onto the end of the shaft of EU0253 but doesn't let CP0142 'squash' onto the bearing.
Anybody else had this problem, or any ideas?
-
Robert E Morey
- Posts: 2253
- Joined: Wed Jul 18, 2007 12:59 am
- Location: Seattle, WA USA
- Has liked: 103 times
- Been liked: 701 times
Re: Sherman M4A3 HVSS Build
Andy
I haven't reached the roller assembly yet. But in general any bearing assy - the axle shaft should be a tiny bit shorter so that the retainer washer and shoulder of the axle shaft are the only contact to the two bearings. You don't need a lot of torque on the M4 screw, just enough to contact the keeper washer to the inner bearing race. Reefing the M4 too tight may be too much side preload on the bearings, causing them to bind up. Adding the additional washer shouldn't be necessary. I loctite (blue, removable) the M4 once the tension is set, so that it doesn't work loose.
Don't know if this helps.
B
-
Andy Walker
- Posts: 100
- Joined: Mon Jul 20, 2015 4:38 pm
- Has liked: 63 times
- Been liked: 42 times
Re: Sherman M4A3 HVSS Build
Thanks Bob. I'll investigate further and see what I can do.Robert E Morey wrote: ↑Sat Sep 04, 2021 9:17 pmAndy
I haven't reached the roller assembly yet. But in general any bearing assy - the axle shaft should be a tiny bit shorter so that the retainer washer and shoulder of the axle shaft are the only contact to the two bearings. You don't need a lot of torque on the M4 screw, just enough to contact the keeper washer to the inner bearing race. Reefing the M4 too tight may be too much side preload on the bearings, causing them to bind up. Adding the additional washer shouldn't be necessary. I loctite (blue, removable) the M4 once the tension is set, so that it doesn't work loose.
Don't know if this helps.
B
-
Tom Miller

- Posts: 157
- Joined: Thu May 23, 2019 9:23 pm
- Location: Portland Oregon USA
- Been liked: 315 times
Re: Sherman M4A3 HVSS Build
Andy,
I had the same problem. I chucked up shaft 253 in the lathe and took a couple of thousands off the shoulder of the shaft until when the M4 is tightened down the shaft turns freely. If you do not have a lathe then your wahser idea is the best solution.
Tom
I had the same problem. I chucked up shaft 253 in the lathe and took a couple of thousands off the shoulder of the shaft until when the M4 is tightened down the shaft turns freely. If you do not have a lathe then your wahser idea is the best solution.
Tom
-
Andy Walker
- Posts: 100
- Joined: Mon Jul 20, 2015 4:38 pm
- Has liked: 63 times
- Been liked: 42 times
Re: Sherman M4A3 HVSS Build
Hi Tom,Tom Miller wrote: ↑Sun Sep 05, 2021 5:59 pmAndy,
I had the same problem. I chucked up shaft 253 in the lathe and took a couple of thousands off the shoulder of the shaft until when the M4 is tightened down the shaft turns freely. If you do not have a lathe then your wahser idea is the best solution.
Tom
I don't have a lathe so think I will try with the washer idea. Doesn't matter how many times I try to tighten the screw into EU0253 it either restricts the wheels from turning, or leaves too much slack movement on EU0252. I found the bearing doesn't rotate normally either....the inner part rotates around the shaft rather than the bearing rotating on itself.
-
Andy Walker
- Posts: 100
- Joined: Mon Jul 20, 2015 4:38 pm
- Has liked: 63 times
- Been liked: 42 times
Re: Sherman M4A3 HVSS Build
I'm thinking of loctiting the inner bearing race to shaft EU0253. This should then stop it rotating on the shaft rather than the bearing doing the actual rotation. Similar to return roller B on page 06.
-
Robert E Morey
- Posts: 2253
- Joined: Wed Jul 18, 2007 12:59 am
- Location: Seattle, WA USA
- Has liked: 103 times
- Been liked: 701 times
Re: Sherman M4A3 HVSS Build
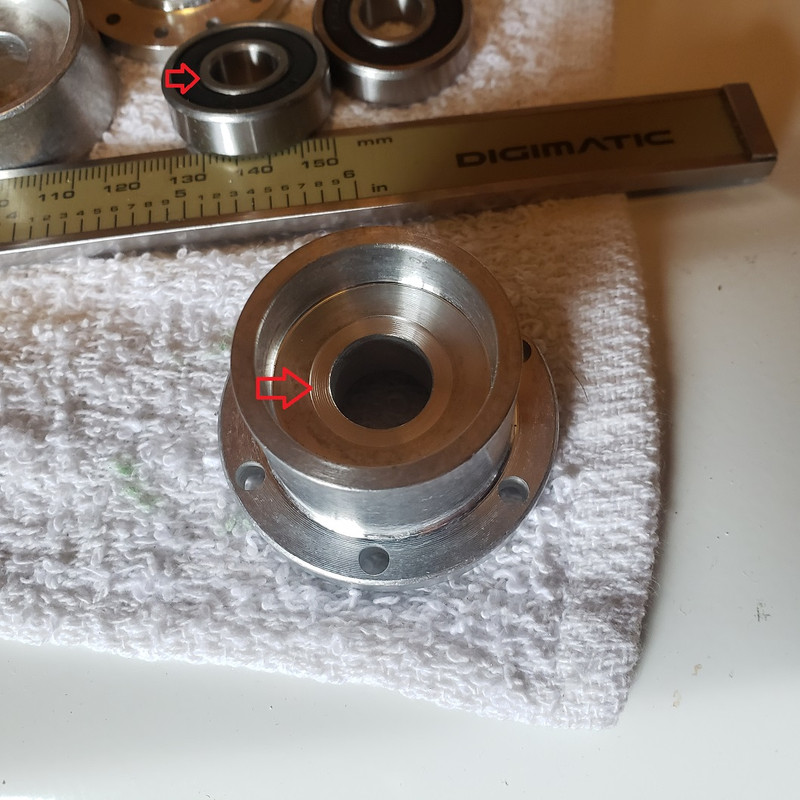
I assembled my roller housing to take a look at the issue. I notice the inner hole of the housing is very close to inner race diameter of bearing. So when M4 retaining screw is tightened up the race will drag on housing, potentially locking rotation. So I relieved the housings a little on the lathe. I agree with Tom, If you don't have a lathe, a washer may work.
On the small roller assy you will want to Loctite the EU0257 shaft per the instructions to the bearing to prevent the retainer washer from dragging on housing.
Also use Loctite (Bearing retainer) on the bearings into the housings - to keep bearing from spinning in housing.
On the small roller assy you will want to Loctite the EU0257 shaft per the instructions to the bearing to prevent the retainer washer from dragging on housing.
Also use Loctite (Bearing retainer) on the bearings into the housings - to keep bearing from spinning in housing.