Adrian
Whoops
-
Adrian Harris

- Posts: 4906
- Joined: Thu Jul 12, 2007 10:46 pm
- Location: Berkshire (UK)
- Has liked: 1181 times
- Been liked: 1378 times
Whoops
3D printing is all well and good as long as you make sure there is enough resin in the vat before you start...
Adrian
Adrian
Contact me at sales@armortekaddict.uk for details of my smoker fan control module
-
John Wiggins
- Posts: 292
- Joined: Fri Jun 03, 2011 2:49 pm
- Location: North Staffordshire
- Has liked: 257 times
- Been liked: 147 times
Re: Whoops
Hi Adrian
That looks suspiciously like a Sherman drivers hatch?
The Quad is coming along, I’ve ordered the motion and sound packs, I’m enjoying the build enormously.
Thanks for passing on the kit to me.
Just need to source suitable batteries and battery charger, any thoughts?
Best regards
John
That looks suspiciously like a Sherman drivers hatch?
The Quad is coming along, I’ve ordered the motion and sound packs, I’m enjoying the build enormously.
Thanks for passing on the kit to me.
Just need to source suitable batteries and battery charger, any thoughts?
Best regards
John
-
Adrian Harris
- Posts: 4906
- Joined: Thu Jul 12, 2007 10:46 pm
- Location: Berkshire (UK)
- Has liked: 1181 times
- Been liked: 1378 times
Re: Whoops
Good spot John 
I'm glad you're enjoying the Quad, it's certainly quite a different beast to the tanks and halftracks.
I think the Quad is designed for a pair of 9Ah batteries, which sit against the rear wall. Whilst I am a fan of the LiFePO4 batteries, I think in this case the extra weight of the batteries over the rear axle will probably be more of a benefit, especially if towing.
For charging my lead acid batteries, I use a pair of Ctek MXS5 chargers, one on each battery. They are rated down to 1.2Ah, so should be suitable.
Adrian.
Contact me at sales@armortekaddict.uk for details of my smoker fan control module
-
Vince Cutajar
- Posts: 2148
- Joined: Wed Nov 15, 2017 1:43 pm
- Location: Malta
- Has liked: 717 times
- Been liked: 1700 times
Re: Whoops
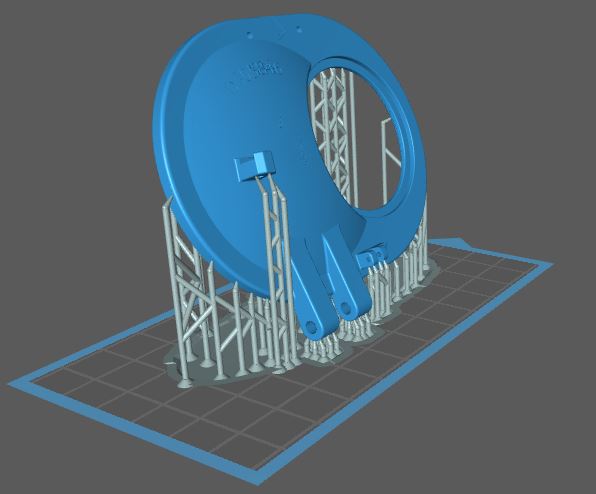
I guess there is a lot of waste in printing those supports. I have seen it many times that parts are printed at an angle when using liquid resin printers hence all those supports. What's the reason for printing at an angle?
Vince
Vince
-
Adrian Harris
- Posts: 4906
- Joined: Thu Jul 12, 2007 10:46 pm
- Location: Berkshire (UK)
- Has liked: 1181 times
- Been liked: 1378 times
Re: Whoops
It's a compromise between number of layers to print and the surface area which is cured on each level.
If you printed it horizontally, the printing time would be much lower but the force required to peel the newly cured layer from the FEP film would be tremendous, which might pull the whole print from the platform or deform the FEP film.
If you printed it vertically, then the separation force would be much lower but the print would require hundreds of layers, all of which take a set length of time, even if you're only printing a small area.
If you wanted to print multiple items, you could do them vertically and side by side, but it still might be quicker to print them individually but at an angle. That was the least angle I could use so that the print fitted within the confines of the print area. It's amazing how quickly you out grow these things, but the next size up have been promised for a while and have now slipped to November.
Adrian.
Contact me at sales@armortekaddict.uk for details of my smoker fan control module
-
Vince Cutajar
- Posts: 2148
- Joined: Wed Nov 15, 2017 1:43 pm
- Location: Malta
- Has liked: 717 times
- Been liked: 1700 times
Re: Whoops
Thanks Adrian. It all makes sense. Would it be possible to print horizontally on short supports?
Vince
Anycubic has got something larger than their own Photon S. Also they are already advertising their upcoming metal 3D printer.It's amazing how quickly you out grow these things, but the next size up have been promised for a while and have now slipped to November.
Vince
-
Robert E Morey

- Posts: 2253
- Joined: Wed Jul 18, 2007 12:59 am
- Location: Seattle, WA USA
- Has liked: 103 times
- Been liked: 701 times
Re: Whoops
Adrian,
Thats no fun to run out of resin.
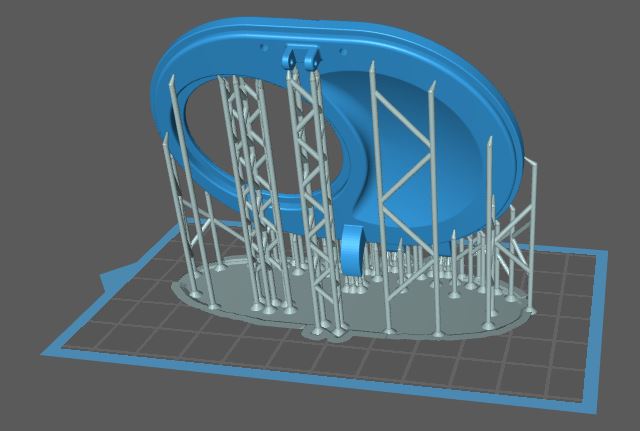
I've had excellent results printing my hatches nearly vertical. It does add some time, this one is about 7.5 hours. But I print the parts at night anyway so the time isn't a factor. I think it minimizes the chance of pulling off the build plate tho. It looks like your print you could reduce the number of supports. You really don't need that many, but they must be in critical locations - supporting the small islands.
Also have had pretty good results with water washable resin. So much easier cleanup!
Happy printing!
B
Thats no fun to run out of resin.
I've had excellent results printing my hatches nearly vertical. It does add some time, this one is about 7.5 hours. But I print the parts at night anyway so the time isn't a factor. I think it minimizes the chance of pulling off the build plate tho. It looks like your print you could reduce the number of supports. You really don't need that many, but they must be in critical locations - supporting the small islands.
Also have had pretty good results with water washable resin. So much easier cleanup!
Happy printing!
B
-
Adrian Harris
- Posts: 4906
- Joined: Thu Jul 12, 2007 10:46 pm
- Location: Berkshire (UK)
- Has liked: 1181 times
- Been liked: 1378 times
Re: Whoops
No, because as soon as the first full layer printed, the stiction to the FEP film would pull the layer off the supports.Vince Cutajar wrote: ↑Tue Oct 06, 2020 8:43 pmThanks Adrian. It all makes sense. Would it be possible to print horizontally on short supports?
About the only signal that things are going OK early on in the print is the clunk sound the machine makes as it separates the resin from the FEP film. No clunk means there's nothing left on the build plate. BTDT
Adrian.
Contact me at sales@armortekaddict.uk for details of my smoker fan control module
-
Adrian Harris
- Posts: 4906
- Joined: Thu Jul 12, 2007 10:46 pm
- Location: Berkshire (UK)
- Has liked: 1181 times
- Been liked: 1378 times
Re: Whoops
I'm still getting the hang of it and wanting to see how things are going, though that particular print ran overnight, so somewhat disappointing to wake up to.Robert E Morey wrote: ↑Tue Oct 06, 2020 9:15 pmBut I print the parts at night anyway so the time isn't a factor.
That was what Chitubox added. The previous run was of both hatches on the same job, but one came free of the supports and interfered with the other.Robert E Morey wrote: ↑Tue Oct 06, 2020 9:15 pmIt looks like your print you could reduce the number of supports.
How is that for brittleness ? I'm using an "ABS-Like" resin to try and impart a bit more usability. A common complaint from the miniatures guys is that the figures are not resilient enough to use for gaming, and that they shatter like glass if dropped.Robert E Morey wrote: ↑Tue Oct 06, 2020 9:15 pmAlso have had pretty good results with water washable resin. So much easier cleanup!
Adrian.
Contact me at sales@armortekaddict.uk for details of my smoker fan control module
-
Robert E Morey
- Posts: 2253
- Joined: Wed Jul 18, 2007 12:59 am
- Location: Seattle, WA USA
- Has liked: 103 times
- Been liked: 701 times
Re: Whoops
Hi Adrian,
I also like to see how things are going - but it takes a long time to be able to see anything. So I just turn it on to print and leave it alone. Always a disappointment to find nothing on the build plate, or a ruined print. Which for me has been rare -but does happen.
I recommend watching Ytube from guy named "3D printing Pro". His resin printing tips are great and especially about Chitubox supports. I rarely use the auto support function in Chitubox. It adds a lot of extra supports, but sometimes misses the critical start points. So I add my supports manually. So far great results.
The water washable seems to be about the same as "ABS like" for strength and brittleness. They are both brittle. I've chipped the "ABS like" parts by dropping them on concrete floor. I'd like to experiment with a tougher resin. For small detail parts I find them ok strength wise - time will tell if they hold up or get broken. I do find the water washable the support rods are not as strong as ABS like, so perhaps for thin sections it is not as good. I tend to add extra thickness in thin regions on my parts to help increase the strength.
One noticeable different with the water washable is it seems to be more sensitive to bed adhesion. Some things I've tried which help:
1) Space heater in the print room. The resin seems to like warmer than 70F. Not been a problem with ABS like.
2) No windows open or air movement of any kind
3) Clean build plate with mild abrasive like baking soda. This seems to help give anodized plate a little tooth.
4) Double check level of machine. Mine was out a tiny bit and prints had a very noticeable layer shift (bend) in the parts. Re-leveling fixed the issue. Small parts tended to start peeling off, or come off completely.
5) Increasing the raft size to 110-120% of part size.
Till next time...
B