Tiger Ausf E “F01” Gruppe Fehrmann

Forum for discussion relating to Tiger 1, Mid, Early, Late Production and Sturmtiger
Post Reply
User avatar
AlastairCooke
Posts: 202
Joined: Tue Jul 16, 2019 9:59 am
Has liked: 8 times
Been liked: 595 times

Re: Tiger Ausf E “F01” Gruppe Fehrmann

Post by AlastairCooke »

Hi All,
Quick update: 31 Jan 24
Weathering tool handles...
20240129_084411-doc.jpg
Just used a range of oil wash colours and allowed them to soak into the wood. Will finish them off with some satin varnish later.

Revised Top Deck
My plan had always been to replace the aluminium top deck with a steel one so that it could be secured with magnets rather than countersunk screws.
top plate laser cut v3.jpg
Took while to design, as I needed to locate additional holes for the lamp and S-mine bases as well for the prototypical tool and cable/rod clamps. Notice that the plate is laminated to give slots for the weld detail and allow smaller holes to be cut with a laser.

Engine Bay Side Plates and Fan Drive Gearboxes
Primed ready for base coat of Hellgrau - RAL7009 (Light Grey [AKInteractive Real Color RC054])...
20240131_085241-doc.jpg
20240131_085457-doc.jpg
Base coat applied, ready for some weathering...
20240131_130317-doc.jpg
20240131_130232-doc.jpg
Oil filler pipes will be fitted when gearboxes are mounted to the side plates.

That's all for now...
Alastair
Tiger 1 (2015 #01 with 2012 parts)

User avatar
AlastairCooke
Posts: 202
Joined: Tue Jul 16, 2019 9:59 am
Has liked: 8 times
Been liked: 595 times

Re: Tiger Ausf E “F01” Gruppe Fehrmann

Post by AlastairCooke »

Hi All,
Update 7 Feb 24
Lower Fuel Tanks
Decided to ‘go to town’ on these. Even though they will only be visible with the engine removed it is good practice for when I get around to painting the engine itself. Painting began with shades of grey applied over a black primer. I tried a technique suggested by ‘Boomer’, from the You Tube Channel ‘River Railroad’, which is heavily thinned Tamiya paint airbrushed at high pressure:
20240202_111654-doc.jpg
I have tried to enhance the volume by graduating the shades: lighter near the top and front, darker at the bottom and rear. Next, some oil ‘dry brushing’, again darker at the bottom and lighter at the top. Note that the scrubbing action has worn off some of the paint allowing the primer to show through for a rather pleasing effect...
20240203_140324-doc - Copy.jpg
20240203_140324-doc - Copy.jpg (134.17 KiB) Viewed 908 times
Citadel wash (‘Devlan Mud’) added as a glaze to make the straps stand out. The valve body and strap joiners were dry brushed with Citadel Dry Colour (‘Necron Compound’) for the same reason. I will now add the plumbing before applying a matt varnish and some washes...
20240206_094713-doc.jpg
In situ with mock balance pipe fitted...
20240207_100401-doc.jpg
20240207_105731-doc.jpg

Engine Bay Side Plates
These were weathered using enamel and oil washes...
20240203_140432-doc.jpg
They now need a coat of matt varnish before some chipping and the addition of the fan drive gearboxes.
I gave the gearboxes an oil wash...
20240204_105403-doc.jpg
The darker wash has accentuated the details and the brown wash looks like oil stains.

That's all for now...
Alastair
Tiger 1 (2015 #01 with 2012 parts)

User avatar
AlastairCooke
Posts: 202
Joined: Tue Jul 16, 2019 9:59 am
Has liked: 8 times
Been liked: 595 times

Re: Tiger Ausf E “F01” Gruppe Fehrmann

Post by AlastairCooke »

Hi All,
Update 16 Feb 24
Right hand engine bay side plate is now complete and ready for installation. I shall fit the oil filler pipe later when I have checked the length to make sure it does not foul the engine cover plate...
20240216_140744-doc.jpg
20240216_140815-doc.jpg
Plate installed...
20240216_150326-doc.jpg

Test fit of revised steel top deck...
20240216_114227-doc.jpg
The steel sheets have a slight bow that will need to be removed before they can be bonded to together. Note that I have added a ring on top. I have included this as I thought it would be easier to countersink on my mill. The ring will be hidden by the turret.

That's all for now...
Alastair
Tiger 1 (2015 #01 with 2012 parts)

User avatar
AlastairCooke
Posts: 202
Joined: Tue Jul 16, 2019 9:59 am
Has liked: 8 times
Been liked: 595 times

Re: Tiger Ausf E “F01” Gruppe Fehrmann

Post by AlastairCooke »

Hi All,
Update 5 Mar 24
Had some issues with the ‘homebrew’ turret controller. Not sure what, but ended up frying the microcomputer and permanently disabling the motor controller. I have decided to re-build it using the Sabertooth 2x12 R/C cannibalised from the (Red Box) Motor Control B (module) along with an Arduino Nano Every. The 2x12 has an onboard 5V (1A) BEC that should be able to power the microcomputer and the encoder so eliminating the need for a dedicated voltage regulator. In addition the Nano Every has the capability to use hardware interrupts on all digital pins which should simplify the coding.
20240227_144045-doc.jpg
20240228_165531-doc.jpg
Had some interference between the motor power cables and the RC signal cable feeding the Sabertooth. (The interference caused sporadic and unreliable motor motion. This happened in the previous set up as well. So part of the original problem was probably a result of poor cable routing). I rerouted the cables and now have steady motion.
20240305_142539-doc.jpg
Rotation motor installed...
20240305_122318-doc.jpg

Top deck
The two 1.5mm steel sheets bonded together after some judicious bending and hammering to minimise the bow:
20240227_130110-doc.jpg
Note use of front hatch rings, M3 bolts, and M5 bolts to help alignment.
A bit of pressure applied while the 3M bonding tape adhesive cures. Can take up to 72 hrs!
20240227_134313-doc.jpg
20240227_134313-doc.jpg (135.87 KiB) Viewed 646 times
Deck with ring epoxied in place and sprayed with Isopon Zinc 182 Rust Inhibiting primer. Things have got a little tight and I had to skim 2mm off the rearmost edge of the turret bearing to ease the fit.
20240304_111450-doc.jpg
20240305_100053-doc.jpg
Note that the front weld has been completed and how the two sheets work together to produce a trough for the side welds. The regularly spaced holes in the lower sheet should help the weld to grip. I have not decided whether to use Milliput or go for a 3D printed part. The printed part may be more robust but will not match the other weld detail.
That's all for now...
Alastair
Tiger 1 (2015 #01 with 2012 parts)

User avatar
AlastairCooke
Posts: 202
Joined: Tue Jul 16, 2019 9:59 am
Has liked: 8 times
Been liked: 595 times

Re: Tiger Ausf E “F01” Gruppe Fehrmann

Post by AlastairCooke »

Hi All,
Update 24 Mar 24
Top Deck Details - Part 1
Lamp Housing
As F01 had only one lamp housing fitted, another baseplate was required. This was sourced from Steve Winstone and milled out to accept the contact plate.
20240318_165218-doc.jpg
20240318_165218-doc.jpg (67.73 KiB) Viewed 498 times

Top plate tapped to accept M2 hex bolts for the lamp bases and S-mine mounting plates. The holes for the hatch hinges will be tapped for M4. I plan to attach the hinge mounting with flat bottomed grub screws and epoxy adhesive to so that I can represent the cone bolts that were used on the full size vehicle.
20240319_120538-doc.jpg

Weld Details
Filled slots with Milliput to represent the weld that joins the two halves of the top deck plate...
20240322_073032-doc.jpg
Side weld detail was also added with Milliput into a slot created using an Evergreen Styrene angle...
20240321_082136-doc.jpg
20240321_082201-doc.jpg
Masking tape was used to prevent Milliput from sticking to the hull side plates and support rails...
20240322_125722-doc.jpg
Finished look, just need to do the other side.
20240324_082608-doc.jpg
That's all for now.
Alastair
Tiger 1 (2015 #01 with 2012 parts)

Tim Carr
Posts: 171
Joined: Sat Jun 08, 2019 4:43 am
Has liked: 1518 times
Been liked: 89 times

Re: Tiger Ausf E “F01” Gruppe Fehrmann

Post by Tim Carr »

Really like how you did that, nice.

Later Tim
Tampa Bay, Fla area USA.

User avatar
AlastairCooke
Posts: 202
Joined: Tue Jul 16, 2019 9:59 am
Has liked: 8 times
Been liked: 595 times

Re: Tiger Ausf E “F01” Gruppe Fehrmann

Post by AlastairCooke »

Hi Tim,
Thanks for the complement. Time will tell if this is a durable solution to modelling the side welds. Next task is to install all the fittings on the hull roof. When I need a change of pace I will fit the Beier USM-RC2.

Alastair
Alastair
Tiger 1 (2015 #01 with 2012 parts)

User avatar
AlastairCooke
Posts: 202
Joined: Tue Jul 16, 2019 9:59 am
Has liked: 8 times
Been liked: 595 times

Re: Tiger Ausf E “F01” Gruppe Fehrmann

Post by AlastairCooke »

Hi All,
Update 14 Apr 24
S-mine and lamp base plates epoxied in place with some weld detail added...
20240326_101158-doc.jpg
Magnets added to front supports...
20240414_104450-doc.jpg
20240414_104504-doc.jpg
Will probably add a third magnet

Front hatch lower hinges fitted...
20240414_104644-doc.jpg
20240414_105546-doc.jpg
Engine cover
I decided that my replacement engine cover which was cut from a 3mm thick sheet of aluminium could be improved by adding a 1mm sheet on the underside to help mimic the milled edges of the original. This idea led to a complete overhaul of the design to incorporate the locks and a repositioned and resized front slot that better matches the prototype. The interior lock details have been replicated, as my F01 will have a fully detailed engine compartment.
Plasticard mock-up to see if the added thickness looks out of place (1mm + 2mm + 1mm)...
20240414_140014-doc.jpg
20240414_140014-doc.jpg (77.38 KiB) Viewed 318 times
20240411_141829-doc.jpg
20240411_141829-doc.jpg (87.5 KiB) Viewed 318 times
I decided that the front slot should be narrower. Note the larger diameter hole in the lower sheet; designed to provide a slot for a mock weld.

CAD images, created in preparation for some laser cutting and 3D printing...
engine cover top.jpg
engine cover bottom-v2.jpg
Note that the internal valve mechanism will not be included as it would probably have been removed when the snorkelling capability was dropped.
That's all for now...
Alastair
Tiger 1 (2015 #01 with 2012 parts)

User avatar
AlastairCooke
Posts: 202
Joined: Tue Jul 16, 2019 9:59 am
Has liked: 8 times
Been liked: 595 times

Re: Tiger Ausf E “F01” Gruppe Fehrmann

Post by AlastairCooke »

Hi All,
Quick Update 18 Apr 24
(Progress on several fronts)
Engine
A change of scene...having put Ivan’s HL230 kit aside for more than a couple of years(!) and with the engine bay nearly complete I was ready to continue that build. Following advice from a fellow model club member, my first task was to enhance the core plug detail on the engine block. This required Plasticard discs of 10mm diameter, which are too small for a rotary cutter but too large for the standard micro punch and die sets.
20240416_111609-doc.jpg
Therefore, I made my own punch and die using some scrap aluminium bar stock and brass rod...
20240416_103902-doc.jpg
Surprisingly this cut neat discs in 20 thou Plasticard. (I am not sure how quickly the aluminium die will wear but I need only about 20 discs.)
20240416_095503-doc.jpg
Modified engine block - before (with the circular indentations trimmed by hand using 10mm end mill)
20240416_115129-doc.jpg
After, with plug detail added. Bottom right one needs a little filler...


Mesh Screens
D.W. to Tiger 1 shows images of Fgst.Nr.250031 (Nov 42) when it arrived at Aberdeen Proving Ground and Fgst.Nr.250122 (Tiger 131 Feb 43) when it was repaired after its capture. There is no evidence of any mesh screens on 250031 however; they are present on 250112. This suggests that the hull of F01 (Fgst.Nr.250158) would have been supplied with the screens installed. An image of F01 taken after it was knocked out that clearly shows a badly bent left radiator inlet screen provides evidence that it had the screens when it went into action in April 1945.

It is my view that these screens were not sufficiently robust to withstand 2 years of driver training and would have been removed. In addition, images of Stadtgas powered Tiger 1s show that the four compressed gas cylinders were fitted over the radiator grill work (two on each side) so that the engine hatch could still be opened. Installation of the cylinder support brackets would have been much easier without the screens. I am going to assume that the screens were refitted when F01 was converted back to use petrol rather than Stadtgas. It is highly unlikely that the original screens would be used, more likely they were taken from a donor vehicle: perhaps the one that supplied the turret (possibly Fgst.Nr.250245 or 250273). Consequently, the screens will be painted in a different ‘shade’ of Dunkelgelb and may even have remnants of a red brown and green camouflage.


More Research
I have decided to have another go at identifying the donor vehicle for F01’s turret. As it is an early version but with the final configuration of track link stowage it comes from a vehicle with a Fgst.Nr. in the range of 250192 (week of 17 Apr 43) to 250391 (introduction of new turret). During this period, 7 Tigers were issued to Pz.Ers.Abt. 500 at Paderborne, one on 27 May 43 and six on 6 Jun 43. Therefore the possible range shrinks to between 250192 and 250280 (week of 29 May 43) of which 48 out of a possible 89 have been identified. These include 250245 and 250273 for which there is photographic evidence that they were used for training. As Fgst.Nr.250245 was completed in the week of 15 May 43, I am assuming that this is the vehicle issued to Pz.Ers.Abt. 500 on 27 May 43. Likewise, Fgst.Nr.250273, completed in 29 May 43, was one of the six received in early June. Many of the tigers produced in the second half on May 43 went to s.Pz.Abt 502 who received eighteen in week of 15 May 43, thirteen in week of 22 May 43 and seven in week of 29 May 43. Of the 30 vehicles completed in the weeks of 22 May and 29 May 43, only 11 have been identified of which 250256, 250259, 250263 and 250268 were issued to s.Pz.Abt 502. If it is assumed that the intervening Fgst.Nrs. formed part of the same batch then a further nine can be allocated. Likewise, if the other five Tigers issued to Pz.Ers.Abt. 500 were part of a batch containing 250273, we can imagine that these vehicles might have been taken from the remaining vehicles completed in week of 29 May 43: that is 250269, 250271, 250274, 250276 to 250278 and 250280.

The other area of fruitful (?) speculation is working out how 250158 was selected for Tiger-Gruppe Fehrmann. When the Panzer-Lehr-Abteilung was formed at Bergen it had 6 Tiger 1s all of which appear to have formed the Gruppe (F01, F02, F03, F04, F05 and F13). By early January 1945, twenty three Tiger 1s had been issued to Pz.Ers.Abt. 500 at Paderborn but only eighteen were available to form Panzergruppe Paderborn in 28 Mar 43. Similarly only two of the three Tiger 1s sent to Putlos in Mar 43 were available to form Panzer-Lehr-Abteilung Putlos in April 45. The difference neatly matches the number at Bergen and so I think it is not beyond the bounds of possibility that five Tiger 1s from Paderborn and one from Putlos were sent to Bergen. Either way if 250158 was used at Putlos or Paderborn in the period March 43 to early 1945 there is an explanation for it being available for service in Gruppe Fehrmann.


Front Hatches
Started to detail the front hatches by adding the hinge bolt detail...
20240417_184743-doc.jpg
20240417_184802-doc.jpg
These images highlight the need to add some Mr Surfacer to hide the print lines.


Functional Locking Bolts
The tow cable, track cable and gun cleaning rod holders all feature locking bolts that have wing nuts. I wanted these to be functional which necessitated the creation of eyelet bolts. These have been made by threading 3D printed brass parts...
20240417_131720-doc.jpg
20240417_141233-doc.jpg

Roof Detail-Front
Have added small headed M2 bolts to simulate the bolts that were used to secure the S-mine launchers and the lamp bases...
20240418_115344-doc.jpg
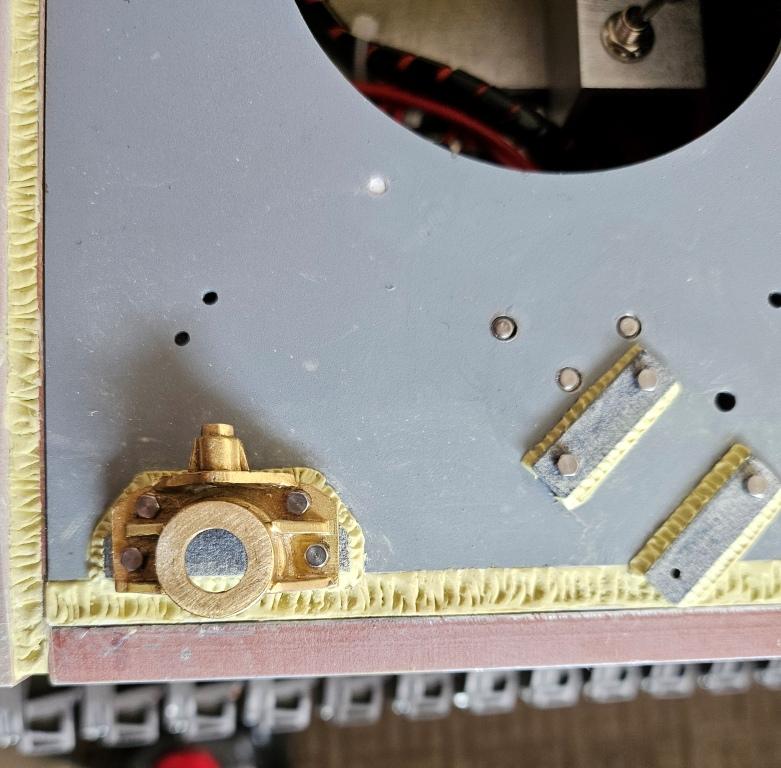
20240418_115344-doc.jpg (76.22 KiB) Viewed 249 times
Had a go bending some thick-walled 2.0mm tubing to represent the electrical conduit that fed the front lamps. This was made much easier by annealing the brass with a hot air gun set to 650 degC!
20240418_160006-doc.jpg
20240418_160042-doc.jpg
Quite a productive week...that's all for now.
Alastair
Tiger 1 (2015 #01 with 2012 parts)

User avatar
AlastairCooke
Posts: 202
Joined: Tue Jul 16, 2019 9:59 am
Has liked: 8 times
Been liked: 595 times

Re: Tiger Ausf E “F01” Gruppe Fehrmann

Post by AlastairCooke »

Hi All,
Update 11 May 24
Front sponson weld completed...
20240428_171809-doc.jpg
Note that I have filled the groove that I milled into the side plate right at the beginning of the build. Looks like more work is needed to hide the fasteners used to secure the sponson plates and roof support.

Rear engine bay cover...
20240429_091039-doc.jpg
I had to design a replacement part as I have moved the radiator grills further apart to get a more scale appearance at the hull sides. I have no idea about the size and shape of the aperture cut into this later pattern cover. It does not matter as the cover plate will be fixed in position.
Trial fit of engine cover support frame with countersunk fasteners...
20240503_090038-doc.jpg
Trail fit of rear cover to assess required length of squared head bolts...
20240503_091249-doc.jpg

Continuing to detail the hull roof exterior...
20240511_092626-doc.jpg
Hatch rings, vent base, lamp conduit boss and axe holder secured in place...
20240511_092703-doc.jpg
That's all for now...
Alastair
Tiger 1 (2015 #01 with 2012 parts)

Post Reply