Page 1 of 1
Dave's Elefant Build
Posted: Wed Jul 25, 2018 9:19 am
by Dave Jones
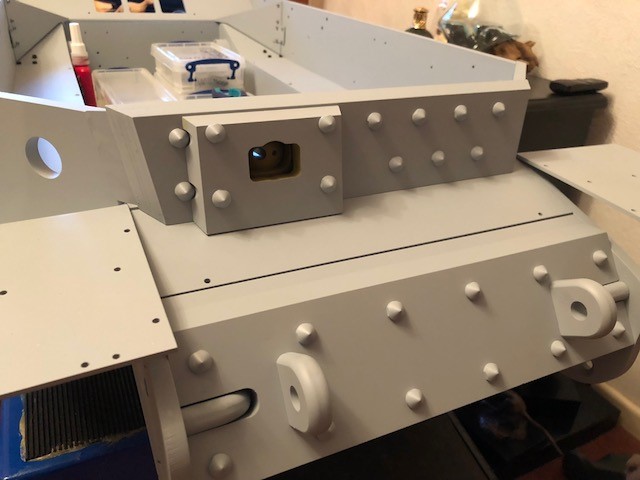
- Elefant Hull Front 2.jpg (53.06 KiB) Viewed 10070 times
It's an ugly brute for sure, almost gothic from some angles. Anyway, I'm really enjoying my first Armortek tank build, this will not be the fastest build in Armortek history (
Steve managed two in about the same amount of time as its taken me to assemble the hull), but I knew from the outset that this was going to be a long project for me. So onwards, a few more components to attach and then it's on to weld detail before red primer and Tamiya TS-3 on the underside. That assumes I have the strength to turn the blinking thing over!

I'll continue to post project updates as I (
slowly) progress.
Dave.
Re: Dave's Elefant Build
Posted: Sun Jul 29, 2018 12:06 pm
by sean kerambrun
All progress is good Dave
Re: Dave's Elefant Build
Posted: Wed Aug 01, 2018 8:45 am
by Dave Jones
Over the last weekend I encountered an issue with my Elefant which I hope I have solved correctly. I was attaching the front fender support brackets CR0641 & CR0641M and was referring to the instructions in section 24 Front Details. This calls for 1 M3x20 Button HD and M3 nut to fix the brackets to CR0104 Hull Plate, so no problem there. However, I can't see that the instructions tell you what fixings to use to affix the bracket to the fenders. The only clue I can find in the instructions is that shown just above the illustration of CR0602 Front Applique are a row of 3 'mysterious' fasteners without any identification. I got out my reference material and noticed that on the real vehicle when viewed from above there were only a row of very small 'bolt'? heads showing in the fender 'channel', so using a fastener (
or nut for that matter) that had a large head or profile was quite wrong. After much head scratching it dawned on me that the holes drilled in the fender supports are actually smaller that those in the fender itself. So my solution was to use M3x8 Button HD fasteners (
those used to assemble the upper hull) screwing them up from the underside of the fender and allowing them to self-tap into the holes in the support bracket. There was plenty of material for the threads to grab onto and to me the look was spot on.
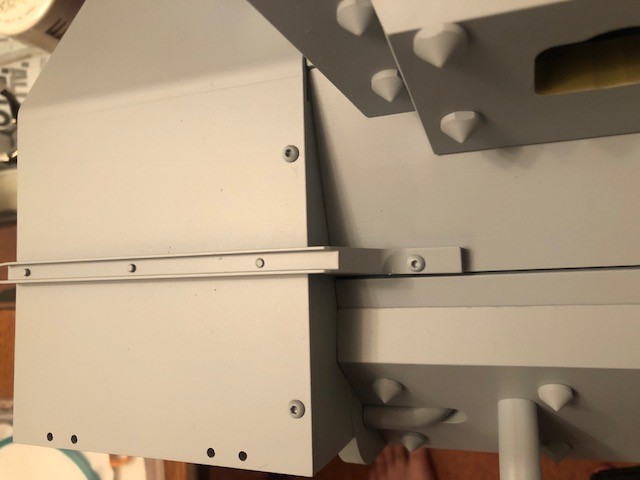
- Elefant Front Fender.jpg (37 KiB) Viewed 9799 times
I have no idea if I've called this right, but I'm pleased with the result. This may help other Elefant builders in the future. Also perhaps Kian or Monique could confirm if my 'guess' on which fasteners to use was correct. If it was, I'm on a roll and will head out and buy a Lotto ticket.

Dave
Re: Dave's Elefant Build
Posted: Wed Aug 01, 2018 6:00 pm
by Steve Norris
Hi Dave.
Seems like the correct solution to me, the only thing I would say is that using a m3 tap for the holes would have been even better.
Regards
Steve
Re: Dave's Elefant Build
Posted: Wed Aug 01, 2018 6:44 pm
by Dave Jones
Thanks Steve
Point taken. Unfortunately I’m a bit of a inexperienced Luddite when it comes to this type of build. Anyway, all appears very solid and it looks ok. Mind you, if I’ve used the wrong fasteners I’m going to be six short somewhere else. Oops!
Dave.
Re: Dave's Elefant Build
Posted: Sat Aug 04, 2018 9:08 pm
by Dave Jones
A bit more progress, this time on the rear. Ended up spending quite a bit of time removing the tooling/machining marks from the exhaust box. I know it will end up with a toolbox and zim covering most of it, but it seemed worth the effort nonetheless.
Even though I’m not quite ready to add the weld detail I simply had to deal with the gap on the upper front hull, for some reason it was really bugging me. That’s better.
Time for a cold beer.
Dave
Re: Dave's Elefant Build
Posted: Thu Aug 09, 2018 10:49 am
by Dave Jones
This is probably a little early in the build to be looking at this, but I have been giving the final paint scheme some thought. I’m intending to build the surviving ‘102’ and have been researching the details of this specific vehicle, in particular the camouflage that was applied while in service in Italy. Most reference material indicates that all Elefant’s received the standard dunkelgelb with red brown and green overspray. However, this has troubled me regarding ‘102’ because the pictures taken at the time of its capture don’t appear to show the red brown and green camouflage. I know b&w photos are notoriously hard to interpret but even so the vehicle looks plain. To support this observation, I found a colour illustration in Karlheinz Münch’s excellent book Combat History of Schwere Panzerjäger 653 that shows ‘102’ in an overall dunkelgelb finish with just an extremely light ‘misting’ of very small red brown patches.
So the purpose of my ramblings to to ask if anyone out there has any definitive info on the colour scheme of this vehicle? Any feedback would be appreciated.
Dave.
Re: Dave's Elefant Build
Posted: Sun Nov 11, 2018 4:24 pm
by Dave Jones
After several weeks of work getting in the way of Elefant building, finally at bit of progress. The first of the six bogey assemblies is cleaned, fettled, test assembled and operating smoothly.
Time to get on with the other five. Once they are all dry assembled to my satisfaction I’ll set them aside ready for primer and painting.
There really is something very satisfying about assembling these superbly engineered sub assemblies. Thanks Armortek for providing kits that provide so much pleasure.
Re: Dave's Elefant Build
Posted: Sun Nov 11, 2018 4:49 pm
by RCSparks
What an awesome build you are doing. I have been following your build since I wanted to learn about this kit too! you really hit the nail on the head.. Armortek did SUCH an awesome job on the machining and attention to detail. I like that you have left your suspension aluminum (thus far). They look so amazing this way.. and really let one appreciate what they are looking at. I find it difficult to paint this machine..

Re: Dave's Elefant Build
Posted: Sun Nov 11, 2018 7:20 pm
by Dave Jones
Thanks for the kind words. There are many on this forum with ability and skills I can only dream of, but still I hope to do the kit a degree of justice.
You’ve probably seen that like you this is also my first Armortek build so it’s a true voyage into unknown territory. It’s going to take probably several years for me to finish, but so what? It’s all about enjoying the build as much as it is running the finished vehicle in my book.
I’ll keep following your build progress with great interest.
Dave
Re: Dave's Elefant Build
Posted: Sun Nov 11, 2018 7:27 pm
by Christoffer Ahlfors
RCSparks wrote: ↑Sun Nov 11, 2018 4:49 pm
I like that you have left your suspension aluminum (thus far). They look so amazing this way.. and really let one appreciate what they are looking at. I find it difficult to paint this machine..
Agree - I fully support you! I have friends who have expressed frustration with the fact that my unpainted model gets much more attention than their painted and better detailed models. It's UNFAIR!