Page 1 of 2
David grays gallery
Posted: Mon May 05, 2008 10:51 pm
by Dale jordan
Great new photos of your late tiger1 on your gallery. David your model looks amazing .. I like the damage to the side fenders . It realy brings the model to life , when the tracks go on and the tiger looks so much bigger . You are at a good stage of the build now . I look forward to seeing her sitting down on the suspension ... Dale
Posted: Tue May 06, 2008 12:54 am
by Tim Bowman
I second Dale's comments.
Dave,
Looks amazing!

As always, thanks for sharing the photos.
Tim
Posted: Tue May 06, 2008 9:14 pm
by David Gray
Hi Dale and Tim. thanks for your comments , i agree dale
the tank looks so much bigger with the tracks on, i,m quite
pleased with the results up to now. i,m just building the other
track then i can sit it on its suspenion. Then i need to decide
if i am going to camo the wheels.
Dave
Posted: Tue May 06, 2008 11:49 pm
by Dale jordan
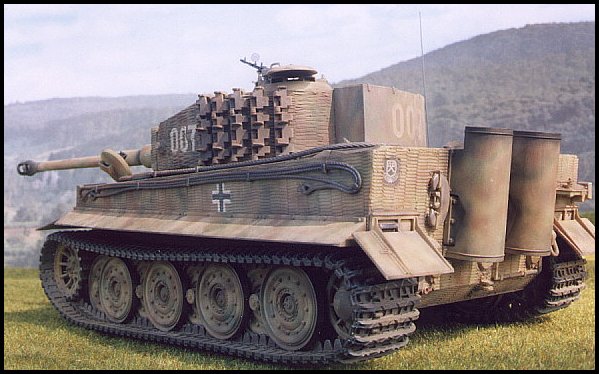
Hello David ... Here is a nice paint job for you to check out . If the camo was applyed in the field they would not have worried about painting the wheels I'm shore they did not have pressure cleaners back then . Dale
Posted: Wed May 07, 2008 9:41 am
by Kent Wiik
Yes David, your Tiger looks stunning!
Don´t agree with Dale.
There are clear ww2 photo evidence of non schurtzen tanks, like the Tiger, had the wheels painted in colours like the rest of the tank.

In field applied.

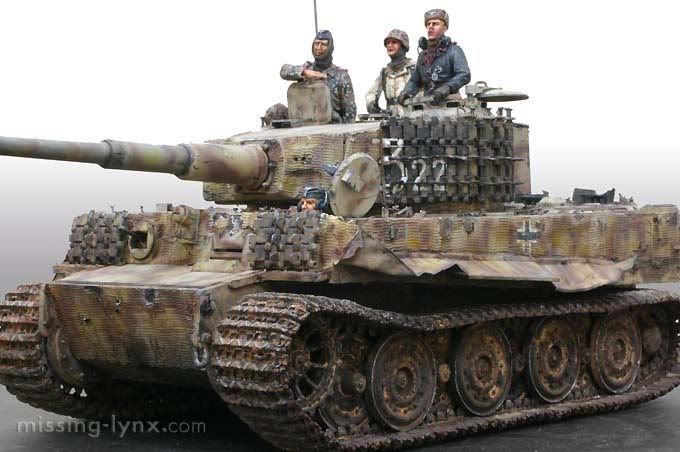
SS101 on road march to Normandy.
As I know David will do SS101 #009 so here is a good one as reference:
More here:
http://missing-lynx.com/gallery/german/jbtlate.htm
Please note the builder has missed that #007 was a command Tiger...

Cheers
Kent
Posted: Wed May 07, 2008 7:31 pm
by David Gray
Hi Dale and Kent ,thanks for your comments , the paint job on
the model looks realy good. I have just purchased
Tigers in combat 11 by Wolfgang Schneider, and in it is a
colour drawing of 009 with camo wheels so i will probably
go with camo on the wheels with some weathering. I will camo
them at the weekend and put a photo in the gallery and see what
you all think.
regards Dave
Posted: Wed May 07, 2008 8:06 pm
by Tim Bowman
Hi all
Funny, I had pulled that same series of pictures of 007 model for reference for my Normandy late Tiger as well.

I figured the builder knew something I didn't about that specific command tank.

David
I look forward to your pictures.
regards
Tim
Posted: Wed May 07, 2008 10:26 pm
by Allan Richards
Dave,
A very nice model that will look superb in the selected colour scheme. A gentle touch with the camo on the wheels and some genuine mud will make it look the business. I went to a lot of trouble painting the tracks but if you run the model a bit the paint comes off the treads quite quickly so its not really worth painting these. The new tracks have a more realistic dull finish anyway.
Allan
Posted: Thu May 08, 2008 7:42 pm
by David Gray
hi Allen, i agree , a gentle touch with the airbrush will look
better than heavy solid colours ,and i think i will leave the tracks
as they are
Dave
Zimming
Posted: Fri May 09, 2008 8:20 pm
by Mike Cooper
Hi David,
I noticed on your gallery that you have applied additional bolts and tab washers to your wheel hubs, I was contemplating adding this missing feature and on seeing your photo's it shows that it is definitely worth the extra effort.
I'm getting to the stage now with my Late Tiger that I need to start applying weld seams and Zimmerit. I bought Mike Stannard's Zim tools and have practiced with various mediums to try and perfect the art of 'zimming'. Can you tell me what medium you use for your Zimmerit and what tool do you use as your application looks perfect from your photos.
Keep up the good work.
Best regards,
Mike Cooper
Posted: Fri May 09, 2008 9:21 pm
by David Gray
Hi Mike thanks for your comments, i used Mike Stannards
zim tool 2 and plastic padding car body filler. A lot of peaople
dont like this and prefer to use milliput ,but i found this very
difficult to work with and could not get the result i was looking for
you get a much finer finish with the body filler and works very well
with the zim tools , and is much cheaper . try experimenting with
different mediums talked about on this forum and the archive forum
and see what works best for you
The wheels are definitely worth spending some time on , i used
B.A nuts and bolts for the hubs.
regards Dave
Posted: Fri May 09, 2008 10:28 pm
by Tim McCarthy
G'day David
Great looking hull.
The plastic padding car body filler what brand is that?
Did you apply it over the base metal or etch primer?
Tim
Posted: Mon May 19, 2008 8:10 pm
by David Gray
Hi Tim ,Plastic Padding is the brand, i suppose car filler is much
the same worldwide what ever brand
i applied the filler onto bare metal , rubbed downe first with 180 grit papper
Dave
Posted: Wed May 28, 2008 3:45 pm
by Mike Cooper
Hi David,
You mentioned that you used B.A nuts and bolts for the hubs. I've trawled the internet for small B.A. bolts and come up with nothing. Could you tell me the web address for the supplier you used and a link to someone who sells the taps for such small bolt holes.
What size B.A. bolts did you use on your hubs ?
Best regards,
Mike
Posted: Sat May 31, 2008 8:27 pm
by David Gray
Hi Mike sorry its took so long to get back to you,
you can get the nuts, bolts and taps from eks supplies
i used 6BA nuts and bolts with one size smaller head [ 7BA]
and 9BA for the locking tabs , i also changed the outer wheel
bolts for M3x12 bolts and m3 nuts , if you need more detailed
info send me a pm
regards Dave