Page 1 of 2
tow bracket
Posted: Mon May 17, 2010 8:14 am
by Martin Diessel
Good morning, I have somewhere seen a drawing with dimensions of the rear tow bracket. But now I cannot find it anymore. Can someone help me?? Martin
Posted: Mon May 17, 2010 5:40 pm
by Roland Mann
Hi Martin,
here it is :
[/img]
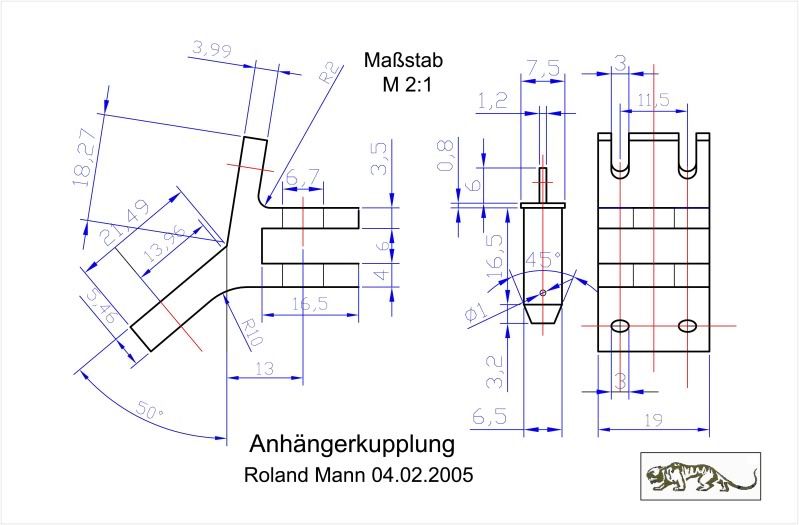
Viel Spaß - enjoy it - Roland
Tow Hitch
Posted: Mon May 17, 2010 10:25 pm
by Steve Stuart
Martin, I wish I had thought to ask this question and to have got Rolands answer a month ago. I had just taken delivery of my milling machine and so I thought that this would make a good introduction to how to use the machine.
I used all the books I could find with pictures of the tow hook and using the original white metal hook from the early tiger for the basis. I have produced one out of aluminium, I still have the large boss on the inside, same as the original, so as to beef it up, just in case I want to tow some thing in the future!
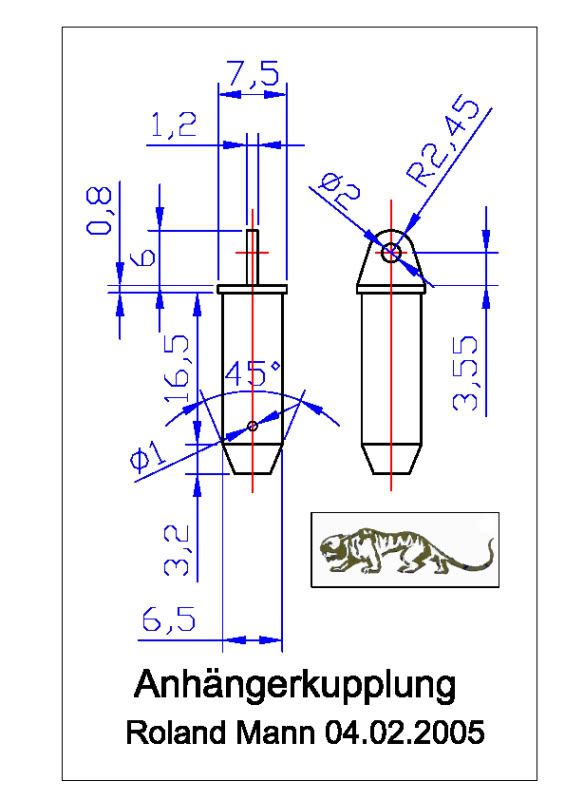
My further question is there further information as to what the top of the tow pin looks like?
Many thanks
Steve
Posted: Tue May 18, 2010 3:13 am
by Martin Diessel
Hi Robert, that is exactly that I was looking for--now I must find someone to make it for me! Thanks Martin
Posted: Tue May 18, 2010 4:42 pm
by Roland Mann
Hi Steve,
and here is the bolt as you wish.
[img][img]
http://i95.photobucket.com/albums/l134/ ... 1Kopie.jpg[/img][/img]
Roland
Posted: Tue May 18, 2010 10:27 pm
by Steve Stuart
Roland
Many thanks!
Steve
Tow bracket
Posted: Tue May 18, 2010 11:43 pm
by Joe Boylan
Hi Steve:
I made some of these out of 316 s/s and they turned out great - the picture doesn't have the slots and holes. I water jetted them - they have a slight under cut where they fell out but thats on the back and will never be seen. Since they are out of s/s they are very strong.

Joe
Posted: Wed May 19, 2010 12:00 am
by Fabrice Le Roux
Hi Joe,
I was digging around my notebooks for those dimensions I sent you in 2008, did you use them for your drawing? They were taken straight off "131" but it would be interesting to see if any variations crept in to the later models.
You and Roland have done a great job!
cheers, Fabrice
Tow Brackets
Posted: Wed May 19, 2010 1:38 am
by Joe Boylan
Hi Fabrice:
Actually I used Roland's drawings, I lost yours and Roland had sent me his. I converted all measurements to decimal for ease of making a dfx file for our water jet. We are now learning Solid Works 3D and what a difference, it would have converted it for me.
Joe
Posted: Wed May 19, 2010 4:21 am
by Brown Hawkins
Is this a new item you will offer for sale? Put me down for one! It looks very nice.
Brown
Posted: Thu May 20, 2010 2:56 am
by Brian Leach
Martin,
I have finished making the pattern and tomorrow I am going to cast the Anhängerkupplung. I will than mill it and send it out to you.
I thought I would include a couple of pictures to give you an idea of what I am doing.
The casting will be of Aluminum. I used plans Roland gave me a year or so ago (THANK YOU), but I also referenced pictures posted on the net, especially those of Vince Abbot (thank you to you too!).
This is one of the pictures of the Bovington T1 Anhängerkupplung

As you can see, it is not flat, but has a draft as a result of the casting process.
Here is a photo of my pattern

If anyone has critisizims (not the spelling please!) please feel free
If you are interested in one let me know
Thanks for watching
Brian
Posted: Thu May 20, 2010 8:58 am
by Sarah Frazer
Hi Brian,
I'd be interested, how much would they be?
Regards,
Sarah
Posted: Thu May 20, 2010 3:52 pm
by Brian Leach
Hello Sarah,
I feel $45, mailing included in the US, would be fair.
Shipping to other countrys would be extra.
This would be for regular mail.
Okay?
Thanks, Brian
Posted: Thu May 20, 2010 10:06 pm
by Brian Leach
Hello again,
I have made the castings
Here they are fresh out of the flask. ( I also cast some backing plates fro the PIII Schwingarmen I am making)

This is another picture of the Anhängerkupplung

I will mill these tonight and have them ready to ship in the morning
I thought it would be fun to post a picture of the furnace I use to melt the Aluminum. It is not fancy, but it almost gets hot enoughto melt iron. It is powered by charcoal brikets and a hair dryer


the hole in the middle is the vent for hot gasses. The silver in there is the molten Al.
I hope you enjoyed
Later gater

Brian
Posted: Thu May 20, 2010 11:40 pm
by Rocky Sembritzky
Brian,
You live in Arizona, wait a month and you will not need the charcoal

Rocky