PIII Schwingarm
-
- Posts: 363
- Joined: Tue Nov 18, 2008 4:15 pm
- Location: Auburn, Wa USA
- Been liked: 3 times
PIII Schwingarm
I have been attempting to cast Aluminum Schwingarms for the PIII.
I thought I would boor you all with my attempts so far
These are my first attempts at making patterns using pictures and a PII arm graciously sent to me by Mark and Gill
This was the first arm I cast. Not too bad, but obviously wrong.
I needed more information.
After much searching I found the information I needed and created SolidWorks model of what I think the Schwingarm may look like.
The center to center dimension is the same as supplied by ArmorTek.
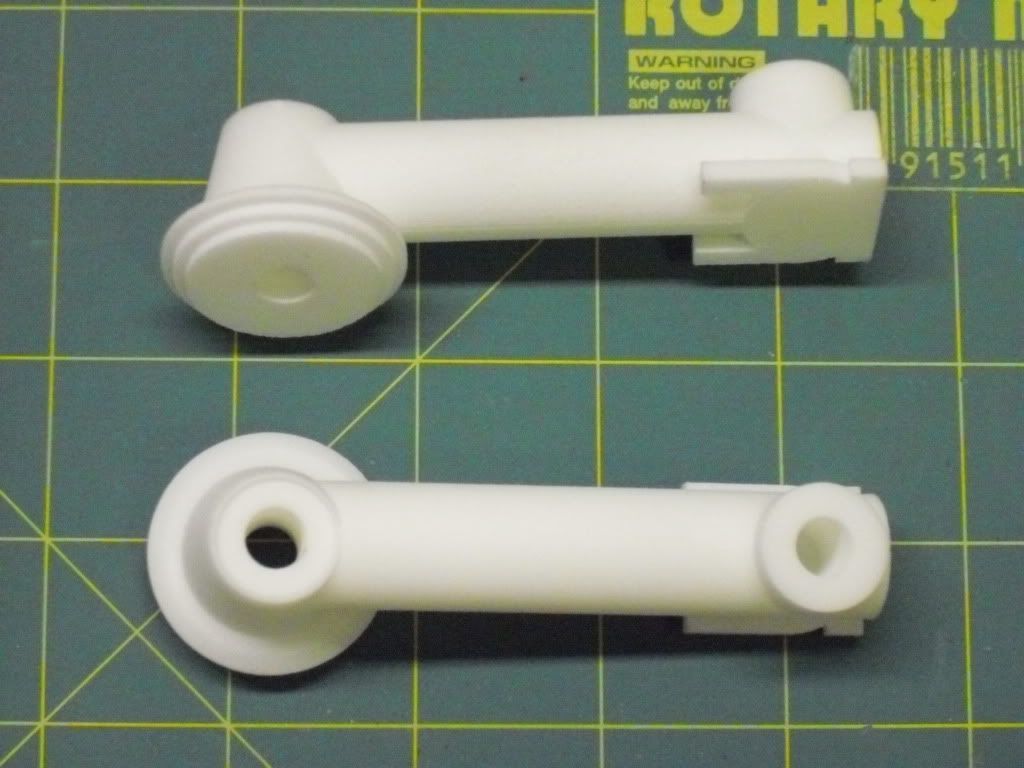
This was cleaned up and midified a bit. I than cast that a few times
Unfortunately it was not easy going.
Here is a picture of one of the castings. I was having trouble with debris washing up into the detail
I also had sink holes from slowing up on the pour
Well, this is close to where I am now. I expect I will have updates in the next few days.
Brian
Last edited by Brian Leach on Sat Apr 10, 2010 7:44 am, edited 1 time in total.
-
- Posts: 279
- Joined: Fri Aug 01, 2008 1:01 am
- Location: Grafton, OH - USA
- Adrian Harris
- Posts: 5061
- Joined: Thu Jul 12, 2007 10:46 pm
- Location: Berkshire (UK)
- Has liked: 1370 times
- Been liked: 1567 times
-
- Posts: 363
- Joined: Tue Nov 18, 2008 4:15 pm
- Location: Auburn, Wa USA
- Been liked: 3 times
-
- Posts: 1762
- Joined: Fri Jul 13, 2007 4:53 am
- Location: Northern California
- Been liked: 177 times
- Contact:
-
- Posts: 363
- Joined: Tue Nov 18, 2008 4:15 pm
- Location: Auburn, Wa USA
- Been liked: 3 times
Hello again,
Well, tonight my buddy Gorden and I had a couple of beers and decided to do a static test on one of the arms I cast. ( beer, power tools, cast aluminum what else do you do Friday nights!)
We chose the worst arm I had cast so far
This was after cleaning up the piece on the mill than drilling and tapping the arm
Well, it was the worst looking arm...
This picture shows how deep the bolt penitrates the arm
We than began to load it up
25lbs
50lbs
75Lbs This was the one with the sink holes!
100 lbs!
I have to tell you, it was SCARY! Weights, beer, running shoes...I have been told my toe will be fine in a couple of weeks... It has now been three hours and they are hanging there, so I think these might be pretty strong.
Initially I wanted run the test to failure, but I , I , these are my first arms, I worked so long on them, I just couldn't destroy it.
the PIIIs weigh less than 300lbs, twelve arms, about 25 lbs static pressure per arm.
I hope you have had a good night...
Sarah, does this answer your questions?
More to come...
Brian
Last edited by Brian Leach on Sun May 02, 2010 3:05 am, edited 1 time in total.
- Adrian Harris
- Posts: 5061
- Joined: Thu Jul 12, 2007 10:46 pm
- Location: Berkshire (UK)
- Has liked: 1370 times
- Been liked: 1567 times
-
- Posts: 202
- Joined: Sat Oct 17, 2009 8:12 am
- Location: Bristol
- Been liked: 2 times
Hi Brian,
I'm very pleased for you, even with the void the arm seems strong enough. A good mechanical test and beer sounds a happy combination
It would be a good test to drill/tap a vertical hole, where the suspension unit lower link goes and try it again. With a significant section missing, which would take most of the tension/compression forces, I doubt if it would survive your impressive static testing rig
The white masters which you used to make the moulds from look very good, are they from a 3D printer?
Looking forward to more of your casting and testing.
Regards,
Sarah
'I reject your reality and substitute my own'
-
- Posts: 363
- Joined: Tue Nov 18, 2008 4:15 pm
- Location: Auburn, Wa USA
- Been liked: 3 times
Hello Everyone,
I have been working on my castings and thought an update may be fun
And Adrian, Yes I could recycle it, but I think it will go into my museum of failures and misfits (The box is getting kinda full )
I have been trying different methods of casting these pieces. Some of the failures were kind of subtle, others quite obvious
This was a problem of too much gas (small amount of water in the plaster mold. Question: what was the orientation?)
I have finally figured out the way to do the castings reliably with the help of Roland Mann (Thank You!)
These are the crude castings. I expect I will mill them this weekend.
Thanks for watching
Brian
-
- Posts: 363
- Joined: Tue Nov 18, 2008 4:15 pm
- Location: Auburn, Wa USA
- Been liked: 3 times
Good Day all!
This weekend I made-up a jig to hold the Schwingarms for machining.
This is an arm in the jig. As you can see, I wanted to be sure the arm didn't move while being milled.
It took me a while to machine the first arm. This is the arm beside an ArmorTek arm. The disk is the "plate" at the torsion bar end of the arm.
As you can see, the arm does not have the "plate" at the torsion bar end. These are cast seperately and will be slip-fit over the end.
I hope to make more of the Schwingarms this week, but I am going to have some wisdom teeth and two metal plates (ooch!) removed from my mouth Wednesday, so there may be some delay.
If you are interested in a set send me a pm.
Thanks for watching,
Brian
-
- Posts: 363
- Joined: Tue Nov 18, 2008 4:15 pm
- Location: Auburn, Wa USA
- Been liked: 3 times
Sarah,
I kind of goofed one of the arms, so did another, more scientific, static test with it ( I drilled the hole slightly off center).
I hope this answers any questions
The arm is pretty much standard for what I am offering.
I didn't clean this one up too much. Actually, beside milling the faces and tapping the holes I will be leaving the join line flash on the pieces so people can file them down to their preferences. it seems there were varying levels of "clean-up" on the join lines on the 1:1. This way there will be a bit of variability, character in the pieces.
This is the arm I tested. I took this picture after doing the test
This is at 110lbs
Here we are at 130Lbs
I tried 140lbs, but the wire kept unbending allowing the weights to fall to the ground before I could take the picture. I decided I prefer my toes as they are and gave up. It did hold for five or ten seconds before falling.
Cheers everyone, out to dinner!
Brian
-
- Posts: 363
- Joined: Tue Nov 18, 2008 4:15 pm
- Location: Auburn, Wa USA
- Been liked: 3 times
Hello Lady and Gentelmen!
So, here I am in the pub, an ale, a burger and, as you from the continet call them, chips, working away on the computer with people 9000 miles away. Hummm! Kind of amazing. But what I really find amazing is that I am just about mastering a process first done 3000-4000 years ago.
Charcoal, sand, a hair dryer, a few bricks, the remmenents of an old cylinderhead and I have what could pass as a tank part. Isn't life wonderful (not to mention the cold malt beverage God has bestowed on all who are worthy!)
Today I cast the last of the Anhangerkupplungen for a while. I had the pattern for what I was hoping would be the final version of the Schwingarm ready so I threw that in too. I think it came out pretty good, a couple of defects, but they will be taken care of with a couple of vents. I am happy, I hope you will be too. I am going to begin making these next week (Adrian) for real unless my girlfriend kicks me out (sometimes she has no sense of humor, like now, she is hitting me!). Then it may be two weeks.
PLEASE, comments, obversations send them to me, I may be lonely soon! (ouch!)
Here are a couple of pictures, cheers! Brian
Brian
Reasonable people act reasonably!
- Adrian Harris
- Posts: 5061
- Joined: Thu Jul 12, 2007 10:46 pm
- Location: Berkshire (UK)
- Has liked: 1370 times
- Been liked: 1567 times
-
- Posts: 363
- Joined: Tue Nov 18, 2008 4:15 pm
- Location: Auburn, Wa USA
- Been liked: 3 times
-
- Posts: 95
- Joined: Sun May 10, 2009 4:04 pm
- Location: Sydney, Australia
Re: PIII Schwingarm
Hi Brian,Brian Leach wrote:
These are my first attempts at making patterns using pictures and a PII arm graciously sent to me by Mark and Gill
Brian
Fascinating to see how things are done. Thanks for the pics.
The other thing I noticed is that Gill and Mark are now working on the PII.
Not sure why they sent you a PII arm rather than a PIII though.