Page 1 of 2
Panther Cupola Interior Insert
Posted: Sat Dec 27, 2008 5:12 pm
by Tim Bowman
Hi everyone,
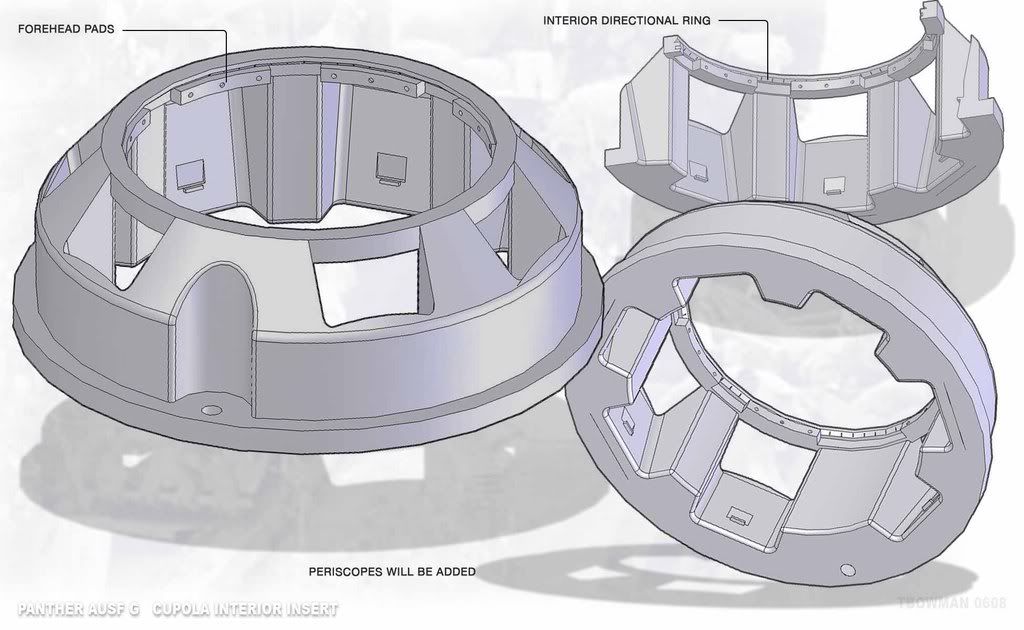
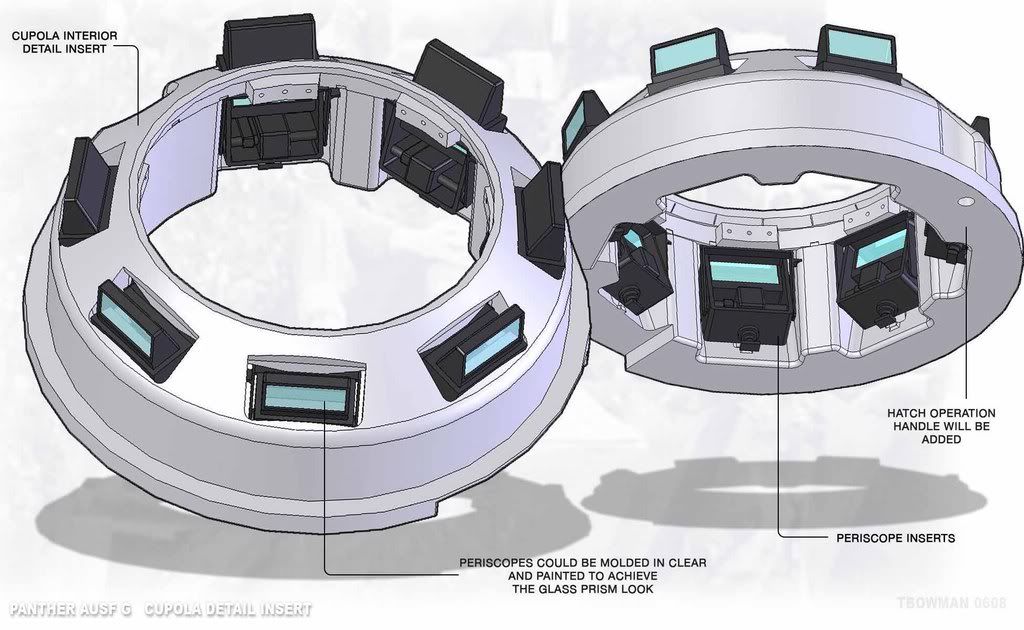
I have just a few things left to complete on the Panther. One of them is this project I started a long time ago but put on the back burner. Like my other parts, I will build a rapid proto, give it the cast-metal texturing and it is then simply inserted from inside Armortek's existing cupola. I will machine away the periscope openings on the existing cupola to accommodate the scale periscopes that are pushed through from the inside, along with the whole assembly.
The cupola periscopes will be done separately the same way, cast in clear and then painted. Although not as spectacular as Mike Stannard's awesome cupola and scopes, it should give a nice representation of the interior.
regards
Tim
Posted: Sat Dec 27, 2008 6:52 pm
by Robert E Morey
This will be amazing when you get it done. Great detail and fantastic design work!
Posted: Sat Dec 27, 2008 11:42 pm
by Allan Richards
Thats a superb piece of work and should appeal to quite a few people.
Posted: Sun Jan 11, 2009 5:19 pm
by Tim Bowman
Thanks Bob and Allan
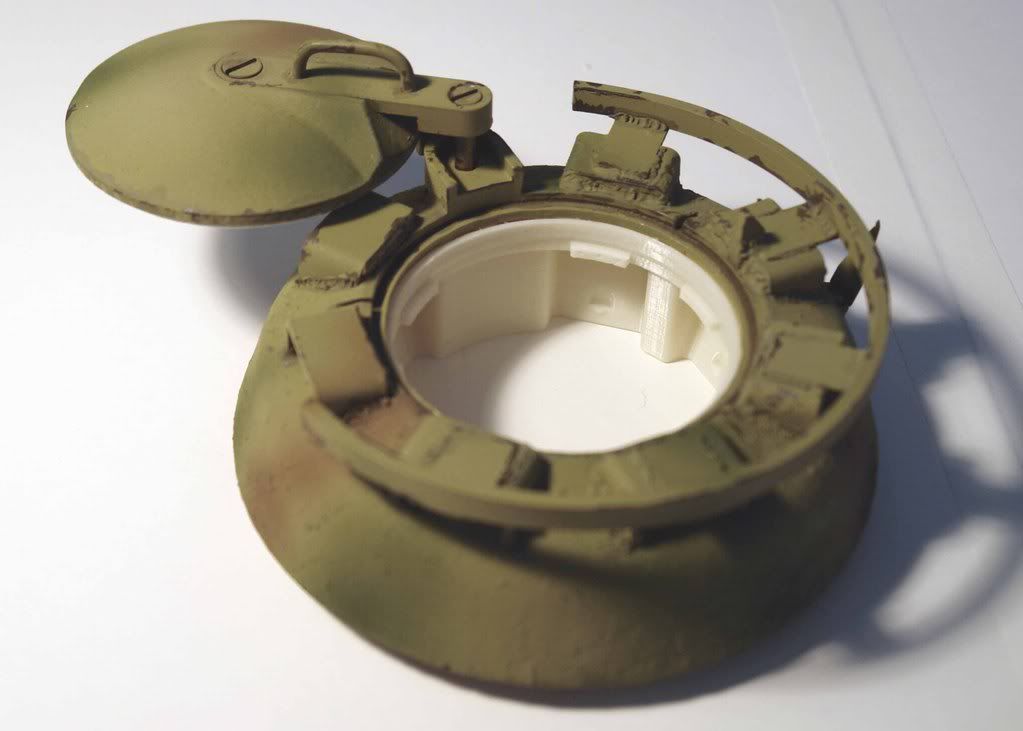
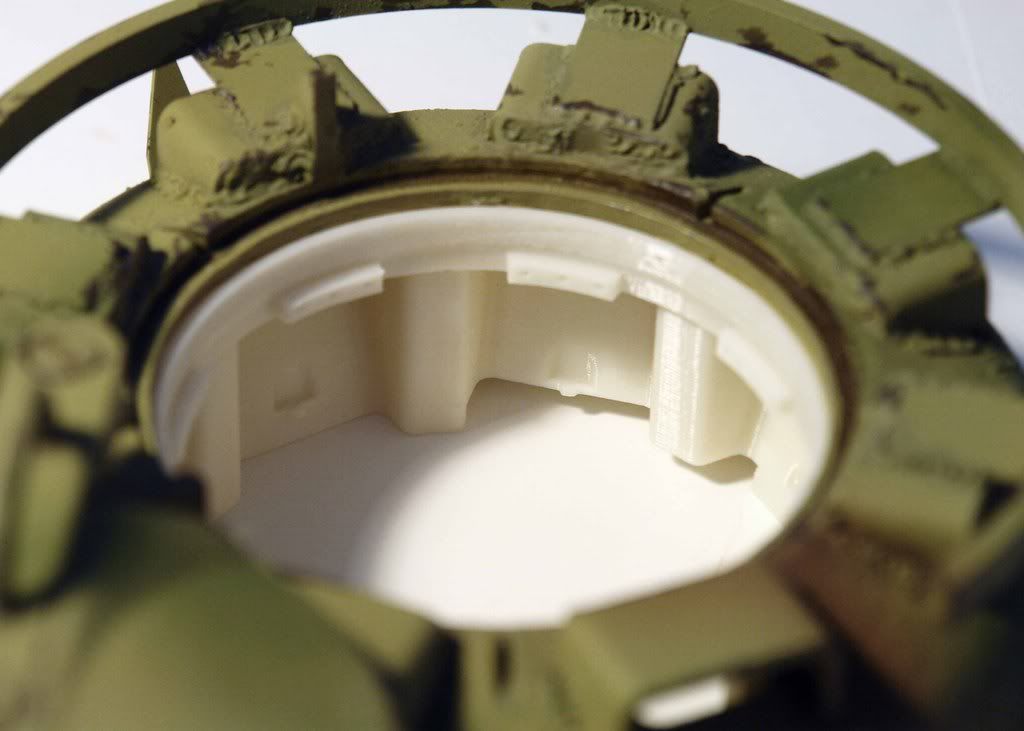
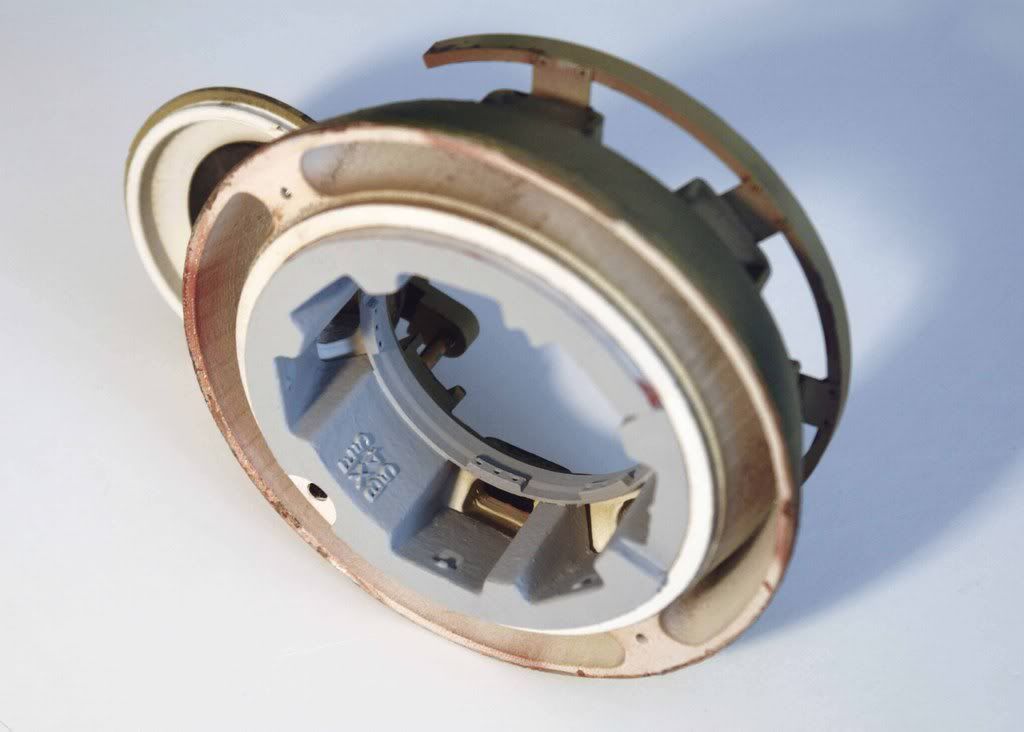
Here's the parts fresh out of the 3D printer. Clean up and cast-metal texturing of the interior is next. Much of the detail does not show up in these photos because of the material color. I'll take some more after they have primer on them.
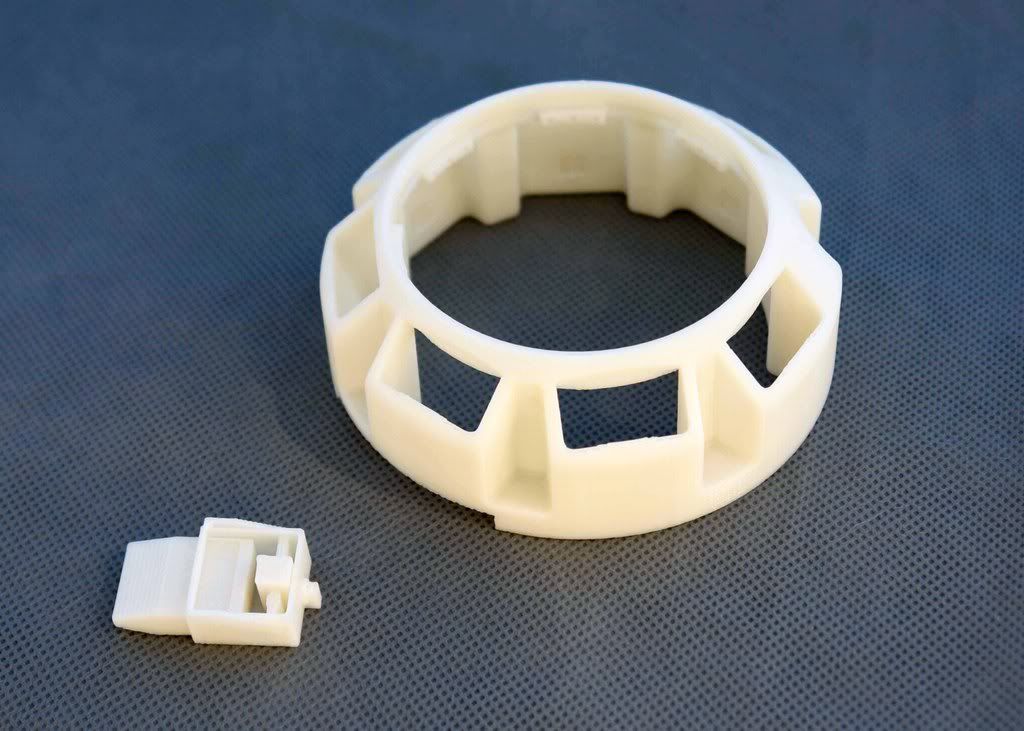

Tim
Posted: Sun Jan 11, 2009 6:05 pm
by cedric meyer
This is amazing!!! Tim you are harry potter!! Tim, May i have one?
ced
Posted: Sun Jan 11, 2009 8:00 pm
by Dale jordan
Excellant workmanship Tim . Will this suit the new King tiger cupola ??where they the same as the Panther on the real Tank . Can we have a photo of how your 3D printer works this sounds like a great Machine ... Dale
Posted: Sun Jan 11, 2009 8:14 pm
by Tim Bowman
Thanks Cedric and Dale
"Harry Potter"

That's funny.
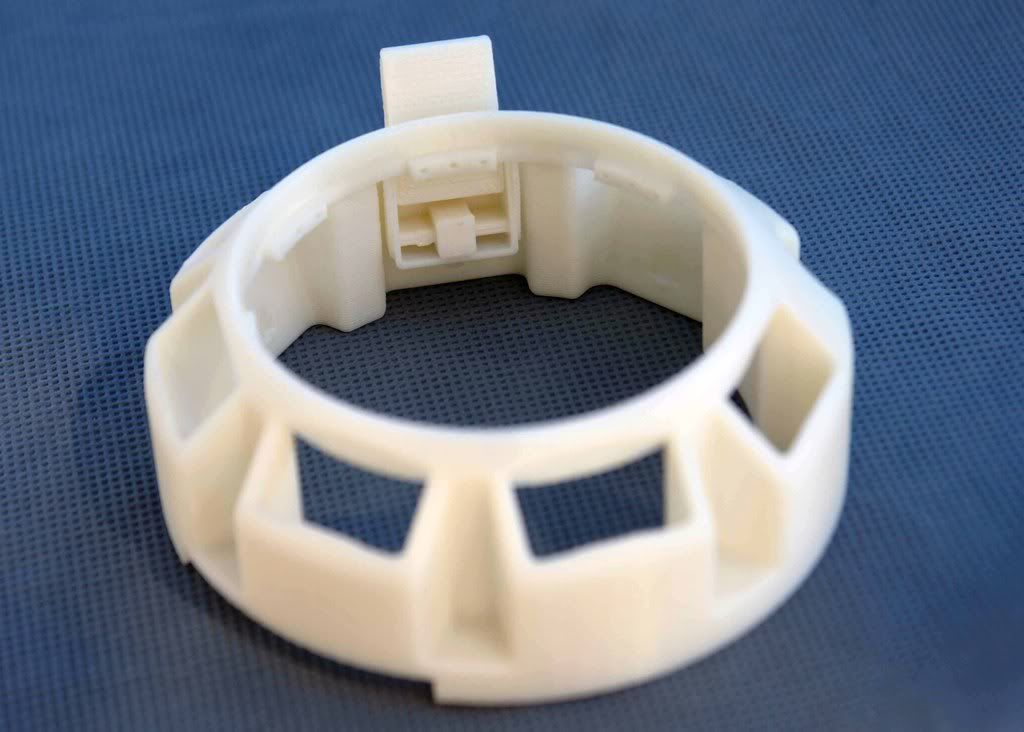
Here it is shown inserted into the cupola. I still have to open the periscope holes on the Armortek part to accommodate the new scopes. So they are absent in these pics.
Dale, unfortunately the Tiger II has the mid and lateTiger I cupola (if I'm not mistaken). There's a very good chance I will be making this part for that one as well. however, for your level of detailing, you may prefer Mike Stannard's "ultimate cupola".

The printer looks like a cross between a refrigerator and a regular printing machine. It is very handy indeed and I wish I was just doing this stuff full time!
regards
Tim
Posted: Sun Jan 11, 2009 8:26 pm
by Kent Wiik
Wow Tim that is
excellent!
When I saw the cupola I thought 1:1 - Honest!
Yes the Panther cupola is not the same as the Mid/Late Tiger I and Tiger II
Tiger I and II had the same one on the other hand.
Tim may I be a rivetcounter and give a tiny input please?
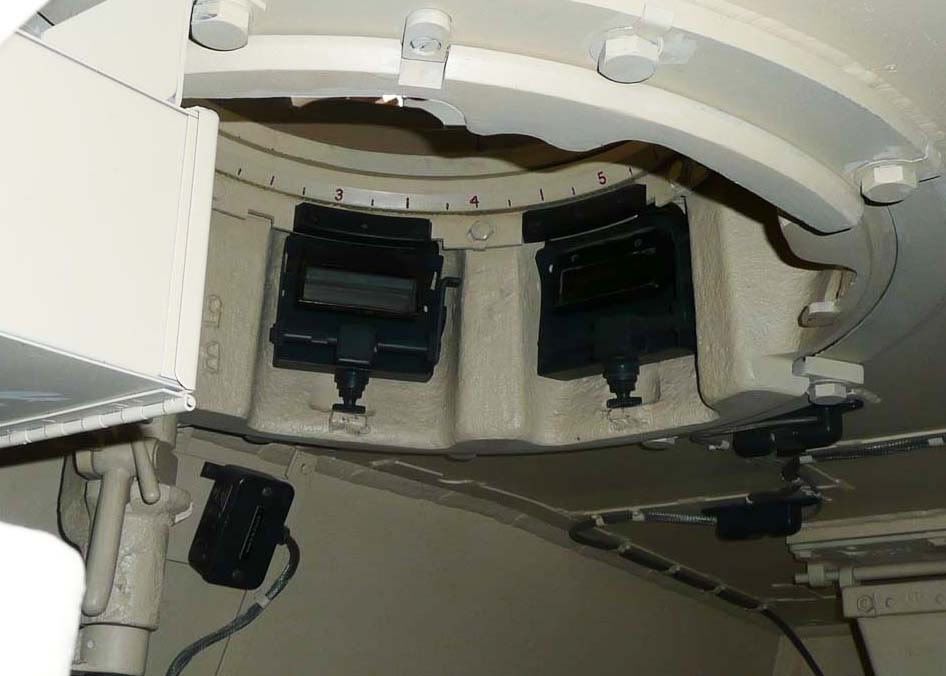
Hope you have not push the button yet as the real periscope looked a bit different...
The inner side was tilted as you have nicely done on the outher side.
Please look at Mike’s type 2.
Nit picking yes I know

but I take a chance to see an accurate made one for everyone to enjoy.

Keep up the good work my friend
You are a big asset to our hobby.
Kent
Posted: Sun Jan 11, 2009 8:55 pm
by Tim Bowman
Thanks Kent
Input is always a good thing. I messed up somewhere on the overall angle of the periscope because even though there is the angle as you show in the type two, it appears to be parallel with the bracket inside the cupola when installed. You can see this on the edge of the prism housing on the periscope on the right.
I will double check things before I mold the periscopes. However, I may have to submit to "close enough for me" this time because visually, you will not pick the difference up with the periscopes installed.
Thanks again
Tim
Posted: Sun Jan 11, 2009 9:12 pm
by Kent Wiik
Yes it is easy to miss this my friend and no big deal
But if it can easily be fixed so why not.
Here is a comparison real thing - drawing.

Cheers
Kent
Posted: Mon Jan 12, 2009 4:26 am
by Robert E Morey
Wow Tim, that insert is a work of art. Fantastic. How can I get me one?
Bob
Posted: Wed Jan 14, 2009 4:43 pm
by Tim Bowman
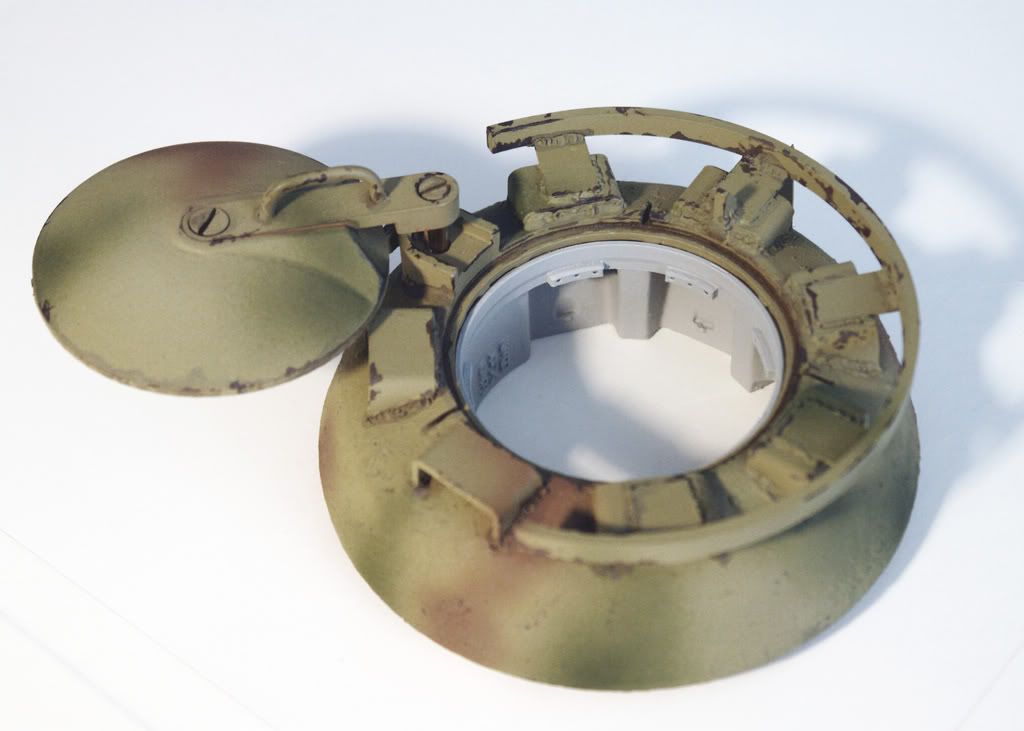
I textured and primed the insert which makes the part easier to see in the photos. I'll be machining the periscope openings this weekend. This is where a little planning would have come in handy. My periscope guards are bonded in place so I have to machine from the bottom as opposed to the top. this would have been much simpler to do a long time ago.
The small bolts seen in the photo of the real thing above will be added to the cast part before final painting.
I'm rethinking the periscope assemblies so they are on hold for the moment.

regards
Tim
Posted: Wed Jan 14, 2009 5:59 pm
by simon_manning
fancy making some more,too nice to keep to yourself,spread a bit of happiness worldwide.simon manning
Posted: Wed Jan 14, 2009 7:40 pm
by colin fairweather
looks fantastic well done

now all you have to do is get working on the tiger 1 / 2 inners hint hint
colin

Posted: Wed Jan 14, 2009 8:48 pm
by Allan Richards
Tim,
This is an excellent piece of work and as has been said already one would swear that you cupola is real. You do hearten me though when you mentioned that with a little fore thought you would not have bonded on the guards. The number of times I found myself in a similar position when I was making my Tiger!! At least I'm not alone in dong this