Late Production Tiger Project
-
Tim Bowman
- Posts: 1762
- Joined: Fri Jul 13, 2007 4:53 am
- Location: Northern California
- Been liked: 177 times
- Contact:
-
Lionel Champ
- Posts: 67
- Joined: Sat May 24, 2008 10:52 am
- Location: Dartford,Kent
- Been liked: 1 time
I would like to thank Tim for his excellent drawing of the pannier gusset. That information can not be obtained from photo's alone. For anyone who is attempting this mod, I would like you to know that a "one euro"coin is almost perfect for getting the arched cutouts inscribed ( I am sure most people use a more technical method,but we neanderthals have to improvise).
Cheers again Tim,
Lionel
Cheers again Tim,
Lionel
-
Tim Bowman
- Posts: 1762
- Joined: Fri Jul 13, 2007 4:53 am
- Location: Northern California
- Been liked: 177 times
- Contact:
Thanks everyone very much.
Here's two of the four bump stops. I am repositioning them on the hull slightly and will take some photos of them mounted later.
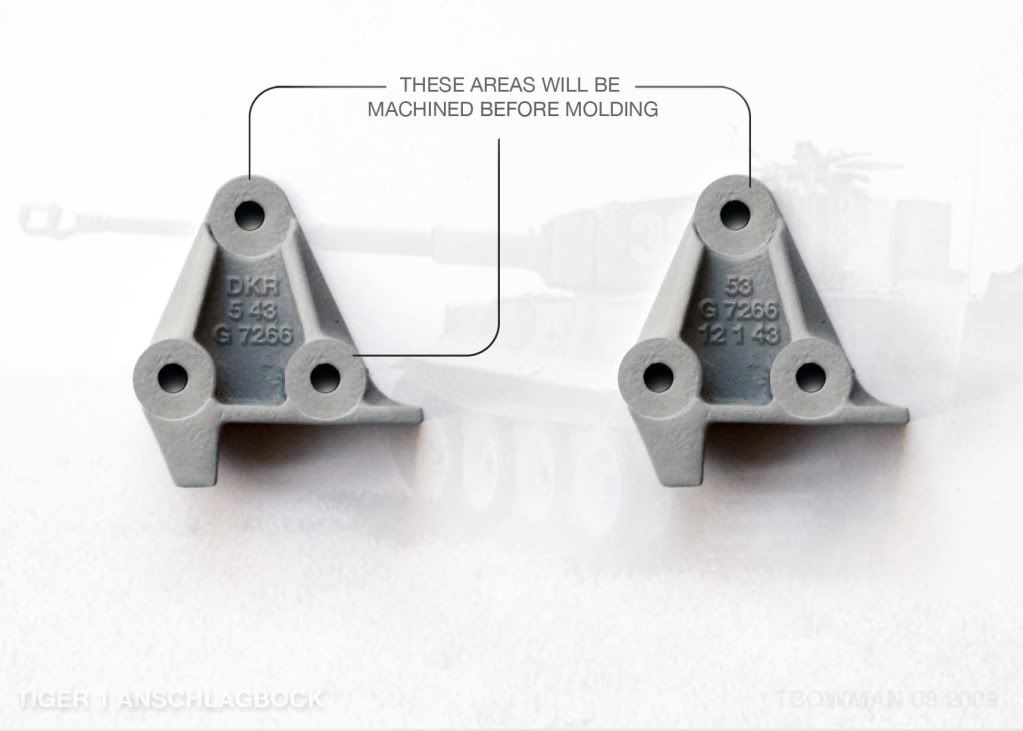
If any rivet counters out there see glaring errors in the cast numbers/letters, now is the time to change them. Otherwise I plan on molding two like this, one plain and one with fewer letters and numbers.
regards
Tim
Here's two of the four bump stops. I am repositioning them on the hull slightly and will take some photos of them mounted later.

If any rivet counters out there see glaring errors in the cast numbers/letters, now is the time to change them. Otherwise I plan on molding two like this, one plain and one with fewer letters and numbers.
regards
Tim
"So long as one isn't carrying one's head under one's arm, things aren't too bad." – Erwin Rommel
-
Kent Wiik
- Adrian Harris
- Posts: 5060
- Joined: Thu Jul 12, 2007 10:46 pm
- Location: Berkshire (UK)
- Has liked: 1369 times
- Been liked: 1567 times
-
simon_manning
- Posts: 2024
- Joined: Fri Nov 02, 2007 8:51 pm
- Location: new forest,hampshire,u.k.
- Been liked: 1633 times
-
Per Sonnervik
- Posts: 153
- Joined: Sat Jul 12, 2008 12:01 pm
- Location: Stockholm, Sweden
- Been liked: 1 time
Hi Tim,
Very nice work indeed and you asked for a rivet counter so here goes; the lettering should be upside down (compared to your part now) and the numbers are not correct. I have a photo but can´t make out the whole number but perhaps Kent´s photo can show the first numbers.
What I can make out is ???0/C27?2-1 DKR
In what material are planning to these details?
/Per
-
Tim Bowman
- Posts: 1762
- Joined: Fri Jul 13, 2007 4:53 am
- Location: Northern California
- Been liked: 177 times
- Contact:
Hi Per
Thank you!
I plan on casting these in metal. The rubber portion I will model, mold and then cast a suitable durometer silicone. This will then be bonded to the mounting plate(not shown above but visible in Kent's Bovington picture.
Kind regards
Tim
Thank you!
I plan on casting these in metal. The rubber portion I will model, mold and then cast a suitable durometer silicone. This will then be bonded to the mounting plate(not shown above but visible in Kent's Bovington picture.
Kind regards
Tim
"So long as one isn't carrying one's head under one's arm, things aren't too bad." – Erwin Rommel
-
Tim Bowman
- Posts: 1762
- Joined: Fri Jul 13, 2007 4:53 am
- Location: Northern California
- Been liked: 177 times
- Contact:
Hi Adrian,
They may be hidden but I've come to realize how much things I didn't do on the Panther bother me now just knowing I didn't do them. IE bump stops. Which will bring me to my next post under the Panther section.
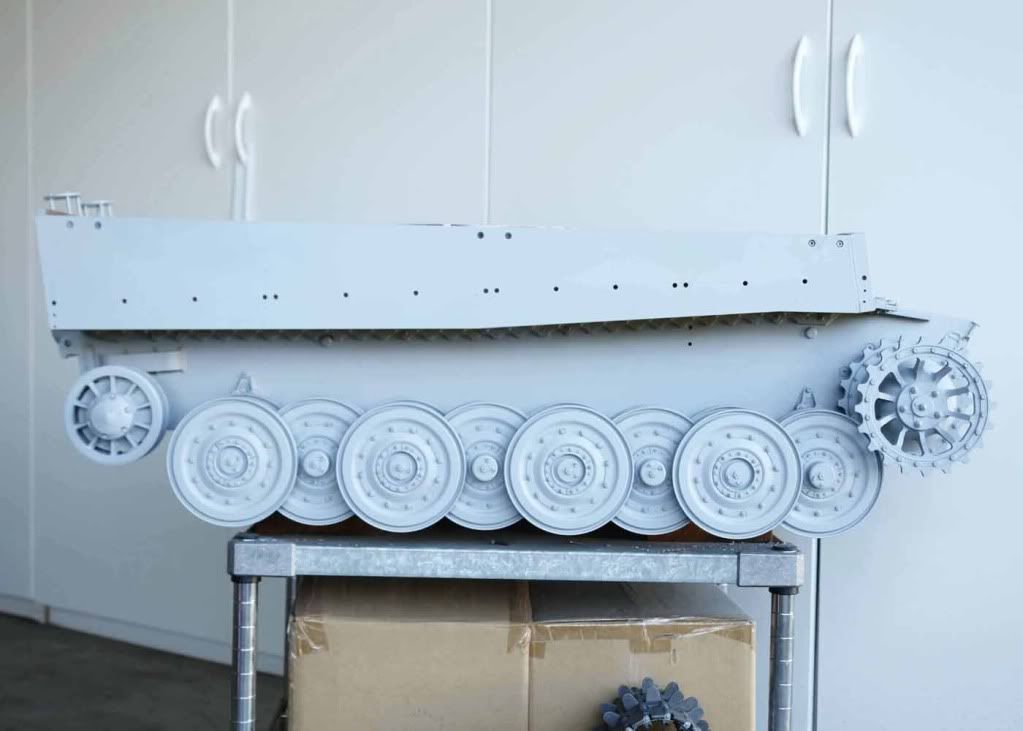
I was finally able to finish the wheels and position the right side bump stops. These two masters will stay as they are, I have two more that will have numbers upside down as Per's comment recommends. Holes for the bumpers are not yet drilled and obviously the rubber bumpers are not in the pictures. Also, I used M3 fasteners but may change to M4s as the real ones appear to have had larger bolts then mine appear to be.
First two photos of the real thing on the factory floor courtesy of Alan Hamby. http://www.alanhamby.com/tiger.html


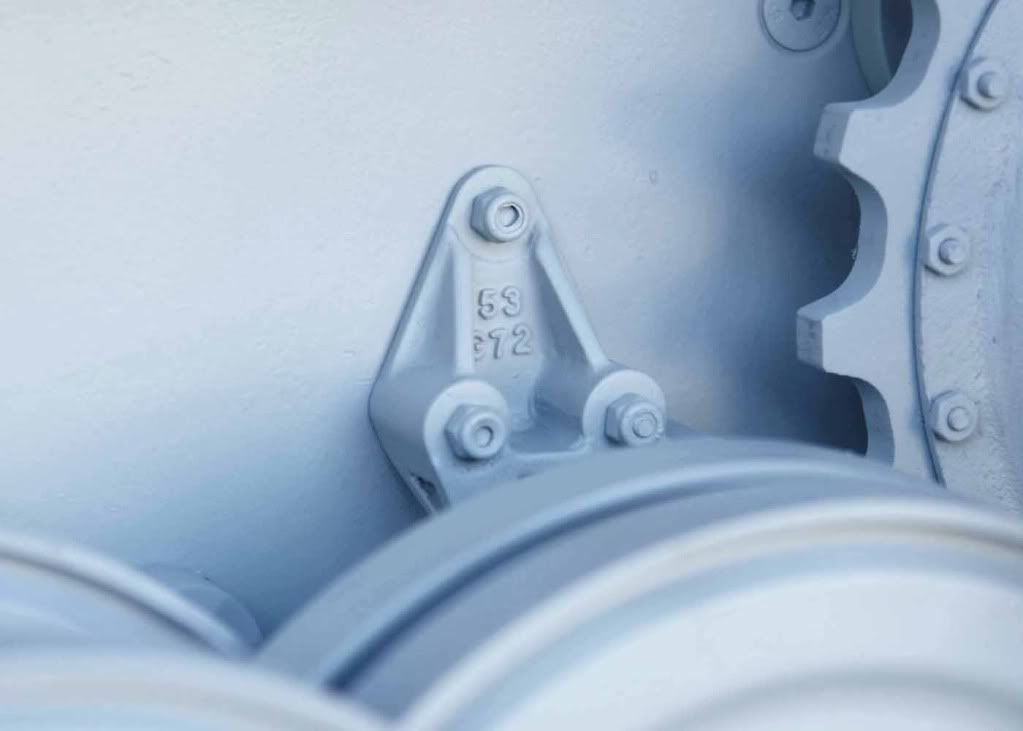


Rear stop bracket with wheels removed

The studs are threaded into the hull sides.
Thank you again Roland, Kent and Per for the help and everyone who is interested in the parts. I will post progress updates as I have them.
Kind regards
Tim
They may be hidden but I've come to realize how much things I didn't do on the Panther bother me now just knowing I didn't do them. IE bump stops. Which will bring me to my next post under the Panther section.
I was finally able to finish the wheels and position the right side bump stops. These two masters will stay as they are, I have two more that will have numbers upside down as Per's comment recommends. Holes for the bumpers are not yet drilled and obviously the rubber bumpers are not in the pictures. Also, I used M3 fasteners but may change to M4s as the real ones appear to have had larger bolts then mine appear to be.
First two photos of the real thing on the factory floor courtesy of Alan Hamby. http://www.alanhamby.com/tiger.html


Rear stop bracket with wheels removed

The studs are threaded into the hull sides.
Thank you again Roland, Kent and Per for the help and everyone who is interested in the parts. I will post progress updates as I have them.
Kind regards
Tim
Last edited by Tim Bowman on Tue Sep 01, 2009 4:50 pm, edited 1 time in total.
"So long as one isn't carrying one's head under one's arm, things aren't too bad." – Erwin Rommel
- Robert E Morey
- Posts: 2298
- Joined: Wed Jul 18, 2007 12:59 am
- Location: Seattle, WA USA
- Has liked: 125 times
- Been liked: 755 times
-
Steve Norris
- Posts: 1225
- Joined: Thu Jul 12, 2007 11:42 am
- Location: Manchester
- Has liked: 8 times
- Been liked: 688 times
-
simon_manning
- Posts: 2024
- Joined: Fri Nov 02, 2007 8:51 pm
- Location: new forest,hampshire,u.k.
- Been liked: 1633 times
- Adrian Harris
- Posts: 5060
- Joined: Thu Jul 12, 2007 10:46 pm
- Location: Berkshire (UK)
- Has liked: 1369 times
- Been liked: 1567 times
Those are great looking photos Tim. 
Why have you gone for threaded holes rather than through holes and bolts Is it to keep the internal clutter to a minimum
I know what you mean about missing things. I'm surrounded by Sherman parts but keep getting new ideas for ways of doing things or building new parts. I think I need to go on a Project Management course
If only I could win the lottery and not have to work to earn the money I need to feed this hobby
It's interesting to see how similar the ends of the swing arms are between Alan's photo and the model ones. The old advice on these was to file the end of the axle flat ad fill the void. From those factory shots it looks like they should have 10BA bolts inserted in the ends instead
Adrian.
Why have you gone for threaded holes rather than through holes and bolts
I know what you mean about missing things. I'm surrounded by Sherman parts but keep getting new ideas for ways of doing things or building new parts. I think I need to go on a Project Management course
If only I could win the lottery and not have to work to earn the money I need to feed this hobby
It's interesting to see how similar the ends of the swing arms are between Alan's photo and the model ones. The old advice on these was to file the end of the axle flat ad fill the void. From those factory shots it looks like they should have 10BA bolts inserted in the ends instead
Adrian.
-
Tim Bowman
- Posts: 1762
- Joined: Fri Jul 13, 2007 4:53 am
- Location: Northern California
- Been liked: 177 times
- Contact:
Thanks for the comments guys. Adrian, I don't really have a good answer for the threaded holes except that I wanted it to look like the real thing when the stops were removed (without the fasteners moving around).
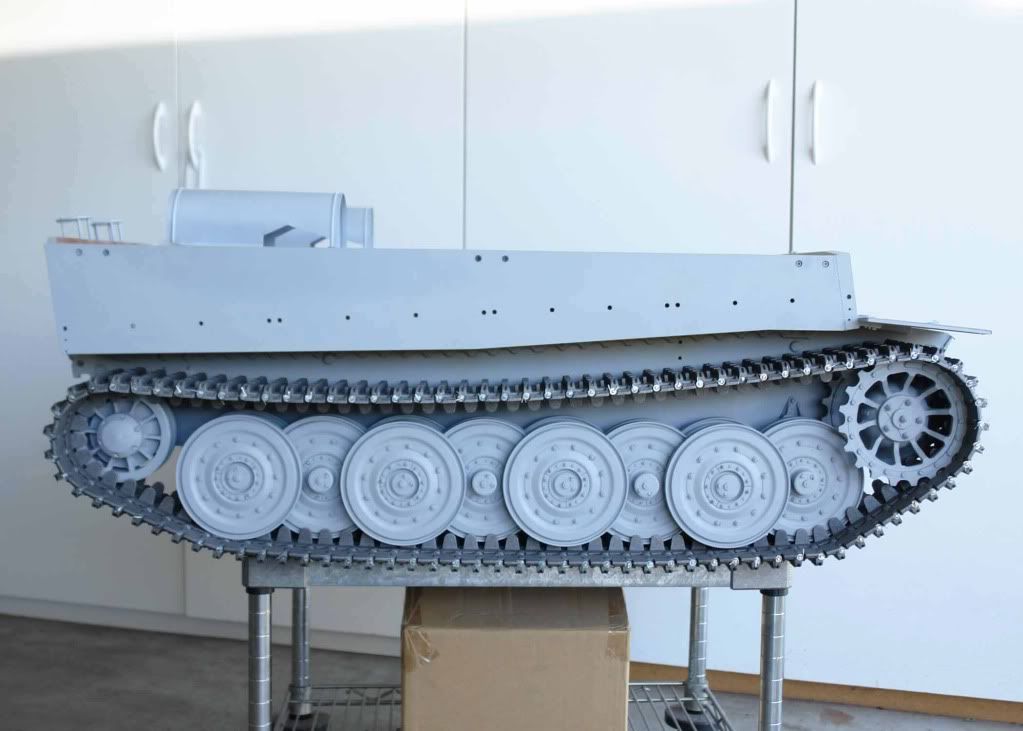
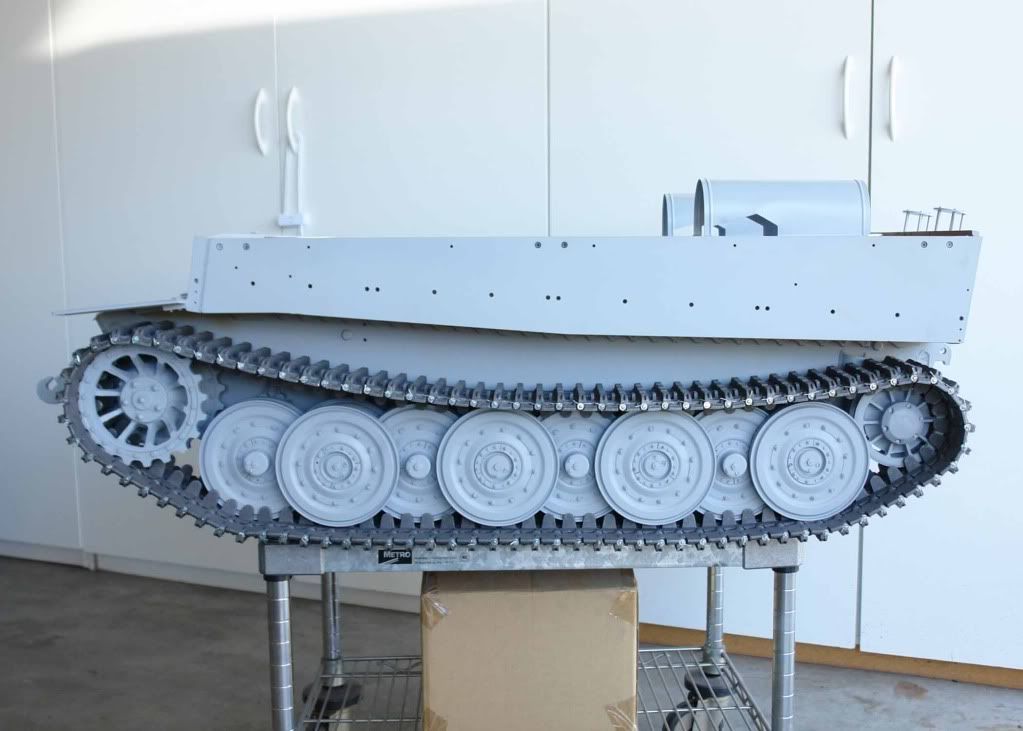
With the wheels and their hubs finally detailed and all four bump stops located, I could not resist the urge to assemble and mount the tracks. The Tiger amazes me in that every time I add the next part it just keeps getting bigger and bigger. The Panther was sort of big to start with.
I stayed up late and assemble both tracks rather hastily as can be seen by the untidy cotter pins. I'll clean those up.


regards
Tim
With the wheels and their hubs finally detailed and all four bump stops located, I could not resist the urge to assemble and mount the tracks. The Tiger amazes me in that every time I add the next part it just keeps getting bigger and bigger. The Panther was sort of big to start with.
I stayed up late and assemble both tracks rather hastily as can be seen by the untidy cotter pins. I'll clean those up.


regards
Tim
Last edited by Tim Bowman on Sun Sep 06, 2009 11:55 pm, edited 1 time in total.
"So long as one isn't carrying one's head under one's arm, things aren't too bad." – Erwin Rommel
-
Dale jordan
- Posts: 1428
- Joined: Fri Jul 13, 2007 1:10 am
- Location: Port Macquarie Australia
- Been liked: 429 times
- Contact:

