Image

A34 Comet Mk I Type A - New Build

Forum for discussion relating to the Comet
Stephen White
Site Admin
Posts: 3114
Joined: Sat Oct 11, 2008 7:05 pm
Location: Dorset
Has liked: 1035 times
Been liked: 2111 times
Contact:

Re: A34 Comet Mk I Type A - New Build

Post by Stephen White »

Steve

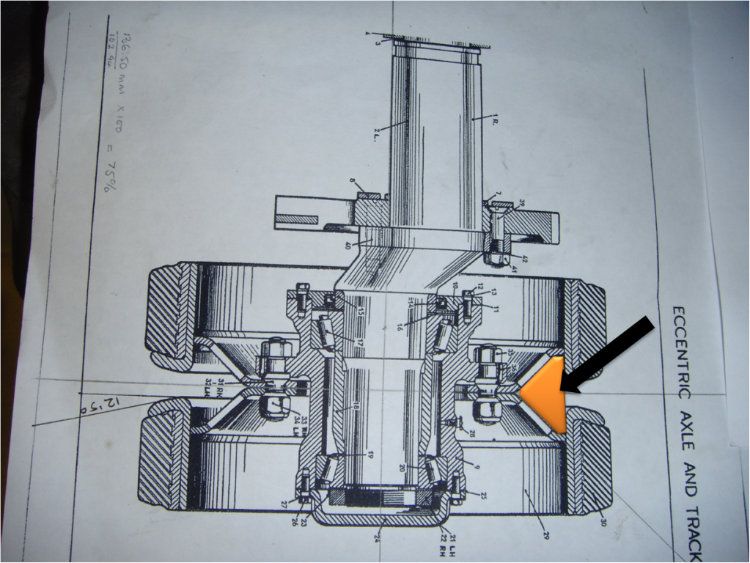
I'll use some spare roadwheel tyres, reduced in diameter and width. I'll happily post dimensions but this drawing and the sectioned drawing from the Tank Museum may help:

Image

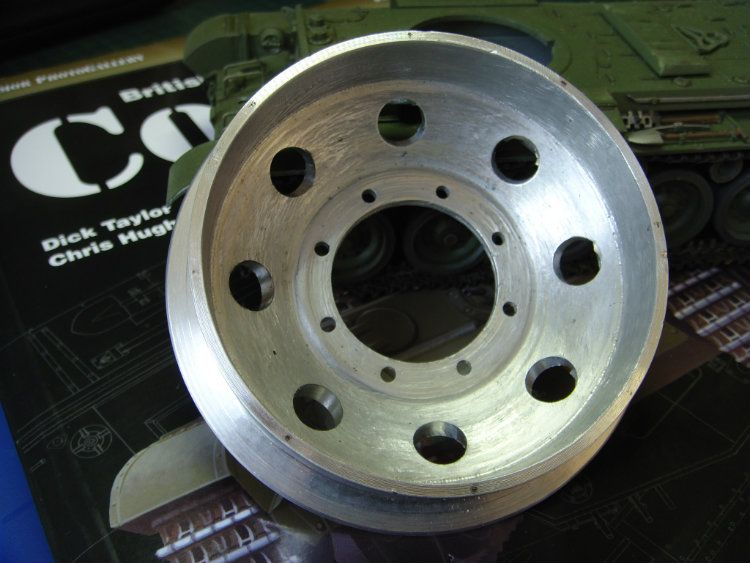
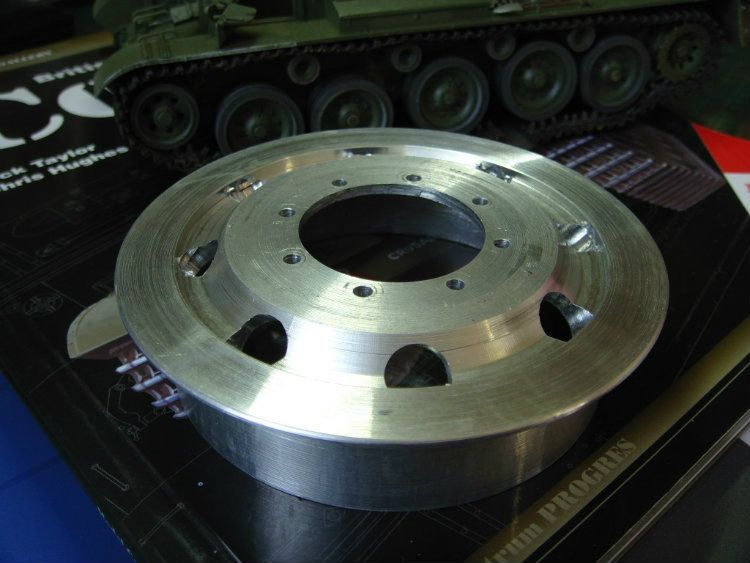
After three days of machining and a huge pile of swarf later, the first half is roughly the right shape. It needs a lot of finishing and the lightening holes to be drilled:

Image

Image

Image

Image

The highlighted area on this section shows why the early pattern idlers were prone to pack with mud and throw the track. Not surprising they were replaced with cast idlers of a more open pattern. The later idlers and the Comet roadwheels went on to be found on the early Centurions.....

Image

Regards

Stephen

Stephen White
Site Admin
Posts: 3114
Joined: Sat Oct 11, 2008 7:05 pm
Location: Dorset
Has liked: 1035 times
Been liked: 2111 times
Contact:

Re: A34 Comet Mk I Type A - New Build

Post by Stephen White »

Here's a lesson in the perils of building to a 1/35th pattern kit. The original Comet idler supplied in the Bronco kit has the six bolts to mount to the hub and six lightening holes.

Image

The later idlers certainly have eight mounting bolts and it simply wasn't likely that the change in idler would have involved a change in hubs. There are very few wartime photos of the original idler and none show all the lightening holes clearly. So I was prepared to go with six. Fortunately, before drilling, I found this wartime document which clearly shows eight lightening holes, which is much more logical:

Image


Subsequently, I checked on the Resicast kit, which is excellent, but which I haven't yet had time to start. It has what I now think is the correct eight holes.

Image

Image

The reverse side. It isn't completely accurate as it would be impossible to turn on a lathe and would have to be made like the original in two pressings but it representative:

Image

One half idler complete, compared with the Armortek late pattern idler:

Image

And here a reminder of the blank which is now a large pile of swarf:

Image

Three more to go....

Regards

Stephen

Paul Morris
Posts: 1559
Joined: Thu Jul 12, 2007 4:44 pm
Location: North Lancs
Been liked: 68 times

Re: A34 Comet Mk I Type A - New Build

Post by Paul Morris »

Hello Stephen.

Well done a lot of work and reserch but it looks like its paying dividends to you.
I know what you mean about piles of swarfe . . .must get back to the J.T. one day :oops:.
Anyway congrats on what looks like is going to be another great build.
Cheers Paul :wink:
Paul's Tank Workshop. Complete Tank builds and re builds zimmerit and paint to museum quality standard. pjtigerman@aol.com
01524 720977
https://www.facebook.com/PaulsTankWorkshop

michael hilton
Posts: 1198
Joined: Thu Dec 15, 2011 4:29 pm
Has liked: 1566 times
Been liked: 835 times

Re: A34 Comet Mk I Type A - New Build

Post by michael hilton »

Hello Stephen, excellent, I have followed you build from the beginning, some serious engineering, you certainly have an eye for detail. Enjoying every moment....Mick

User avatar
Adrian Harris
Posts: 5103
Joined: Thu Jul 12, 2007 10:46 pm
Location: Berkshire (UK)
Has liked: 1466 times
Been liked: 1636 times

Re: A34 Comet Mk I Type A - New Build

Post by Adrian Harris »

Amazing piece of machine Stephen - most impressive.

> I found this wartime document which clearly shows eight lightening holes

But it also only shows seven holes in the hub ... :shock:

Adrian.
Contact me at sales@armortekaddict.uk for details of my smoker fan control module

Stephen White
Site Admin
Posts: 3114
Joined: Sat Oct 11, 2008 7:05 pm
Location: Dorset
Has liked: 1035 times
Been liked: 2111 times
Contact:

Re: A34 Comet Mk I Type A - New Build

Post by Stephen White »

The new early type idler now has its second half:

Image

Image

Image

Regards

Stephen

User avatar
Adrian Harris
Posts: 5103
Joined: Thu Jul 12, 2007 10:46 pm
Location: Berkshire (UK)
Has liked: 1466 times
Been liked: 1636 times

Re: A34 Comet Mk I Type A - New Build

Post by Adrian Harris »

A lovely bit(*) of machining Stephen :D

Adrian.

(*) For very large values of "bit" :lol:
Contact me at sales@armortekaddict.uk for details of my smoker fan control module

Stephen White
Site Admin
Posts: 3114
Joined: Sat Oct 11, 2008 7:05 pm
Location: Dorset
Has liked: 1035 times
Been liked: 2111 times
Contact:

Re: A34 Comet Mk I Type A - New Build

Post by Stephen White »

Thanks Adrian - see you at Tankfest?

Moving now to the drive train, some work on the final drives. The kit doesn't represent the quill shaft covers which are visible at the top of the final drive housings. So bored out a cut out on the outer hull plate and a corresponding section of the final drive housing and turned the two covers from ally bar. 10BA blind set screws to fix. Job done.

Image

Image

Image

Image

Regards

Stephen

User avatar
Adrian Harris
Posts: 5103
Joined: Thu Jul 12, 2007 10:46 pm
Location: Berkshire (UK)
Has liked: 1466 times
Been liked: 1636 times

Re: A34 Comet Mk I Type A - New Build

Post by Adrian Harris »

> Thanks Adrian - see you at Tankfest?

To quote Teal'c: "Indeed" :lol:

Looks like you're moving along nicely, though that Cent book looks like it'll take a bit of reading. Any long flights coming up :?:

Adrian.

PS: You have a PM about the Comet.
Contact me at sales@armortekaddict.uk for details of my smoker fan control module

Stephen White
Site Admin
Posts: 3114
Joined: Sat Oct 11, 2008 7:05 pm
Location: Dorset
Has liked: 1035 times
Been liked: 2111 times
Contact:

Re: A34 Comet Mk I Type A - New Build

Post by Stephen White »

A bit mundane, just the assembly of the suspensions. Remarkable only for the ability of Kilopoise to get everywhere.

Image

Image

Image

Image

Regards

Stephen

Iacopo Di Giampietro
Posts: 226
Joined: Fri May 11, 2012 9:14 pm
Been liked: 48 times

Re: A34 Comet Mk I Type A - New Build

Post by Iacopo Di Giampietro »

I had lost this WIP! :shock:

Great job, congratulations!

Iacopo

Stephen White
Site Admin
Posts: 3114
Joined: Sat Oct 11, 2008 7:05 pm
Location: Dorset
Has liked: 1035 times
Been liked: 2111 times
Contact:

Re: A34 Comet Mk I Type A - New Build

Post by Stephen White »

The retaining bolts for the final drives are cap heads. The real Comet is covered in hex heads, not least on the final drives. It's important to retain the high tensile cap heads on this unit with all the gearbox stresses but I wanted the final drives to look authentic.

With cap heads:

Image

Solution:

Mill out a rebate to the depth of the cap head:

Image

Sink the cap heads:

Image

Place a cut down 7BA set screw on top. Job done:

Image

Image

Regards and thanks for looking.

Stephen

Stephen White
Site Admin
Posts: 3114
Joined: Sat Oct 11, 2008 7:05 pm
Location: Dorset
Has liked: 1035 times
Been liked: 2111 times
Contact:

Re: A34 Comet Mk I Type A - New Build

Post by Stephen White »

Back to the front idlers. I think I need a course in production engineering techniques. Anyway, all four now complete:

Image

Next stage is the tyres. I decided to use Comet roadwheel tyres, which are bigger in diameter and section. The material is easy to shape on a grinder, as long as it isn't allowed to heat excessively. Not sure what the white hat and yellow coat brigade would say. First step is to achieve the correct section:

Image

Image

Then cut and shave off until a perfect fit is achieved:

Image

I used Loctite 271 as adhesive. The joint needs reinforcement and I decide to pin both sides:

Image

Image

The central flanges of the two halves are obviously thicker together than that of the single kit idler, which would offset the idler from the track centreline. I've therefore taken a risk and reduced the hub flange to take account:

Image

Full set:

Image

Assembled idler:

Image

Image

Image

Clearance for the track horns:

Image

Comparision between the early and late idlers:

Image

It will be worth it, as long as the tyres stay on. NOt sure of the wisdom of taking a part which worked well on the real thing and replacing it with one that didn't. I guess that's one of the mad pleasures of a custom build.

Thanks for reading.

Stephen

User avatar
Adrian Harris
Posts: 5103
Joined: Thu Jul 12, 2007 10:46 pm
Location: Berkshire (UK)
Has liked: 1466 times
Been liked: 1636 times

Re: A34 Comet Mk I Type A - New Build

Post by Adrian Harris »

Excellent work as always Stephen :D :D

> NOt sure of the wisdom of taking a part which worked well on the real thing
> and replacing it with one that didn't.

Just remember to swear in 1/6th scale when it fails in a prototypical way :lol: :lol:

Can't wait to see mud oozing through these idlers, just like Steve Stuart's W&P photo.

Adrian
Contact me at sales@armortekaddict.uk for details of my smoker fan control module

Steve Stuart
Posts: 776
Joined: Fri Apr 18, 2008 11:34 pm
Location: Oxford
Has liked: 260 times
Been liked: 190 times

Re: A34 Comet Mk I Type A - New Build

Post by Steve Stuart »

The solution to the tyres may well be at some model engineering show now you have honed your technique for grinding rubber! You may find some thing smaller that is the right diameter. With my work hat on, I am wondering if micro scooter wheels or in line roller skates might offer some thing of the near or correct size, please let us know what the diameter needed is and I, and, I am sure, others might find some thing!
As Adrian has pointed out extruding mud would be good, but finding 1/6 scale War and Peace mud might be a tall order, you are more likely in my experience with clogged tracks to blow a fuse, namely the one the local Halfords has run out of!
All the best
Steve

Post Reply