Page 26 of 26
Re: 00 FD 96 John's Main Contender
Posted: Thu Jan 23, 2025 1:40 pm
by John Clarke
Hi Andy they've all gone, but I'll ask Mark if some more can be made/printed.
Re: 00 FD 96 John's Main Contender
Posted: Thu Jan 23, 2025 2:08 pm
by andymusgrove
Thank you that would be great.
I guess those were resin printed, I have a FDM Prusa Printer and I don’t think it would achieve the finish looking at the photos.
I’m just getting back into my build still got lots to do so any help is very gratefully recieved.
Loving the work on your thread so thank you keep up the good work.
Cheers
Andy
Re: 00 FD 96 John's Main Contender
Posted: Fri Jan 24, 2025 9:22 pm
by John Clarke
I've asked Mark to print a half dozen handles and I should have them next Monday. I'll let you know the damage (cost) when I get them.
Anyone can ask Mark Hawkins through the PM's for Fine Printed detail parts. Once he knows the dimensions he can draw up and print in high (fine resin) definition any part you can think of within reason.
I've also seen that he can print flexible rubberize items too.

Re: 00 FD 96 John's Main Contender
Posted: Sat Jan 25, 2025 10:13 pm
by andymusgrove
Oh cool thanks John

look forward to hearing from you.
Re: 00 FD 96 John's Main Contender
Posted: Thu Jan 30, 2025 1:10 pm
by John Clarke
I've been adding more detail to the turret. The emergency gunner's sight drilled out and slotted and filling in the slots for the smoke discharger mounts with shaped aluminum plate .
The original kit supplies some bolt on plates that fit in the milled out slots. But the full size original uses an odd arrangement of welded on brackets.
So I'll have to make them. I can only think that the full size originals are adjustable with a large hammer

I don't know why I'm shocked

Re: 00 FD 96 John's Main Contender
Posted: Thu Jan 30, 2025 8:32 pm
by John Clarke
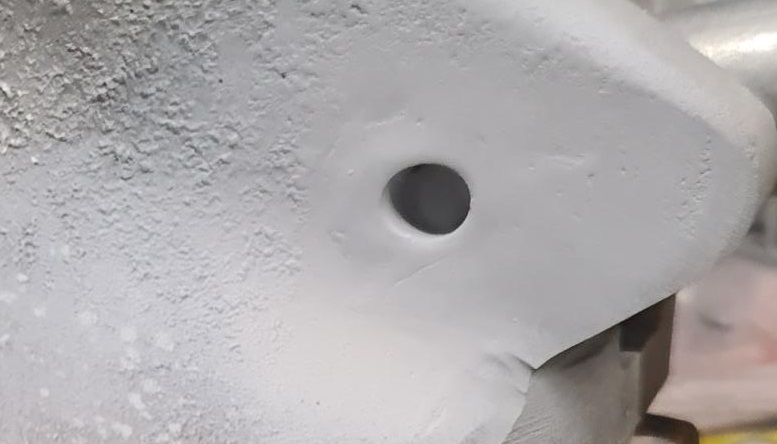
I've Filed off the blanks in the milled slots for the smoke dischargers and will filled any small gaps. Earlier decided to fill in the Main Gun pivot point hole. It's huge.
Filling it in would present a problem if something went wrong with the pivot, heaven forbid.
So I made a plug which has a hole in the center which allows easy removal with a hooked pick. Should anything go wrong with the pivot, I can easily knock through the lightly filled center blank and pull the plug out.
Originally I was going to leave the plug with the small knock out open, as if it were like the original pivot point, but looking at it and comparing it to the real tank, it's the wrong place.
So I drilled dummy pivot hole in a guesstimated place, putting a flat aluminum disk in the bottom of the hole to hide the conical shape the drill had made.
- 1000008103.jpg (67.64 KiB) Viewed 397 times
Showing the new dummy pivot point, with actual pivot point now filled in. The excessive grit to look like the casting sand will be smoothed out before final painting.
All those filings come in handy.
Now I know why we were taught to make glitter cards at junior school. Future skills? (failed)
- IMGP5626.jpg (43.22 KiB) Viewed 397 times
 look forward to hearing from you.