Page 3 of 5
Posted: Tue Nov 09, 2010 8:34 am
by John Davie
I find the best choice of small BA stuff, including those with a smaller head size is EKP
http://www.ekpsupplies.co.uk/index.php
John
Posted: Mon Nov 15, 2010 12:23 pm
by John Davie
Posted: Mon Nov 15, 2010 2:02 pm
by robert michael hilton
Hello John, most inspiring build....both yourself, and Phil give me the lift I need when things do not go well.
I have to say, the Forum, Mark and Gill, are a great team to have around.....Mick
Comet
Posted: Mon Nov 15, 2010 2:11 pm
by phil fitzpatrick
Hi John
I like all the work you have been putting on your Comet with the welds
and textures.
Cheers
Phil
Posted: Tue Nov 16, 2010 11:22 am
by Dennis Jones
If anybody wants 10ba nuts & bolts try Blackgates Engineering 01924 466000. £12 + vat + pp per 100 or they do 10's and 50's. I get a lot of my supplies from them. I have done the sane as John but I just cut mine off and riveted them over also done the sprocket covers with countersunk 7 ba nuts and bolts, Hoping to do something with the sprocket cover fixing to make it look more authentic. Have also used countersunk nuts and bolts for deck scopes as according to photos that what was used. Was going to supply some photos but camera is in the car and the wife has gone out in it for the day.
Dennis.
Posted: Tue Nov 16, 2010 3:29 pm
by John Davie
Hi Dennis,
I used 10BA (I think) hex bolts on the sprocket covers although I didn't go to the extreme of drilling and lock wiring them as the pictures I have of the real thing show! I too have used countersunk slot headed bolts in lots of places as the photos I have show these seemed to be a common fixing at the time of the Comet.
John
Posted: Tue Nov 16, 2010 6:49 pm
by Robert E Morey
John,
Your Comet looks great. I like the paint color and cast surface texture on the turret front and mantlet. Looks very authentic. Great build. I'm sure you are excited to get it running. Kind regards, Bob
Posted: Wed Nov 17, 2010 8:00 am
by John Davie
Thanks Bob,
I've had it running since I put the hull together and it seems to run well, but it's too wet and muddy to to do much running yet as I don't want to get it dirty until I have finished the painting and basic weathering. After that, like all my stuff, it can get as dirty and muddy as it wants - all adds to the effect!!!
John
Posted: Sat Nov 20, 2010 2:01 pm
by John Davie
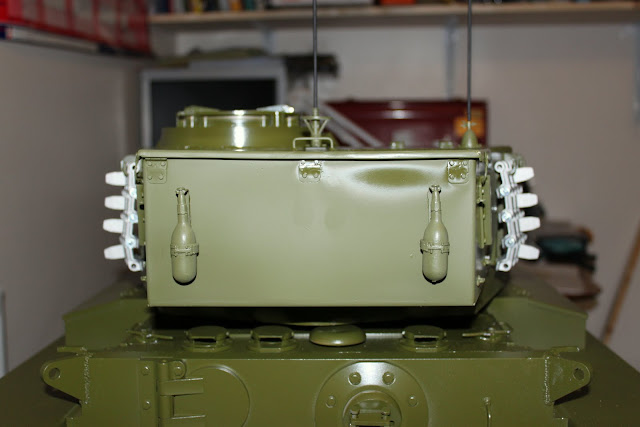
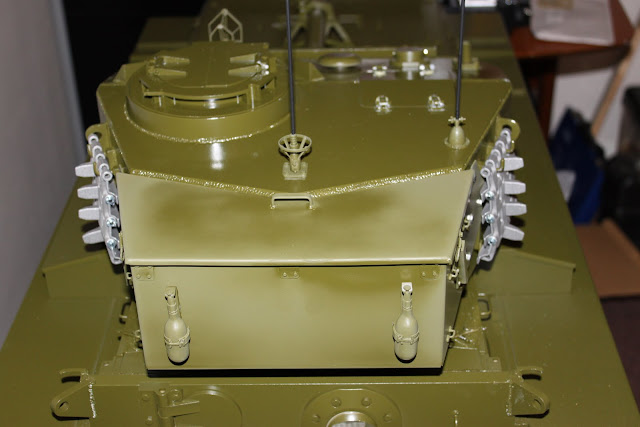
Bustle bin now attached.
John


Posted: Sat Nov 20, 2010 3:44 pm
by Dave Dibb (Armorpax)
Hi John,
Sorry to be a pain but the extinguishers go the other way up,
Cheers
Dave
Posted: Sat Nov 20, 2010 4:00 pm
by John Davie
Whoops!!!
Don't know why I put them that way up all my pictures show the correct way, must have been dreaming!!! Thanks for pointing it out.
John
Posted: Sat Nov 20, 2010 4:27 pm
by John Davie
Turned them round

!!!! That's better

.
John


Posted: Sat Nov 20, 2010 5:39 pm
by Adrian Harris
Having seen, and driven, the demonstrator at various shows, it's great to see one in the green, so to speak


Adrian.
Posted: Fri Dec 03, 2010 12:59 pm
by Dennis Jones
John,
What did you use to get the cast look on the turret front ? Is it the spray on one ?
Dennis.
Posted: Fri Dec 03, 2010 2:26 pm
by Stephen White
John
Your cast steel effect looks great - very necessary for the Comet.
If I may offer a suggestion, I've used UPOL High #5 which is readily available in a well known motoring store. It's designed to be a high density primer but you can spray it at various thicknesses and achieve some very subtle effects, including the marks of rolled steel (some of the Comet was cast and some plates were RHA - rolled homogenous armour). It's a sort of Mr Surfacer 500 on steroids (and a lot cheaper).
If you want to see the effects, I've put some photos on page 19 of my Pz III blog.
My Comet options pack arrived today, so I'm all set to start - in a year or so when the Pz III is finally finished.
All the best.
Stephen