Hi Robert, if you search Google for Delft Clay Casting System it will show you the stockists and it is ideal for one-off projects, I have a small electric furnace, using crucibles that hold approx a kilo of brass, but the most I have melted at one time is about 1/4 lb
the furnace will heat to about 1200 degrees, when it is poured into the mould, the clay around the object chars, you just scrape this off and reuse the clay
regards
Jeff
2025 ARMORTEK KIT SURVEY
Over the last few years we have brought out a whole series of kits as a direct result of your feedback - kits like the Pershing, JagdPanther, Hetzer, Leopard 2A4, and more recently the Sd Kfz 7, 88mm Flak 36 and the upcoming Challenger 2.
So, in keeping with what has become and annual tradition, here is your opportunity to once again influence our future production plans.
We have added in some "guide pricing" next to the names of the models. This is a rough estimate of the price at the current rates.
Thanks in advance for your input and we look forward to the results.
Panther Progress!
-
Jeffrey Goff
- Posts: 805
- Joined: Thu Jul 12, 2007 12:52 pm
- Location: NORTHAMPTON
- Has liked: 20 times
- Been liked: 737 times
-
Robert E Morey

- Posts: 2348
- Joined: Wed Jul 18, 2007 12:59 am
- Location: Seattle, WA USA
- Has liked: 158 times
- Been liked: 830 times
Jeff thanks for the info,
I've found a source in the US. Theres even some good how to video's here:
http://www.contenti.com/products/_new_i ... me=casting
Interesting concept. I've never heard of this type clay or of using it like a sand casting process. Id like to try it to make some small brass or bronze parts.
Thanks for again for mentioning it! Looks like this old dog learned a new trick <to try out>!
Kind regards
Bob
-
Robert E Morey
- Posts: 2348
- Joined: Wed Jul 18, 2007 12:59 am
- Location: Seattle, WA USA
- Has liked: 158 times
- Been liked: 830 times
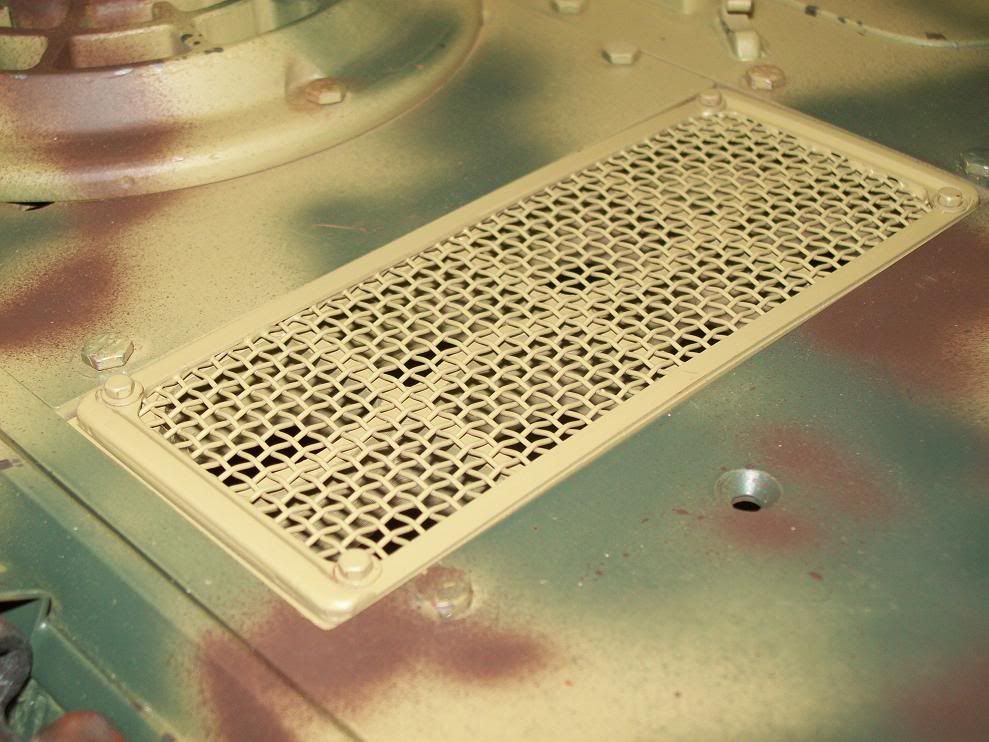
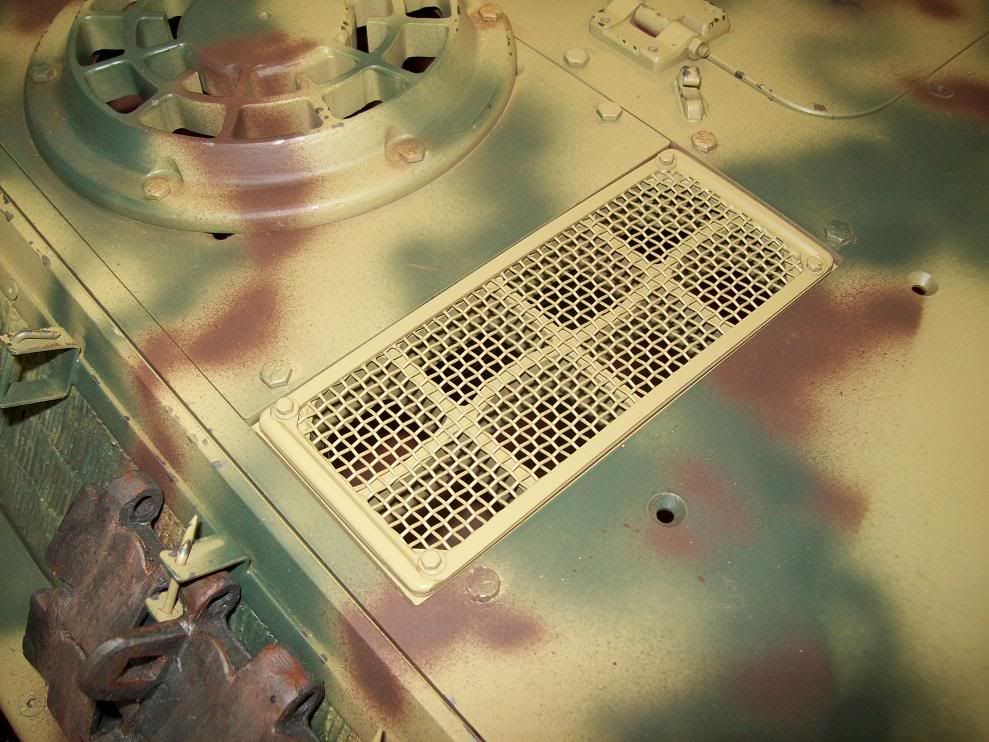
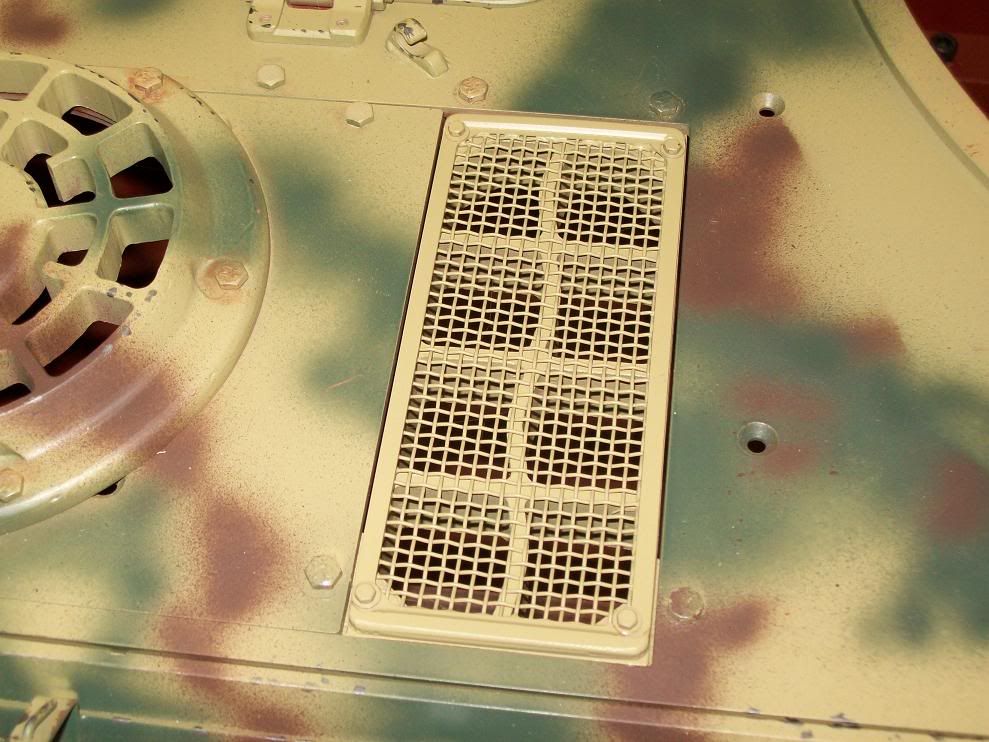
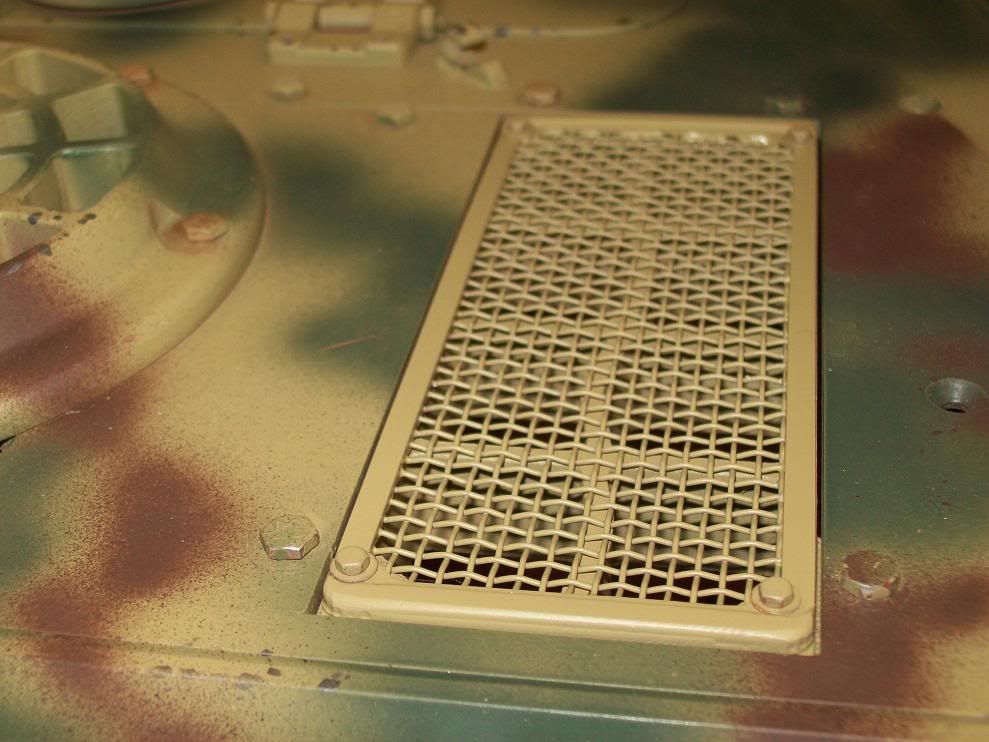
After a short vacation and break to do a little triathlon - I'm back at it. I decided to remake the mesh grill covers, not being happy with the fragile kit supplied part, and not happy with my first attempt at an improvement. In my first version the M3 bolts stick up too high, and are nearly whacked by the turret. Also it looks wrong sitting on top of the deck. The real mesh covers were recessed and fit flush to the deck.
So I redesigned the part and made another frame on the CNC. Both frame and mesh are brass so they can be soldered together. The screws were changed to #2-56 which look a lot more scale. However compared to the M3's they look puny! Approx 2mm is removed from the top of the white metal grille to provide the recessed look.
I think this one looks a lot closer to the real thing. Close enough for me to make the other 3 and finish this part of the project. What do you guys think? I know it is not 100% accurate. N-joy and feel free to comment.
So I redesigned the part and made another frame on the CNC. Both frame and mesh are brass so they can be soldered together. The screws were changed to #2-56 which look a lot more scale. However compared to the M3's they look puny! Approx 2mm is removed from the top of the white metal grille to provide the recessed look.
I think this one looks a lot closer to the real thing. Close enough for me to make the other 3 and finish this part of the project.
-
Fabrice Le Roux
- Posts: 394
- Joined: Thu Jul 12, 2007 8:57 pm
- Location: London UK
- Been liked: 14 times
Bob,
Very nice.
The standard M3 hex screws supplied are very overscale in some places. I have had quotes to have M3 threaded bolts cut from smaller hex stock but I would have to place orders for thousands. However there is a risk of a smaller screw breaking when under load.
My solution is to where possible beef up the structural fixings with concealed M4 or even M5 countersunk socket screws. Where the screw heads are more noticable, or even just decorative, and under less stress I used smaller BA screws, in some cases just epoxied into the holes. In the UK, EKP Ltd make BA screws with the next size down head, eg a BA8 with a BA9 head. Very handy.
Making correct scale castellated nuts is another headache altogether..
Keep up the good work!
Fabrice
-
Kent Wiik
-
Robert E Morey
- Posts: 2348
- Joined: Wed Jul 18, 2007 12:59 am
- Location: Seattle, WA USA
- Has liked: 158 times
- Been liked: 830 times
Kent,
I did consider making the sloped insert, but haven't come up with an easy way to to do it. Maybe a resin plug that gets epoxied into the holes? Its not a very noticable detail like the mesh screens are so for now I will skip the sloped insert. Wouldn't be that hard to make a wood master plug and a small RTV mold to cast them in resin. Maybe someday when I have no other projects 
Fabrice, that would be a great solution to get M3's with a M2.5 or M2 hex head. I don't know how easy that would be here in the US. I can get 4-40 and 3-48 hex though, that may be a good compromise size wise for the hex. I don't care for mixing metric and english threads though.
For now I think I will live with the size difference.
Thanks for the feedback guys!
Bob
I did consider making the sloped insert, but haven't come up with an easy way to to do it. Maybe a resin plug that gets epoxied into the holes? Its not a very noticable detail like the mesh screens are so for now I will skip the sloped insert. Wouldn't be that hard to make a wood master plug and a small RTV mold to cast them in resin.
Fabrice, that would be a great solution to get M3's with a M2.5 or M2 hex head. I don't know how easy that would be here in the US. I can get 4-40 and 3-48 hex though, that may be a good compromise size wise for the hex. I don't care for mixing metric and english threads though.
For now I think I will live with the size difference.
Thanks for the feedback guys!
Bob
-
Tim Bowman
- Posts: 1762
- Joined: Fri Jul 13, 2007 4:53 am
- Location: Northern California
- Been liked: 177 times
- Contact:
-
Gerrit Haarhoff
- Posts: 14
- Joined: Mon Jul 23, 2007 6:46 am
- Location: South Africa
- Been liked: 4 times
-
Robert E Morey
- Posts: 2348
- Joined: Wed Jul 18, 2007 12:59 am
- Location: Seattle, WA USA
- Has liked: 158 times
- Been liked: 830 times
Hi Gerrit,
Thanks for the feedback and comments. As for the mesh I bought it from an industrial supply house (McMaster-Carr) here in the US. I didn't actually make the mesh. I can provide the P/N for it for those interested. A 12 X 12 (inch) piece is surprisingly inexpensive, approx $17 USD. Material is brass.
As for the tutorial, I would be glad to do a how-to on how I made the whole part - but I used CNC to make the mesh bracket. If enough are interested in how the whole part was made I'd be glad to put together a "how to". The mesh bracket can be manually machined and doesn't have to be CNC machined.
I gotta say Gerrit your Panther was a huge inspiration to me during my build. Your details, paint and weathering are fantastic. Between you, Steve Norris and Tim Bowman I had a lot of great details to draw on. Thanks guys! This forum was and still is great source for information and inspiration.
Let me know your thoughts on the how-to...
Thanks all for the kind remarks and feedback.
Bob
Thanks for the feedback and comments. As for the mesh I bought it from an industrial supply house (McMaster-Carr) here in the US.
As for the tutorial, I would be glad to do a how-to on how I made the whole part - but I used CNC to make the mesh bracket. If enough are interested in how the whole part was made I'd be glad to put together a "how to". The mesh bracket can be manually machined and doesn't have to be CNC machined.
I gotta say Gerrit your Panther was a huge inspiration to me during my build. Your details, paint and weathering are fantastic. Between you, Steve Norris and Tim Bowman I had a lot of great details to draw on. Thanks guys! This forum was and still is great source for information and inspiration.
Let me know your thoughts on the how-to...
Thanks all for the kind remarks and feedback.
Bob
-
Stephen White
- Site Admin
- Posts: 3114
- Joined: Sat Oct 11, 2008 7:05 pm
- Location: Dorset
- Has liked: 1038 times
- Been liked: 2111 times
- Contact:
-
Derek Attree
- Posts: 1305
- Joined: Thu Jul 12, 2007 12:44 pm
- Location: london
- Has liked: 219 times
- Been liked: 199 times
Hi Guys
For those in the UK
The brass mesh I used came from Squires in
bognor regis I posted pictures in my Panther
gallery last year.
I made all the grills for the Panther and have
enough for the Stug / PZIII grills as well.
the sheet cost £10 for a 500mm x 300mm sheet.
the part number is on an earlier post in the Panther section.
Hope this helps
Derek
we must stop making stupid predictions
-
Robert E Morey
- Posts: 2348
- Joined: Wed Jul 18, 2007 12:59 am
- Location: Seattle, WA USA
- Has liked: 158 times
- Been liked: 830 times
New pictures with the weathering almost done. Probably going over the top with the painting now  but I like the weathered look. Once I start driving it - it will weather itself! The tracks are un-pinned so that I could paint the rear idlers. Still have not decided whether to make the rear storage bins or modify the kit bins
Have one more rear deck mesh screen to make then that project is done!

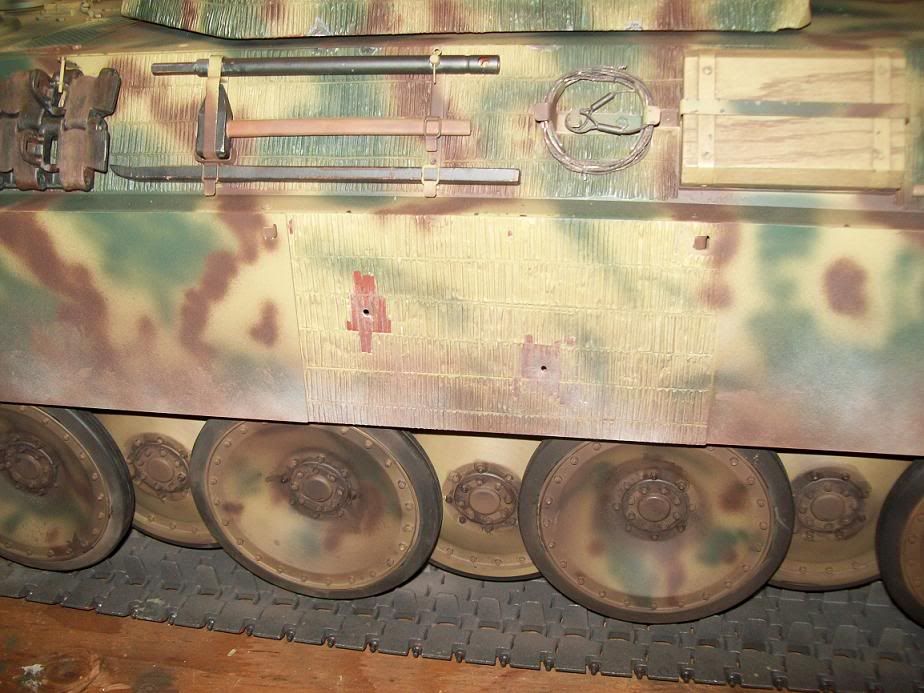


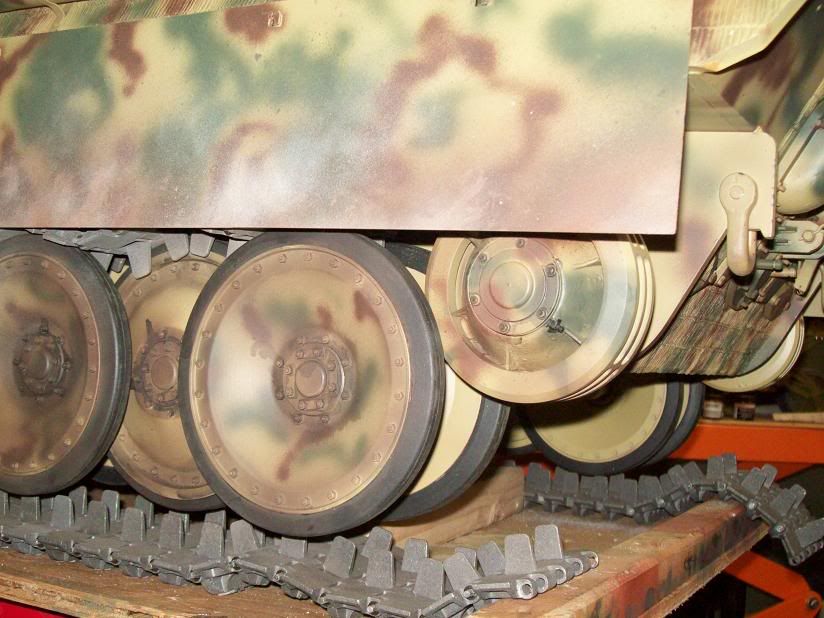
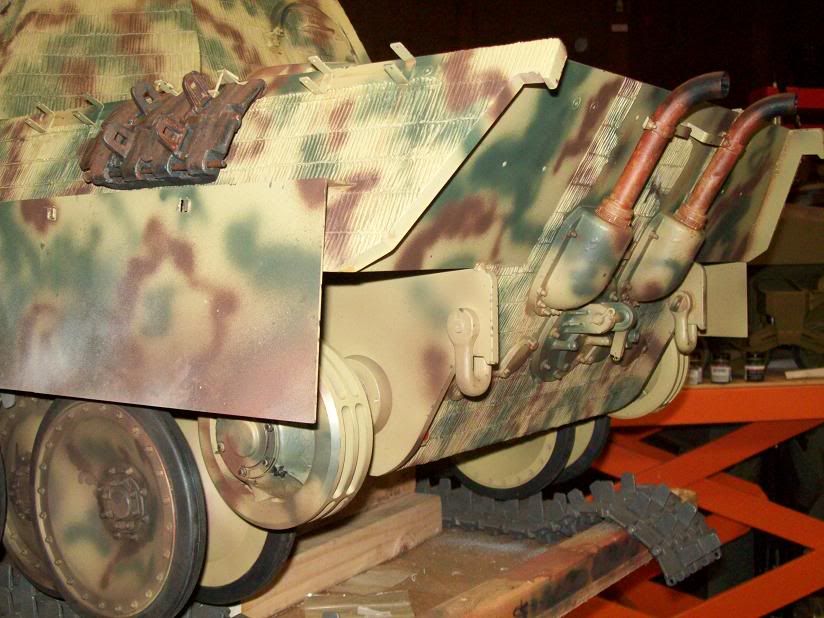
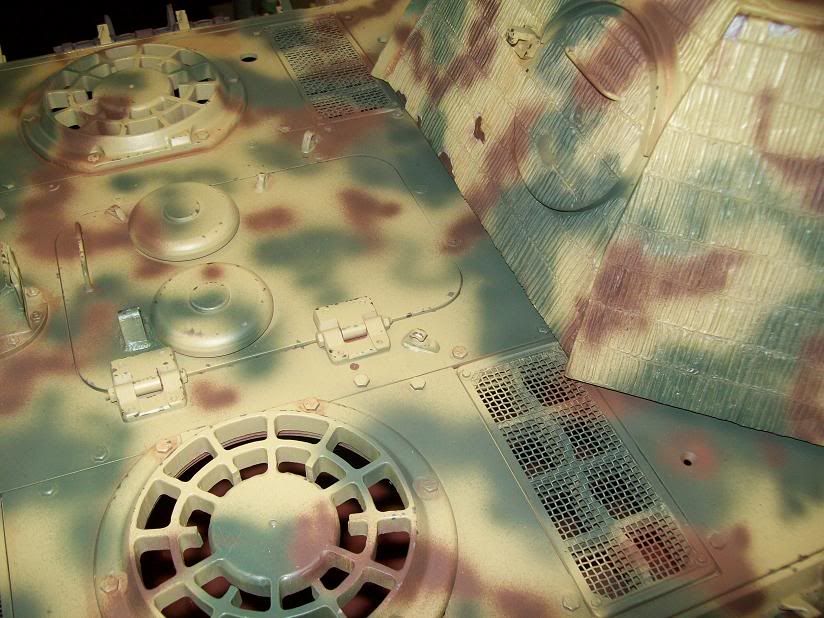
Have one more rear deck mesh screen to make then that project is done!
-
Jeffrey Goff
- Posts: 805
- Joined: Thu Jul 12, 2007 12:52 pm
- Location: NORTHAMPTON
- Has liked: 20 times
- Been liked: 737 times
-
Tim Bowman
- Posts: 1762
- Joined: Fri Jul 13, 2007 4:53 am
- Location: Northern California
- Been liked: 177 times
- Contact:
-
Robert E Morey
- Posts: 2348
- Joined: Wed Jul 18, 2007 12:59 am
- Location: Seattle, WA USA
- Has liked: 158 times
- Been liked: 830 times
Guys if I make the bins that will take another 6 months! I'm slow as a snail. 
I'm embarrassed to say theres no electronics inside yet either except the main motors. Not even the batteries. I've spent 2 years detailing the outside!
The tiger will have to wait, I gotta get this one rolling first!
I resigned myself a long time ago that I cannot keep up with you Tim!
Bob
I'm embarrassed to say theres no electronics inside yet either except the main motors. Not even the batteries. I've spent 2 years detailing the outside!
The tiger will have to wait, I gotta get this one rolling first!
I resigned myself a long time ago that I cannot keep up with you Tim!
Bob