Roy's StuG III (no. 2020/10)
-
Björn Johansson
- Posts: 166
- Joined: Wed Mar 31, 2021 4:50 pm
- Location: Falsterbo
- Has liked: 481 times
- Been liked: 408 times
Re: Roy's StuG III (no. 2020/10)
WOW! what a superb and tidy / beautiful wiring top notch
Kind regards from Björn
- Roy Beukeveld
- Posts: 191
- Joined: Fri Feb 14, 2020 7:23 pm
- Location: The Netherlands
- Has liked: 171 times
- Been liked: 118 times
- Contact:
Re: Roy's StuG III (no. 2020/10)
Hi guys,
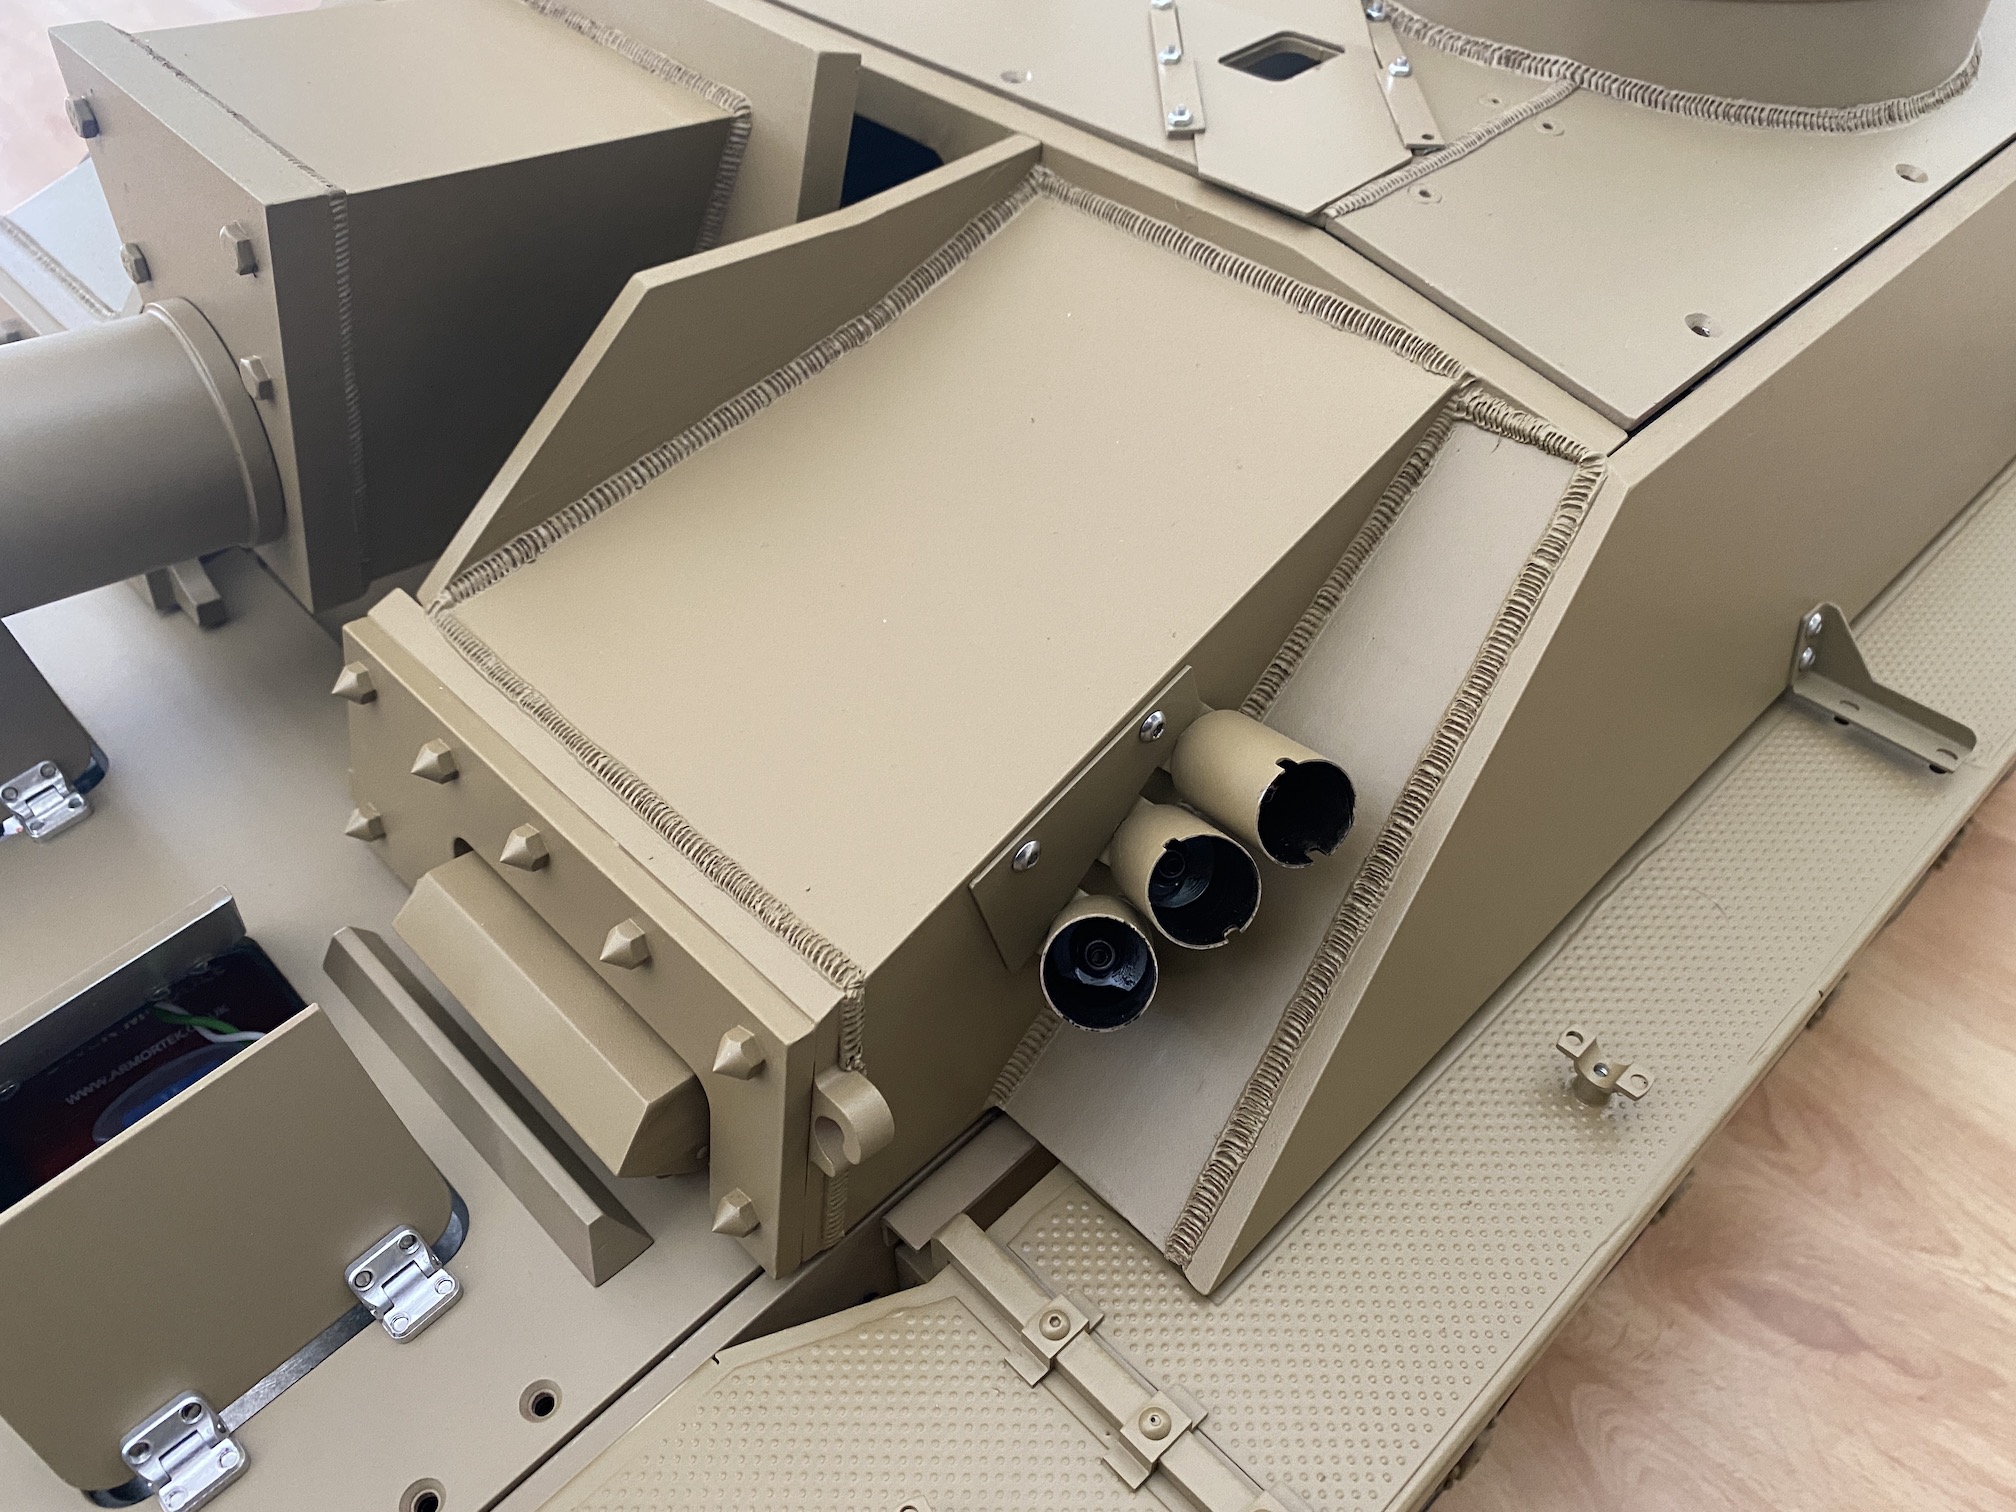
I have been working on the fighting compartment the past weeks. Did the assembly, filling painting, and also my first welding job.
Tough one I must admit. First attempts were way to big, so making sample welds smaller and different. Ended up this way, the way they looked in plain milliput, and how they look after paint also makes a lot of difference.
What do you think?

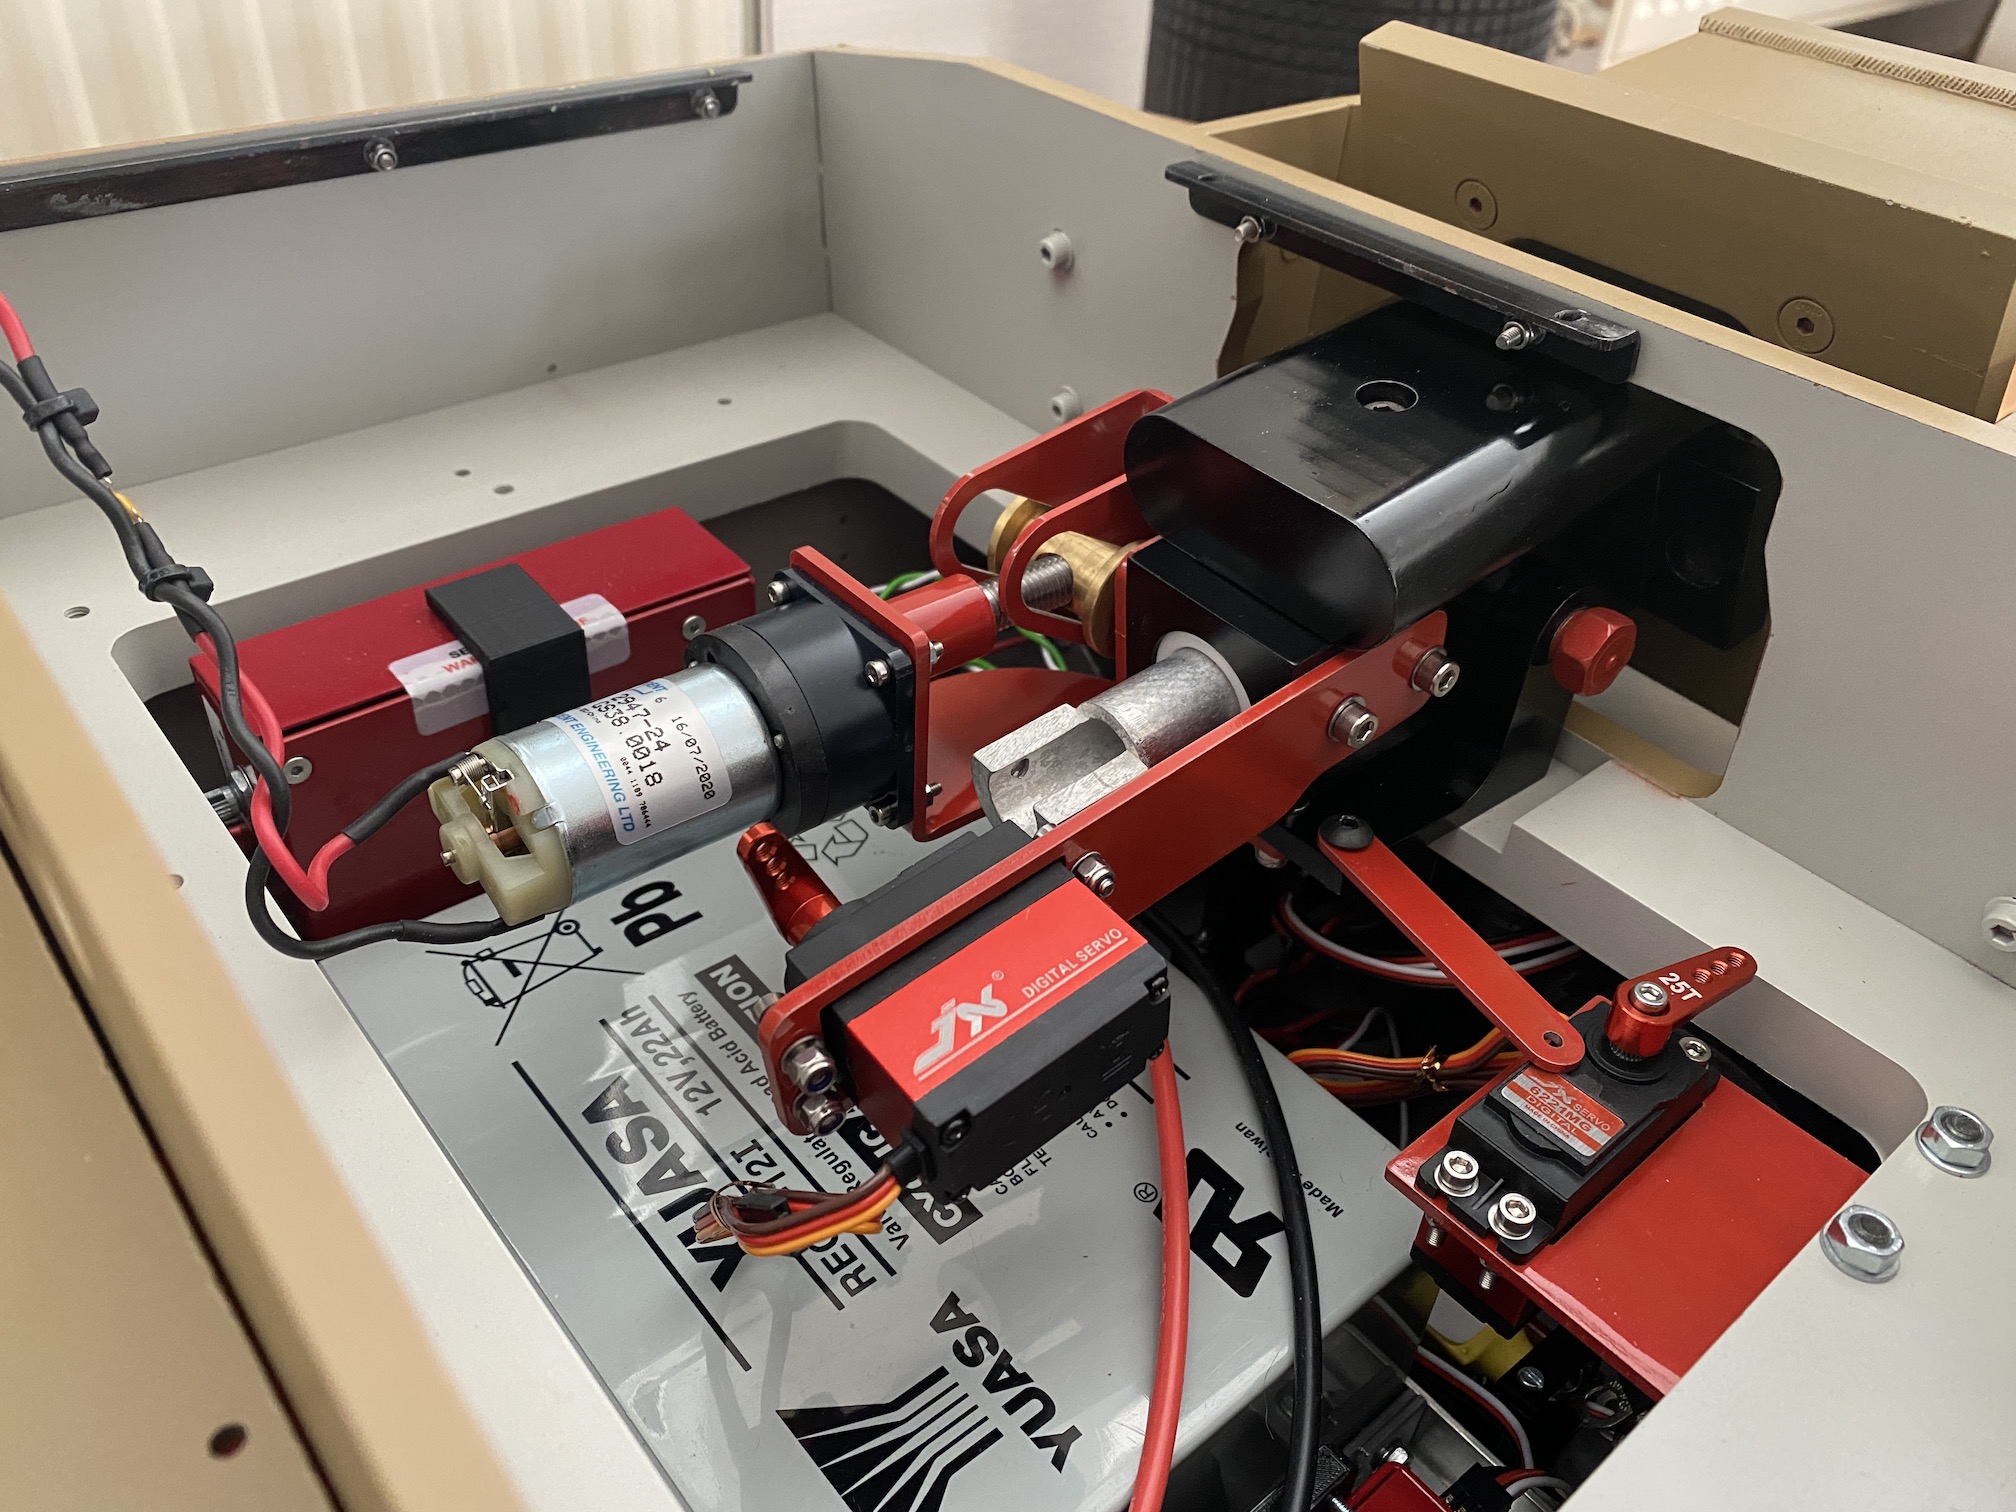
Also started on the gun mechanics, not everything is in place, so still work in progress.

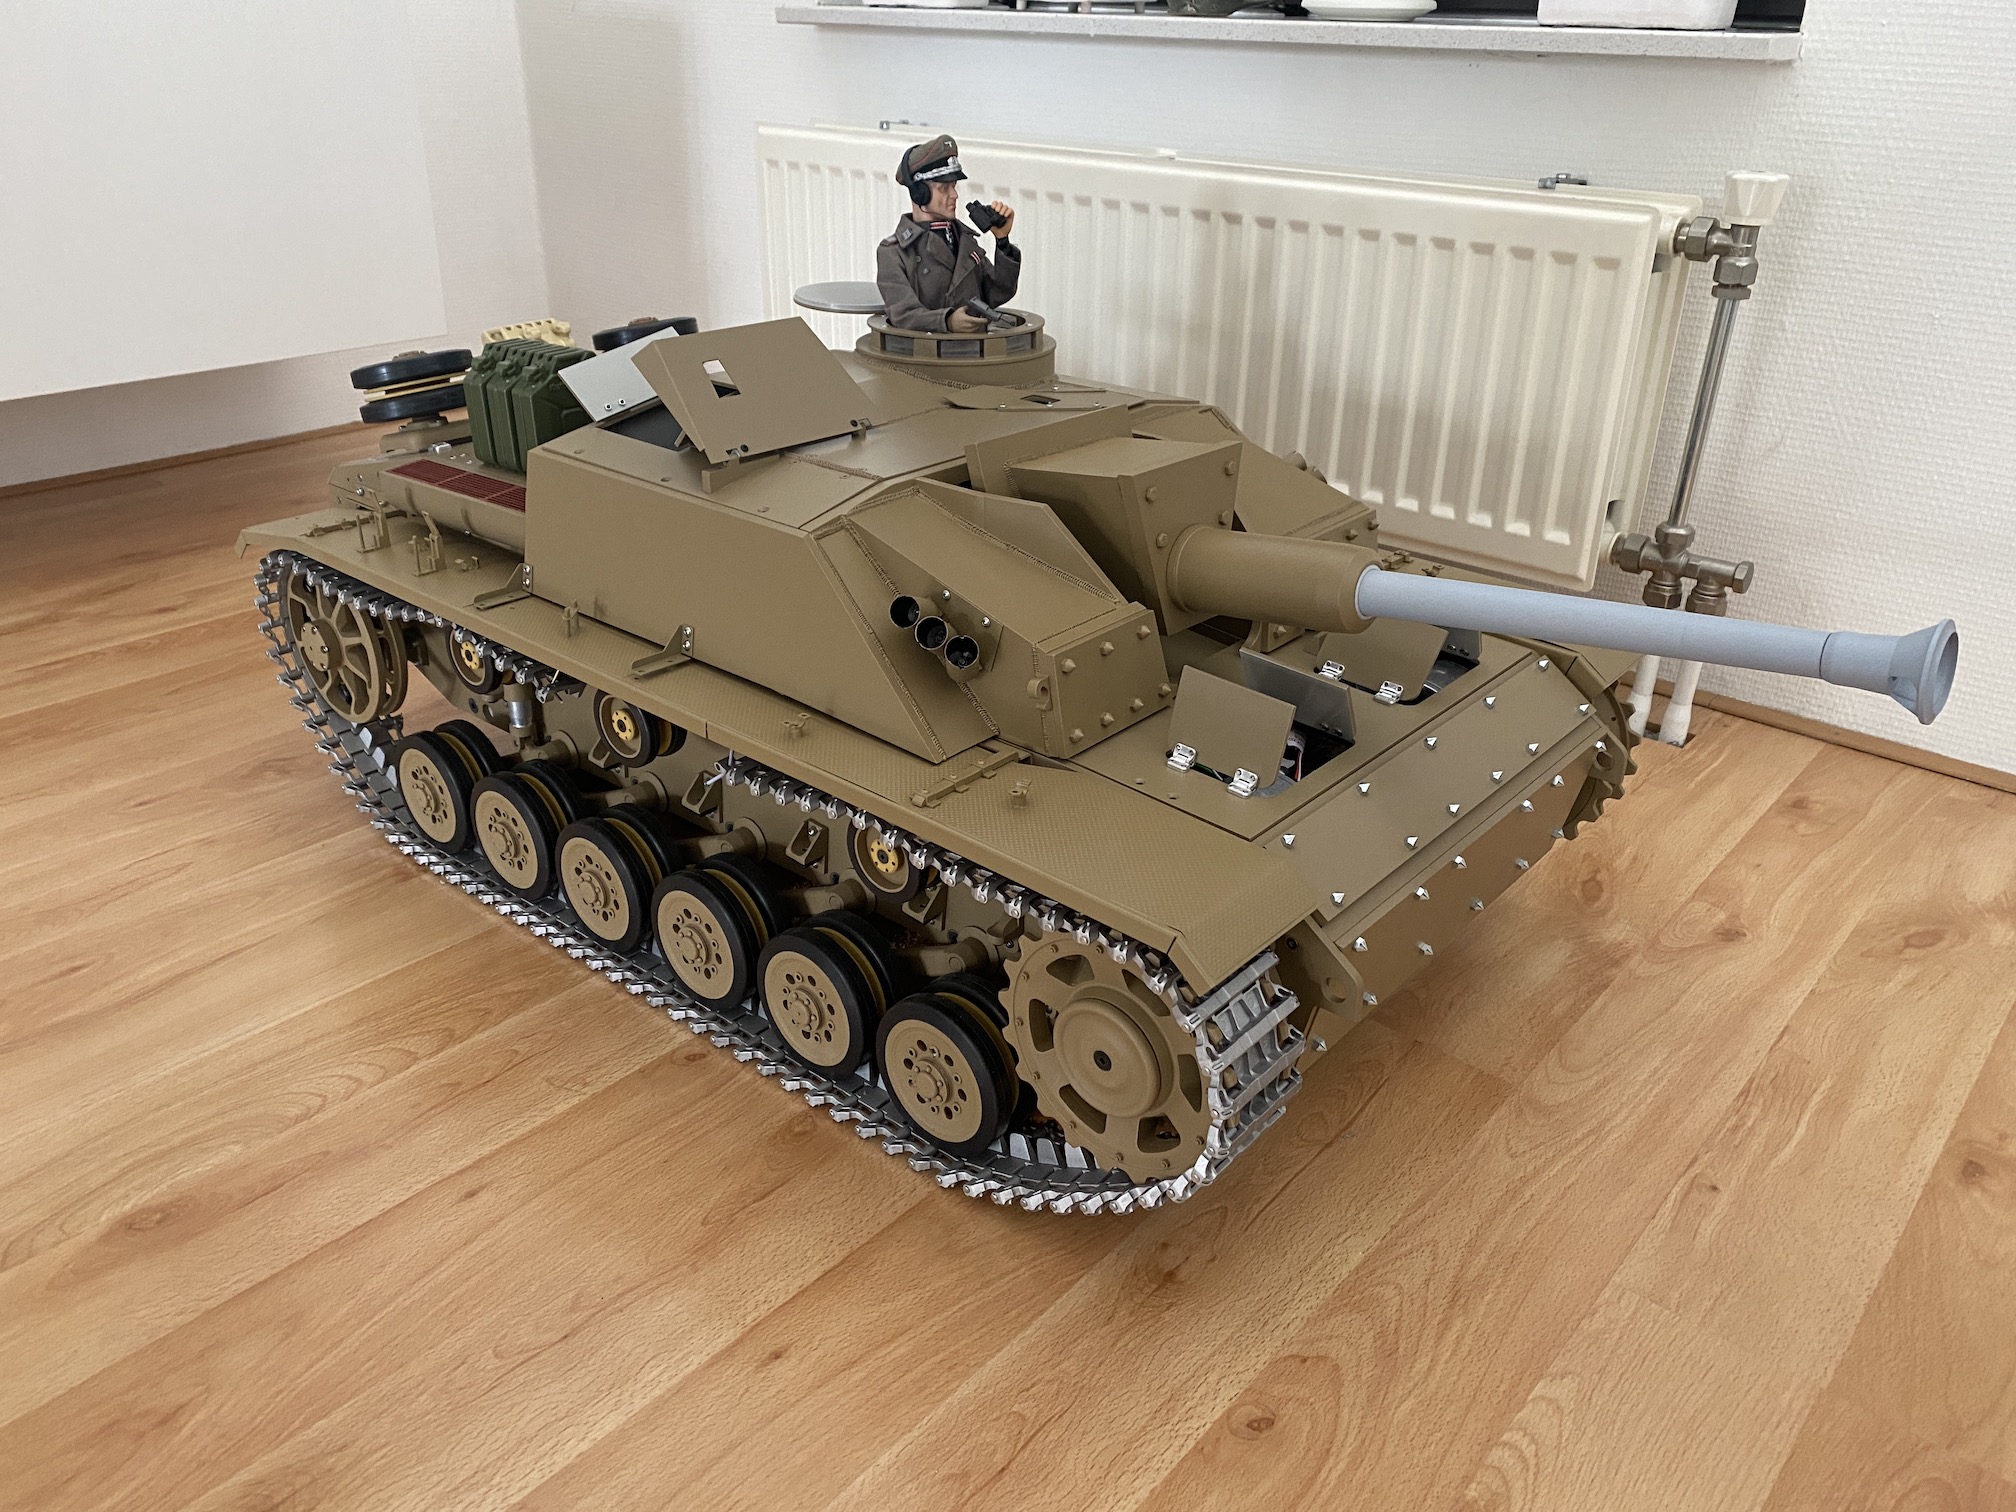
And couldn't resist to loosely put al components together to get a glance of wat the overall result will look like (it's still on blocks here so a bit high).

I have been working on the fighting compartment the past weeks. Did the assembly, filling painting, and also my first welding job.
Tough one I must admit. First attempts were way to big, so making sample welds smaller and different. Ended up this way, the way they looked in plain milliput, and how they look after paint also makes a lot of difference.
What do you think?
Also started on the gun mechanics, not everything is in place, so still work in progress.
And couldn't resist to loosely put al components together to get a glance of wat the overall result will look like (it's still on blocks here so a bit high).
Kind regards,
Roy
Roy
- Marco Peter
- Posts: 548
- Joined: Mon Feb 26, 2018 12:05 pm
- Has liked: 1530 times
- Been liked: 797 times
Re: Roy's StuG III (no. 2020/10)
Yes always a huge difference!Roy Beukeveld wrote: ↑Sat Apr 17, 2021 3:57 pm...the way they looked in plain milliput, and how they look after paint also makes a lot of difference.
That's why the first layer of paint is always is a great moment!
'Konan', my Tiger 1 Mid
'Gunther', my Panther G
'Gunther', my Panther G
-
yves mouton
- Posts: 1053
- Joined: Fri Nov 06, 2009 7:55 pm
- Location: Belgium
- Has liked: 1 time
- Been liked: 741 times
Re: Roy's StuG III (no. 2020/10)
Hello Roy,
Yes your weldings are nice and beautiful
Also your electric panels and wires are very neat
Best regards Yves
Yes your weldings are nice and beautiful
Also your electric panels and wires are very neat
Best regards Yves
- Roy Beukeveld
- Posts: 191
- Joined: Fri Feb 14, 2020 7:23 pm
- Location: The Netherlands
- Has liked: 171 times
- Been liked: 118 times
- Contact:
Re: Roy's StuG III (no. 2020/10)
Thank you guys 
A question about the StuG, does anyone know what the purpose was for the sharp pointed hex bolts used to hold the additional armor plates in place?
Why were they pointed as they are?
A question about the StuG, does anyone know what the purpose was for the sharp pointed hex bolts used to hold the additional armor plates in place?
Why were they pointed as they are?
Kind regards,
Roy
Roy
- Robert E Morey
- Posts: 2349
- Joined: Wed Jul 18, 2007 12:59 am
- Location: Seattle, WA USA
- Has liked: 161 times
- Been liked: 830 times
Re: Roy's StuG III (no. 2020/10)
Roy awesome looking Stug! Your details are really paying off well. I suspect the bolts were cone shaped to try and help deflect incoming projectiles. They are not long enough to spear garden gnomes.
Best regards,
Bob
Best regards,
Bob
- Tim Page
- Posts: 523
- Joined: Wed Dec 03, 2014 10:45 am
- Location: Milton Keynes
- Has liked: 40 times
- Been liked: 471 times
Re: Roy's StuG III (no. 2020/10)
Hi Roy, the bolt-on armour fitted to the front glacis plate and front of the fighting compartment used normal nuts or, in some cases castle nuts but never the cone heads like you have used.
The cone heads were used on the rear panel above the exhausts and in some other areas but not on the armour.
Late versions of the Stug 3 had this add-on armour welded in place.
Cheers
Tim
The cone heads were used on the rear panel above the exhausts and in some other areas but not on the armour.
Late versions of the Stug 3 had this add-on armour welded in place.
Cheers
Tim
2008 Armortek Panther ausf.G (early) #0035
2012 Armortek Tiger 1e (Late) #001
2009 Armortek BefehlsPanzer 111 ausf.J #0011 (SOLD)
2010 Armortek A34 Comet #0031 (SOLD)
2012 Armortek Tiger 1e (Late) #001
2009 Armortek BefehlsPanzer 111 ausf.J #0011 (SOLD)
2010 Armortek A34 Comet #0031 (SOLD)
- Roy Beukeveld
- Posts: 191
- Joined: Fri Feb 14, 2020 7:23 pm
- Location: The Netherlands
- Has liked: 171 times
- Been liked: 118 times
- Contact:
Re: Roy's StuG III (no. 2020/10)
Hi Bob,
Thank you very much


Well you got me thinking here, you are right. Looking back on pictures all I see are nuts on these places and no cone heads. I guess I just went along with the manual and didn't give it any further thought.
But no problem, I'll leave it the way it is, maybe not entirely authentical this way but it looks nice on the model.
Thanks for your reply!
Thank you very much
To short for garden gnomes indeed... but there are other predators out there as well...Robert E Morey wrote: ↑Mon Apr 19, 2021 6:15 am...They are not long enough to spear garden gnomes...
Hi Tim,
Well you got me thinking here, you are right. Looking back on pictures all I see are nuts on these places and no cone heads. I guess I just went along with the manual and didn't give it any further thought.
But no problem, I'll leave it the way it is, maybe not entirely authentical this way but it looks nice on the model.
Thanks for your reply!
Kind regards,
Roy
Roy
- Tim Page
- Posts: 523
- Joined: Wed Dec 03, 2014 10:45 am
- Location: Milton Keynes
- Has liked: 40 times
- Been liked: 471 times
Re: Roy's StuG III (no. 2020/10)
No worries Roy.
It is your model for you to build exactly as you want.
I was not trying to pick fault but just wanted to mention it in case you had overlooked it as it would be a lot easier to fix now.
BTW - I love the way you have done all the wiring and modules in your Stug.
It is a very neat install.
Cheers
Tim
It is your model for you to build exactly as you want.
I was not trying to pick fault but just wanted to mention it in case you had overlooked it as it would be a lot easier to fix now.
BTW - I love the way you have done all the wiring and modules in your Stug.
It is a very neat install.
Cheers
Tim
2008 Armortek Panther ausf.G (early) #0035
2012 Armortek Tiger 1e (Late) #001
2009 Armortek BefehlsPanzer 111 ausf.J #0011 (SOLD)
2010 Armortek A34 Comet #0031 (SOLD)
2012 Armortek Tiger 1e (Late) #001
2009 Armortek BefehlsPanzer 111 ausf.J #0011 (SOLD)
2010 Armortek A34 Comet #0031 (SOLD)
- Roy Beukeveld
- Posts: 191
- Joined: Fri Feb 14, 2020 7:23 pm
- Location: The Netherlands
- Has liked: 171 times
- Been liked: 118 times
- Contact:
Re: Roy's StuG III (no. 2020/10)
Hi Tim,
No problem at all, I know you mean well
And thanks for the compliments on my wiring
No problem at all, I know you mean well
And thanks for the compliments on my wiring
Kind regards,
Roy
Roy
-
Björn Johansson
- Posts: 166
- Joined: Wed Mar 31, 2021 4:50 pm
- Location: Falsterbo
- Has liked: 481 times
- Been liked: 408 times
Re: Roy's StuG III (no. 2020/10)
Great looking vehicle you got there ! Thank you for the inspiration.
Kind regards from Björn
- Roy Beukeveld
- Posts: 191
- Joined: Fri Feb 14, 2020 7:23 pm
- Location: The Netherlands
- Has liked: 171 times
- Been liked: 118 times
- Contact:
Re: Roy's StuG III (no. 2020/10)
Yesterday the first testdrive of my StuG took place.
All went great, all components functioned well and set up was quite easy.
I do have some finetuning to do on the transmitter but that’s the second part of the setup.
Must say I already had a ton of fun building this but seeing it drive for the first time is a milestone
Because the engine deck is off I had some temporary wiring in place. Still waiting for some connectors and components to be delivered, then I can finish up the electrics. After that the engine deck and fighting compartment can come back on again.
I have a short video of it in the link below
Kind regards,
Roy
Roy
-
Vince Cutajar
- Posts: 2193
- Joined: Wed Nov 15, 2017 1:43 pm
- Location: Malta
- Has liked: 791 times
- Been liked: 1761 times
Re: Roy's StuG III (no. 2020/10)
That looks great Roy. For me, it's a great feeling when any model comes to life.
Vince
Vince
-
michael hilton
- Posts: 1198
- Joined: Thu Dec 15, 2011 4:29 pm
- Has liked: 1566 times
- Been liked: 836 times
Re: Roy's StuG III (no. 2020/10)
Good morning Roy, that is a most excellent build.....however your work is far from over  do I now treat my StuG to a coat of weathering, or do I leave it, as is.
To weather or not to weather, that is the question Weathering is a whole new experience, and a most enjoyable one. Until recently hardly any of my models were weathered. The 'builds' and builders on this Forum persuaded me to give it a go. Lots of helpful advice will come your way. It will be your choice Roy....either way a very impressive model, well done my friend...Mick
To weather or not to weather, that is the question
-
Björn Johansson
- Posts: 166
- Joined: Wed Mar 31, 2021 4:50 pm
- Location: Falsterbo
- Has liked: 481 times
- Been liked: 408 times
