Iacopo's Panzer III, a new and first adventure for me.

Forum for discussion relating to the Panzer III/StuG III
Post Reply
Andrea Daviero
Posts: 105
Joined: Fri Dec 03, 2010 7:24 pm
Been liked: 5 times

Re: Iacopo's Panzer III, a new and first adventure for me.

Post by Andrea Daviero »

Sorry, I made it with the touch screen, so it looks not so good!Image

You can use 24V lamps istead of LEDs in that case no resistors are required, the wiring is the same
Regards
Andrea Daviero (Andrew)

Ray Brown
Posts: 452
Joined: Tue Jul 05, 2011 2:00 am
Location: Penrith NSW
Has liked: 26 times
Been liked: 103 times
Contact:

Re: Iacopo's Panzer III, a new and first adventure for me.

Post by Ray Brown »

Interesting setup.

Thanks lacopo

Iacopo Di Giampietro
Posts: 226
Joined: Fri May 11, 2012 9:14 pm
Been liked: 48 times

Re: Iacopo's Panzer III, a new and first adventure for me.

Post by Iacopo Di Giampietro »

Good afternoon everyone.
Sorry for the long absence: I have not updated the work on my Panzer III!
We were left to the commander's cupola.

Well, as expected was put back on the lathe to widen the opening, because you could not close the doors once put the internal details.

Image

As you can see, were also added to the armor for viewers, a magnificent work of art of our John Fitzsimons. Three were left open, two closed, just to give a bit of movement to the dome.
Were also added to the rear pistol ports:

Image

Doors terminated and pinned above the drip, which will be permanently attached with washers at the end:

Image


Image


Have been made as all details of the interior doors of the commander's cupola, including the locking system!

Image

Image


Image

Image

Pillows made earlier did not satisfy me: too massive.
Then I have them redone again, always in leather.

Image

Image

Lack swabs opening doors!

Image

Well, I would say that we are!

Image


Image

Image

I forgot: in photographs lack the commander's "viewfinder" , but I have not mounted because the cupola is not yet fixed, and I would like to avoid unwanted creases, but the holes have already been made and then just screw it!
As always I will apologize for my broken English! :oops:

All for now: the next one! :wink:

Stephen White
Site Admin
Posts: 3114
Joined: Sat Oct 11, 2008 7:05 pm
Location: Dorset
Has liked: 1033 times
Been liked: 2111 times
Contact:

Re: Iacopo's Panzer III, a new and first adventure for me.

Post by Stephen White »

Iacopo, it's always a joy to see your next update. You've certainly got a good eye for detail. I particularly like the head pads which you've made very neatly out of leather. I was contemplating making some from CX5 sculpting clay for my Centurion but your work might cause me to think again about leather. I also like the way you've done the locking mechanism. Thanks for taking the time to share with the Forum. Happy Christmas and enjoyable model making for the New Year.

Stephen

Ian Rodney
Posts: 480
Joined: Thu Jul 05, 2012 6:39 am
Been liked: 53 times

Re: Iacopo's Panzer III, a new and first adventure for me.

Post by Ian Rodney »

Hi Lacopo,

Great to see your progress on your Panzer III. Like what you have done on the commander's cupola.
On the hatches, and side doors etc…..
I hope to add some of the detail parts I bought from John onto my own Pz III. cupola someday!

Keep the pics coming!

Cheers
Ian

Iacopo Di Giampietro
Posts: 226
Joined: Fri May 11, 2012 9:14 pm
Been liked: 48 times

Re: Iacopo's Panzer III, a new and first adventure for me.

Post by Iacopo Di Giampietro »

Thank you all for your comments!
I'm glad that so far my work you like.

As always, I hope you'll understand what I write with my bad English ... :oops:

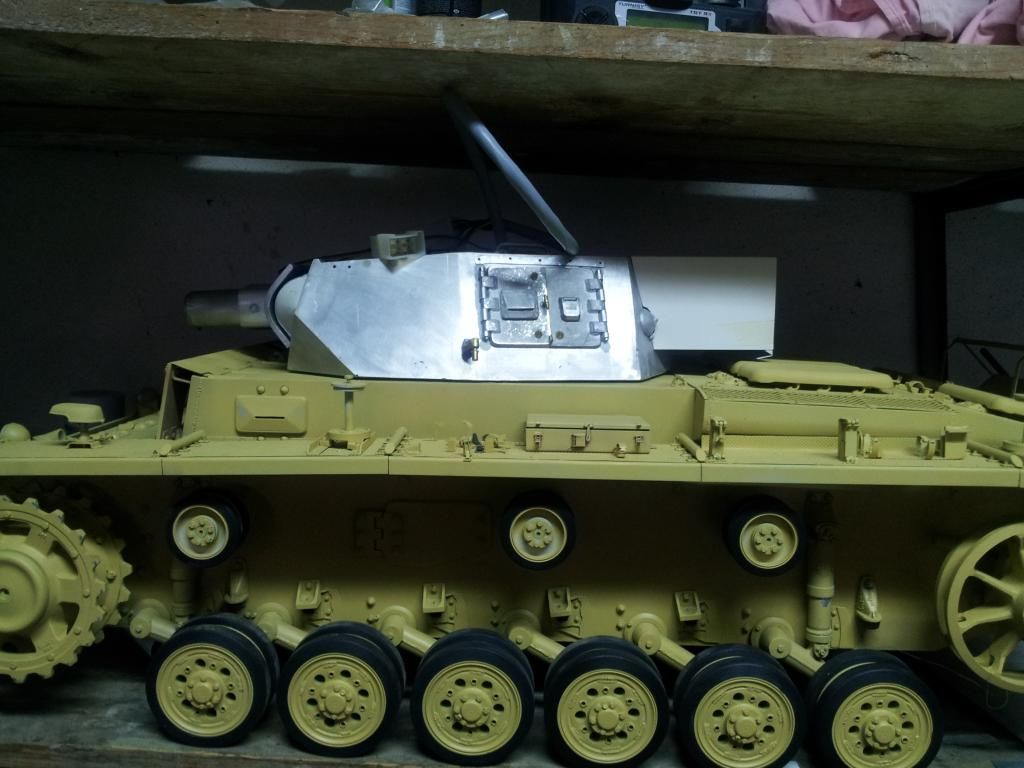
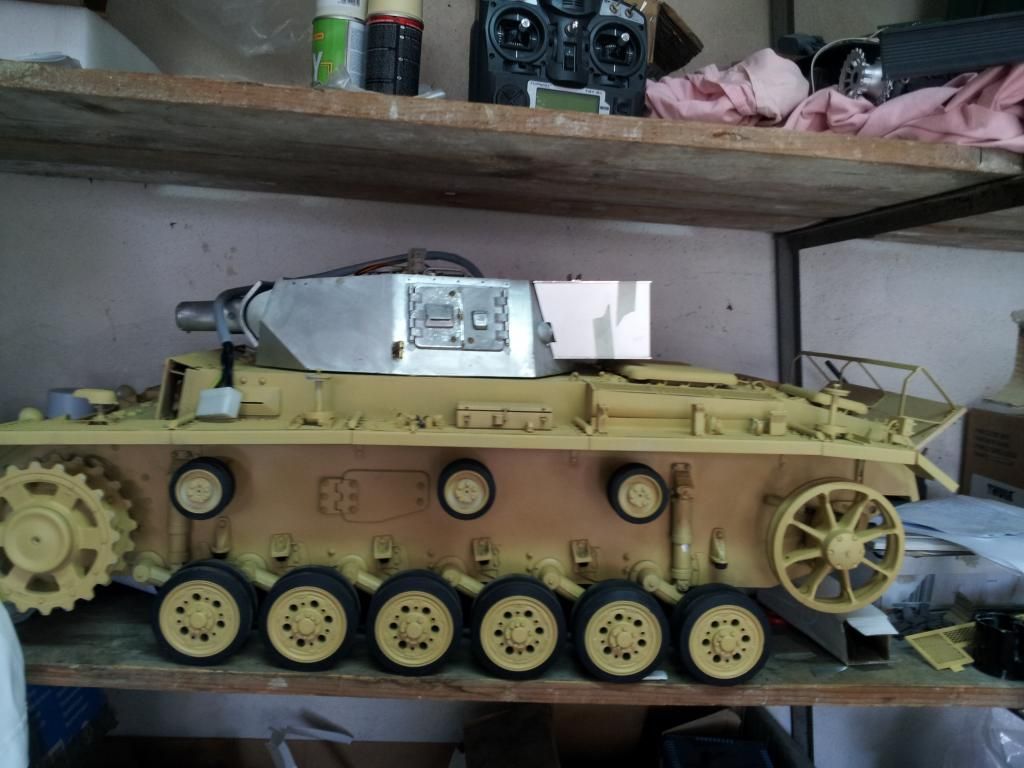
We can say that we have given a first sketched the turret, so I switched to the sore spot of the tank: the rear rommelkiste .
The rear body provided by the kit was designed for the Panzer IV and has little to do with the original of the Panzer III, so I took the opportunity to create something different and truly original:
  I have made the decision to build a Panzer III Funklenk!
I then started the project to build from scratch one of the boxes made by soldiers in the field for storage systems for remote radio control of explosives transported by Borgward ...
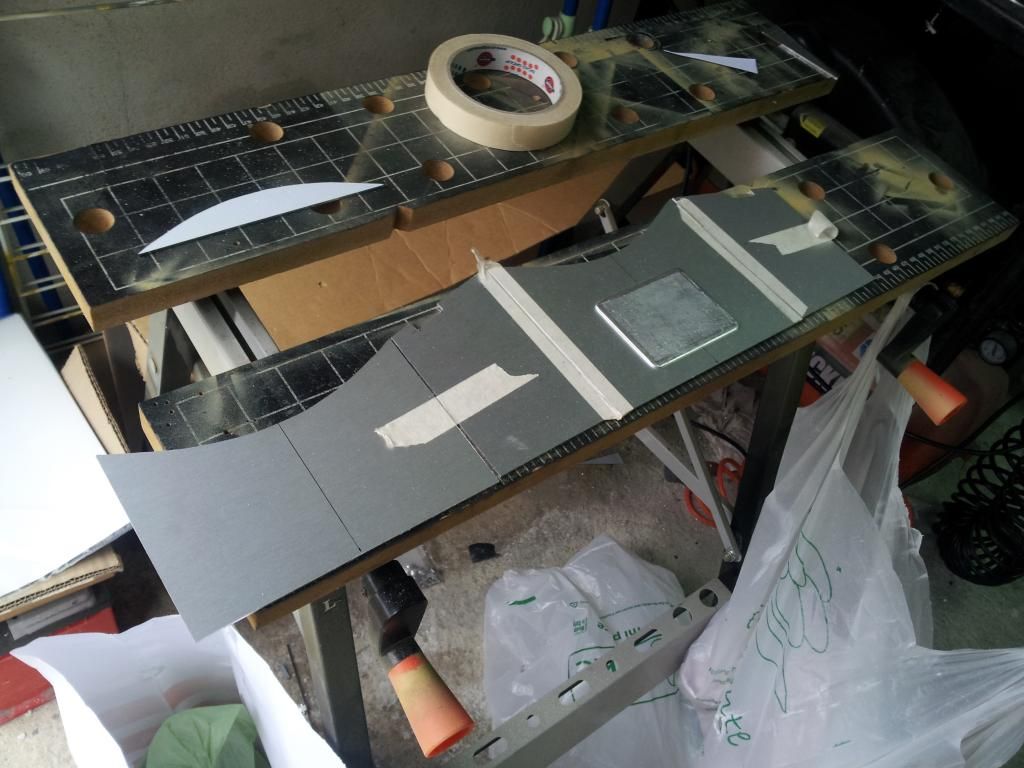
Like any good little project I left as the basis of the measures of a 1/35 kit of the Dragon, just to have an idea, and then I made a cardboard template on the model to see dimensions and more.

Image

Image

Then I am past the realization of the various pieces.
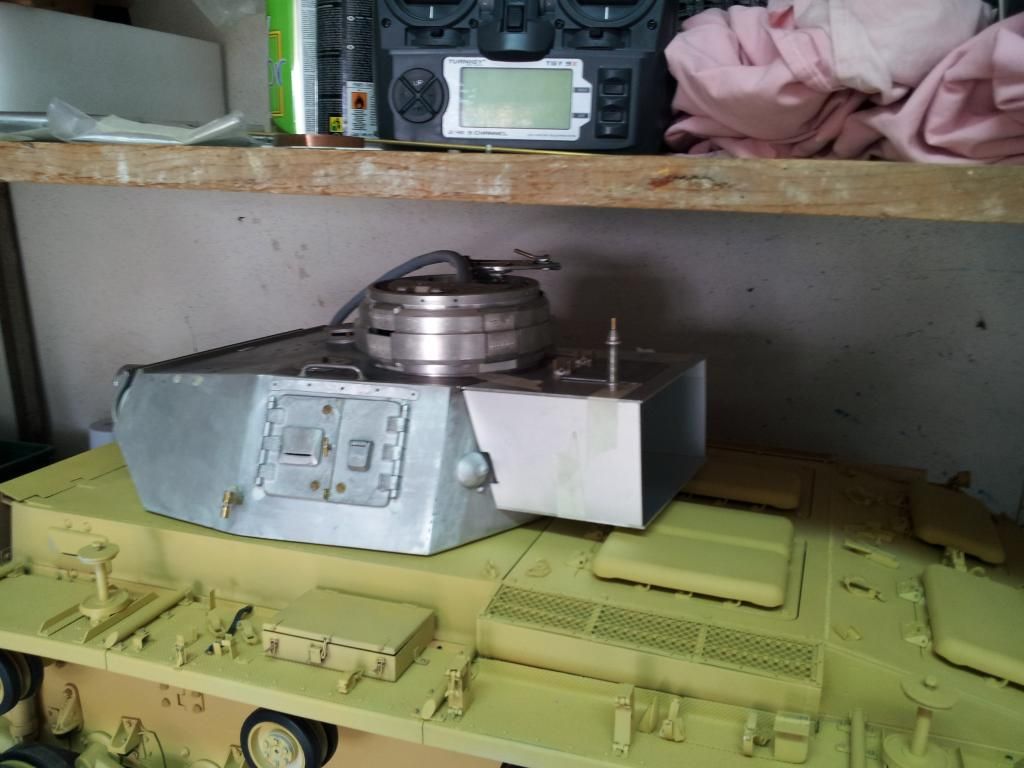
To do so, I focused on the aluminum, using sheets of 1.5 mm thickness, in order to have plates with the real scale but with the problem of fixing, since the aluminum does not fuse with normal equipment ... .


Image

The tipping as said was made in the field, and there was not a fixed rule for the realization: the only fixed points were the two rear doors and a top door, an antenna for transmission (realized in different ways, it was often recycled base other wagons) and stop.

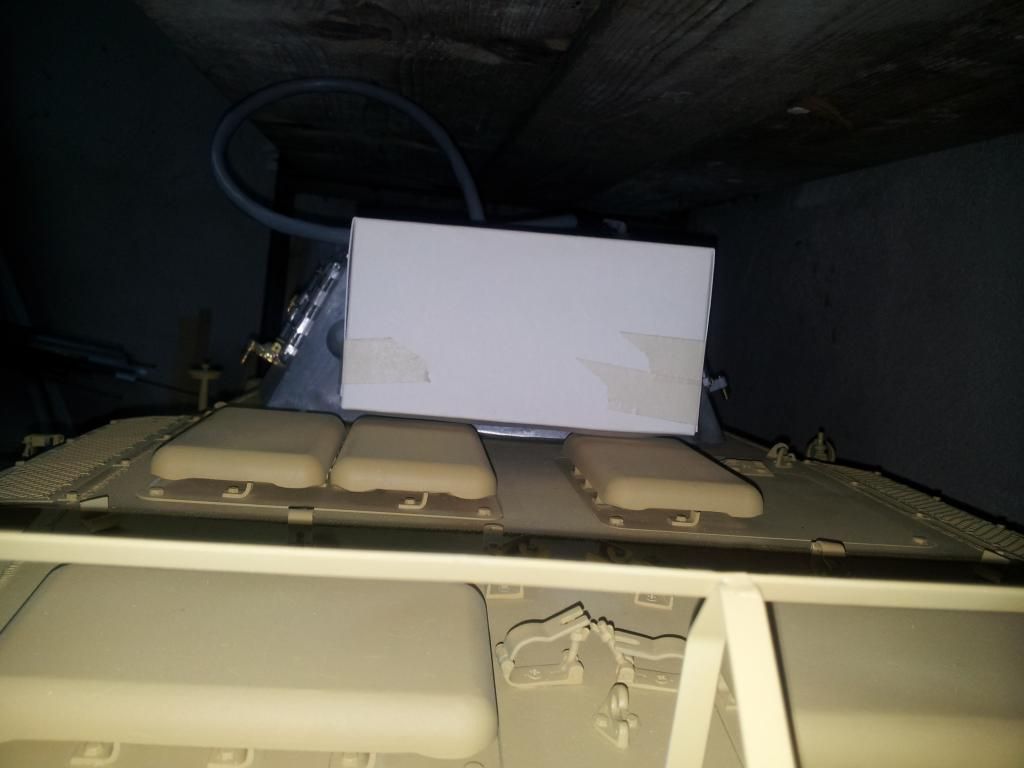
So, I started to sketch the top flap:

Image

Antenna base built from scratch, the most common type on funklenk and on Borgward (of course it is fully functional):

Image

With the aid of the tape paper coachbuilder, I did the first tests on the tank, helping me with the aluminum angular to put everything right angled:

Image

Image

Image

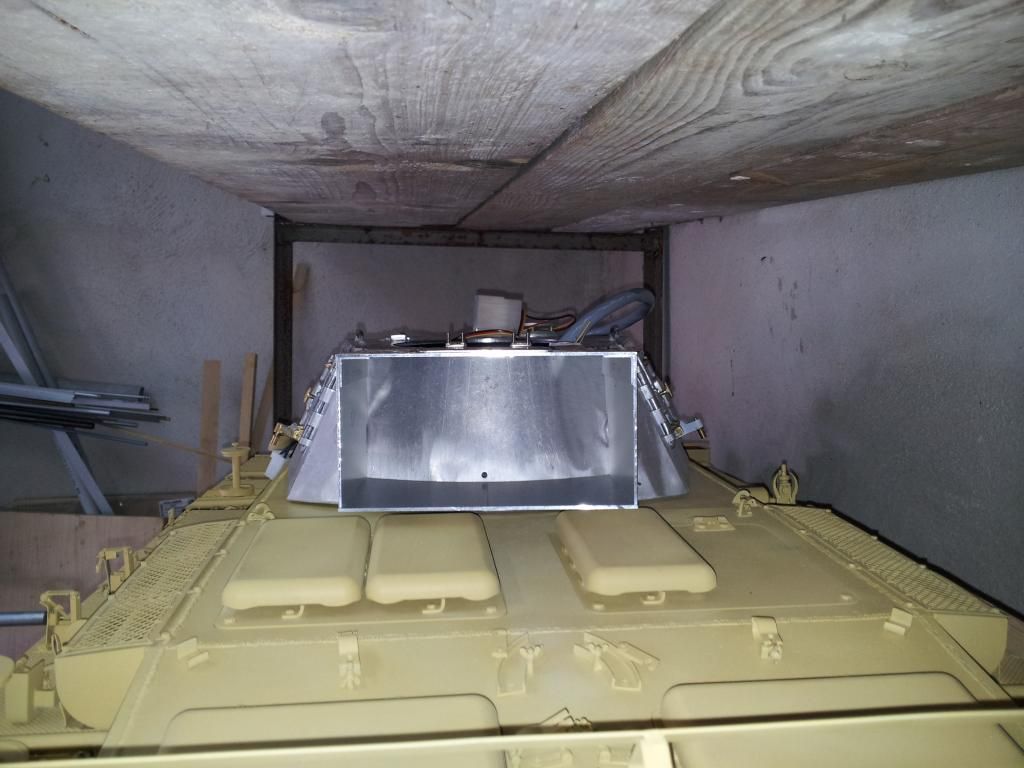
Well, let's say with a filed here and there we are!
Photos together to get an idea:

Image

Well, it's all for now!
The next update .... and Merry Christmas to all! :wink:

Iacopo Di Giampietro
Posts: 226
Joined: Fri May 11, 2012 9:14 pm
Been liked: 48 times

Re: Iacopo's Panzer III, a new and first adventure for me.

Post by Iacopo Di Giampietro »

Hello.
Resume work on the Panzer III.

Image

Image

Image

Meanwhile I also sketched the two doors, experiencing a first locking system very simple ....

Image

Image

I wanted to do something more elaborate, and I adopted one of the most "complex": many Panzer III Funklenk adopted in fact a box with a single handle and no locking system .... I thought it was too simple a solution (aesthetically ).
So I opted for the double handle (as you can see the holes present on the plates) and the central locking system to handle.
I think it will be revised, because I do not know how to hold the doors closed, since I can not use magnets .... so I have to think of a "mechanical" with bolts ....
See you soon!

Stephen White
Site Admin
Posts: 3114
Joined: Sat Oct 11, 2008 7:05 pm
Location: Dorset
Has liked: 1033 times
Been liked: 2111 times
Contact:

Re: Iacopo's Panzer III, a new and first adventure for me.

Post by Stephen White »

Iacopo,what a great choice of subject. You will have a unique model. I looked to do the same by choosing an Ausf N. I was daunted by the apparent difficulty of joining aluminium but I've recently had real success with brazing rods. I've put some details on my Cent thread but would happily give you more details in a pm of the stuff I used, if you wanted to experiment, It's a lot easier than it seemed to start with and the good thing is that the joints remain harder than the aluminium and don't re-melt at the metling point of the weld. That means you can assemble a box without it all coming unstuck with the last joint.

Congratulations and do please keep sharing your saga - ti's good to see.

Stephen

Iacopo Di Giampietro
Posts: 226
Joined: Fri May 11, 2012 9:14 pm
Been liked: 48 times

Re: Iacopo's Panzer III, a new and first adventure for me.

Post by Iacopo Di Giampietro »

Thank you very much, Stephen.
Receive compliments from you is a real pleasure!
I had also considered the rods for brazing, but then a little fear, a little laziness went on mechanical joints pure and simple, with the aid of two-component epoxy glue!

Meanwhile I went a little ahead with the work.
The locking system of the rear doors has been redone, trying to make it functional.
I opted for a dual latch, that with the rotation of the handle will not only to lock the door counterpart but also to bring down two latches, precisely, upward and downward.
This is the first draft:

Image

And this is the exterior handle:

Image

After having reviewed a little, I adjusted a bit of detail and replaced the lock tab contralateral, making the same size of the other components.
We say that the closure system is complete:

Image

Finally, I fixed the door to its upper plate, to which was added also the angular locking tailgate which will act one of the bolts:

Image

Image

Of course there are the finishing touches to do ... but it's all for now.
Until next time!

Iacopo Di Giampietro
Posts: 226
Joined: Fri May 11, 2012 9:14 pm
Been liked: 48 times

Re: Iacopo's Panzer III, a new and first adventure for me.

Post by Iacopo Di Giampietro »

Good afternoon everyone.
We can say that the rear body is practically finished, although I realized now that missing the hole on the right hand side door stop plate to put the padlock fastening ... :oops:

To you the pictures!

Image

Image

Image

Image

This is the closing system of the doors seen from inside, and are also visible the two perforated plates for fixing to the turret:

Image

Image


Image

The antenna base is complete, missing only the piece of spring steel wire:

Image

Well, it's all for now!

Ciao,
Iacopo

simon_manning
Posts: 2050
Joined: Fri Nov 02, 2007 8:51 pm
Location: new forest,hampshire,u.k.
Been liked: 1715 times

Re: Iacopo's Panzer III, a new and first adventure for me.

Post by simon_manning »

well worth the effort iacopo, one more quality part to add to an already superb build, regards simon manning.

Iacopo Di Giampietro
Posts: 226
Joined: Fri May 11, 2012 9:14 pm
Been liked: 48 times

Re: Iacopo's Panzer III, a new and first adventure for me.

Post by Iacopo Di Giampietro »

Good morning everyone.
Completed the rear body,
it's time to put hand to the tower. But before we decided to make a small change to the amplifier module:
in addition to the button activated from the outside for programming (which avoids to disassemble the box) we added a mini cooling fan control unit, to prevent overheating.

Image

The fan, operating at 24V, is active with the departure of the tank.

That done, I put hand to the tower itself: the turret plates were completely welded, and it was the most "simple" then draw the new welding lines with a small milling.

Image


Image

Even the front plate has been shaped, with the characteristic "beak" advancing front.

Image

This was possible due to the milling of the front of the two side plates with increasing the angle of inclination (the red line to the blue line), since the standard plates had an wrong inclination .

Image


Image

All for now.
Until next time!
Ciao.

Iacopo Di Giampietro
Posts: 226
Joined: Fri May 11, 2012 9:14 pm
Been liked: 48 times

Re: Iacopo's Panzer III, a new and first adventure for me.

Post by Iacopo Di Giampietro »

Good morning everyone.
Update on the work on the Panzer III.
After that the various components were colored ivory white, the electronics is mounted inside the turret.

Image

Image

As you can see, on the mantle I milled a rectangle, which will be positioned the trap door service for the cannon.
After placing the electronics in the turret, we were able to weld the top of the turret.
So I left with the job of fake welds along the furrows that had dug all around:

Image

I have also fixed the MG and support, and here am going to weld all around:

Image

On top of the mantle has added an aluminum plate milled by hand which has been pasted with the liquid steel to a strip of copper sheet metal, all to simulate the "cap" on the front part of the mantle (the screws are only for "pull "the liquid steel and are provisional).
Also added the viewfinder coaxial armored, and the viewer in the turret:

Image

Other welds:

Image

Image

Once fixed the liquid steel, we made the fillings of the case and we have added conical bolts / hex, and washers felled, and then set the base of the gun:

Image

Image

Well, it's all for now! :wink:
Ciao!

Iacopo Di Giampietro
Posts: 226
Joined: Fri May 11, 2012 9:14 pm
Been liked: 48 times

Re: Iacopo's Panzer III, a new and first adventure for me.

Post by Iacopo Di Giampietro »

Hello everyone!
After the mantlet itself, we go on to the waterfall with the other pieces, which have been modified or rebuilt from scratch or as needed:

Image


Image

Image

The two side plates have been realized ex-novo from aluminum sheet:

Image

Image


Image

Image


Image

Image


Until next time!
Ciao,
Iacopo

Ian Rodney
Posts: 480
Joined: Thu Jul 05, 2012 6:39 am
Been liked: 53 times

Re: Iacopo's Panzer III, a new and first adventure for me.

Post by Ian Rodney »

Hi lacopo,

Good to see you back with updated pics on your Panzer III turret.
Most enjoyable to see your latest work on your tank.
Excellent coverage and most Inspirational to get back to working on my own Pz III G. But not ready yet to
share pics on the forum.

To comment on your pics on the Forum elsewhere being cut off on the RH side. Please be assured that I and hopefully others when looking at your pics can see all your pics full size on photo bucket. Even though they might look cut off when reviewing the Topic.
As some one else said on the forum, perhaps it's down to the size of pic when down loading them.
I mean the width sizes, was it 660mm? or something smaller!…will need to re-check what sizes are best to send pics into the Forum.

Anyway good to see you back on the Forum, keep the Pz III pics coming!

Cheers
Ian

Post Reply