Hello all:
I am a new owner that has just completed his first build (late Tiger) and is now faced with the somewhat less than inspiring prospect of disassembling the whole lot to clean and paint the parts. The plan is to clean with Chemfil DX579 and then prime with a light grey SEM self etching primer followed by applying the base coat. Hopefully that's a/the right procedure.
The first question I have is, since we're dealing with mated steel, aluminum, and brass parts and consequently have the potential for electrolytic corrosion, what is the recommended level of teardown? Shouldn't all the mated parts be separated? I have no experience with painting metals to draw on, especially mixed metals. and would be very grateful for some guidance from those of you that do.
Thanks
BTW What does it mean to add a poll etc. to my topic?
first build, first un-build
-
Sean Cleary
- Posts: 31
- Joined: Tue Apr 08, 2008 4:15 pm
- Location: San Mateo, California
- Has liked: 1 time
- Contact:
-
Tim Bowman
- Posts: 1762
- Joined: Fri Jul 13, 2007 4:53 am
- Location: Northern California
- Been liked: 177 times
- Contact:
Sean,
Congratulations on the Tiger! At least when you reassemble it this time it'll be a snap.
Unfortunately, I'm no expert on the paint side and didn't give my Panther much thought but I etch-primed all aluminum and then primed everything before paint. anything with a bearing was painted assembled, or masked off.
But what I'm really posting for is that you are in San Mateo! Finally, another Bay Area Armortek owner. That's excellent news.
Poll is well, you know like taking a poll. Other forum users can vote in the poll, etc.
Hope we get to meet sometime
Kind regards
Tim
Congratulations on the Tiger! At least when you reassemble it this time it'll be a snap.
Unfortunately, I'm no expert on the paint side and didn't give my Panther much thought but I etch-primed all aluminum and then primed everything before paint. anything with a bearing was painted assembled, or masked off.
But what I'm really posting for is that you are in San Mateo! Finally, another Bay Area Armortek owner.
Poll is well, you know like taking a poll. Other forum users can vote in the poll, etc.
Hope we get to meet sometime
Kind regards
Tim
"So long as one isn't carrying one's head under one's arm, things aren't too bad." – Erwin Rommel
-
Sean Cleary
- Posts: 31
- Joined: Tue Apr 08, 2008 4:15 pm
- Location: San Mateo, California
- Has liked: 1 time
- Contact:
Thanks Tim:
USA is just around the corner from San Mateo. You ought to stop by for a visit! Seriously, where are you exactly, if you don't mind me asking? On second thought, I'd better send an email.
I'd love the opportunity to compare notes - and tanks, for that matter.
It is a pleasant surprise to learn you're not the lone ranger after all.
Sean
-
Allan Richards
- Posts: 743
- Joined: Thu Jul 12, 2007 10:34 am
- Location: Kent
- Been liked: 10 times
Sean,
When I built my Tiger I painted it as I went, I couldn't bring myself to tear it down after fitting everything, especially if you've gone as far as test running it. There are a lot of metal to metal parts but I painted them so that the edges were sealed by paint and its now about three years old and kept in a garage in a damp England climate without any sign of corrosion. You are doing the right thing in using the etching primer but I found it was best to put this on really thin then use the filler primer to build things up.
This said I expect you get quite a salty maritime climate living in the bay area so corrosion may be more of a problem.
Allan Richards
-
Sean Cleary
- Posts: 31
- Joined: Tue Apr 08, 2008 4:15 pm
- Location: San Mateo, California
- Has liked: 1 time
- Contact:
Thanks Allan,
That was great feedback. I've kind of resigned myself to tearing it apart with the hope that the re-build will go considerably faster than the initial build did, as Tim mentioned.
So, after applying the the etching primer, I am to procede as follows:
1. apply the filler primer i.e. the red oxide
2. reassemble everything but ropes, tools, hooks, shovel etc.
3. apply an enamel base coat i.e. Tamiya dark yellow
4. assemble the parts left out in step #2
5. apply camouflage
At least that's what I've pieced together from reading the other posts. Can you confirm?
I just want to make sure I haven't left anything out and that I've got the steps in the proper sequence, given the amount of time involved.
Thanks again
Sean
-
Derek Attree
- Posts: 1307
- Joined: Thu Jul 12, 2007 12:44 pm
- Location: london
- Has liked: 219 times
- Been liked: 200 times
Hi Sean
Most people fill the joining screw head holes after assembly to get a smother finnish.
I did this on my Panther after everything was etch primered and the interfaces of the joints were red oxid primered and screwed together then I hit it with red oxide inside and out as the interior of the hulls was just left red oxide in the late war.
Some people even glue the hull plates as well with JB weld I did not do that.
I hope it makes sence
good luck
Derek
we must stop making stupid predictions
-
Ad Wouterse
- Posts: 292
- Joined: Thu Jul 12, 2007 4:32 pm
- Location: The Netherlands
- Been liked: 2 times
Hi Sean,
Unless you are planning to permanently store your Tiger in the backyard or keep it in the water for prolonged periods, I wouldn't worry to much about electrolytic corrosion.
Your 5 steps list should keep the Tiger in good shape for many years.
But mind you, you might want to add some more steps like weathering etc.
Cheers,
Ad
Ad
-
Allan Richards
- Posts: 743
- Joined: Thu Jul 12, 2007 10:34 am
- Location: Kent
- Been liked: 10 times
Sean,
As Derek suggests I would etch prime everything then, put together, then fill screw heads and imperfections etc and add welds, then filler prime, colour, cammo, weathering if you are doing this. If you are applying decals paint a coat of gloss varnish where they will be applied, apply them, then paint a coat of gloss over them, then finally I would recommend a coat or two of matt varnish to seal the weathering. I painted and finished the tools etc seperate from the tank. As a precaution test the varnish and decals on some scrap before trying on the tank. I used cellulose paint for priming and the main colour and then Tamiya paints for weathering and oilbased varnish.
As Derek suggests I would etch prime everything then, put together, then fill screw heads and imperfections etc and add welds, then filler prime, colour, cammo, weathering if you are doing this. If you are applying decals paint a coat of gloss varnish where they will be applied, apply them, then paint a coat of gloss over them, then finally I would recommend a coat or two of matt varnish to seal the weathering. I painted and finished the tools etc seperate from the tank. As a precaution test the varnish and decals on some scrap before trying on the tank. I used cellulose paint for priming and the main colour and then Tamiya paints for weathering and oilbased varnish.
Allan Richards
-
Sean Cleary
- Posts: 31
- Joined: Tue Apr 08, 2008 4:15 pm
- Location: San Mateo, California
- Has liked: 1 time
- Contact:
Thank you everyone. It a quite a boost to one's enthusiasm to have his methodology validated by so many experts prior to going at it for the first time.
Allan:
You reminded me of a couple of other questions I had when you mentioned welds. I've worked quite a bit with epoxy as it is a critical component in the manufacture of my company's product however I hadn't heard of Araldite until I saw it mentioned in the Armortek manual:
1. Since epoxy's have such a broad spectrum of properties, does Araldite contain some specific properties pertaining to our particuular application, and if so, which properties and which type(s) (part numbers) of Araldite?
2. I had intended to use epoxy to strengthen the joins as well as to mimic the welds particularly around the turret lid, cupola etc. Is that the way you guys do it?
3. I'm hoping the answer to #2 is yes since it would seem the only alternative would be soldering or worse yet - actual welding - skills I have yet to acquire. I recall a couple of posts having been written about the soldering but welding is scarcely something one can learn on the fly.
Thank you again Derek,Tim, Ad, Allan, and Allan. Hopefully this will answer all that is required for me to complete the model.
As for all the fantastic after-market parts, I think it's best I cut my teeth on a "stock" build rather than risking the possibility of screwing up such beautifully crafted (and understandably pricey) pieces as I've been seeing.
-
Allan Richards
- Posts: 743
- Joined: Thu Jul 12, 2007 10:34 am
- Location: Kent
- Been liked: 10 times
Sean,
Araldite has been around for years and started life as a two part glue that takes some 12 hours to cure. Later they came out with Araldite Rapid which is a 5 minute epoxy. I am not sure if the 12 hour Araldite is epoxy or not because it may have been around before epoxy was developed as a glue.
I've always had my doubts about epoxy's sticking metal as I've found that the epoxy sets very hard and then the bond fails by cracking due to vibration or sudden impacts/shocks. This seems to occur even when I've taken real care to clean and rough up the bonding area. I've had more success with the Gripfil glues which is like No Nails that never sets rock hard.
This said you obviously know more than I about epoxy so any tips please let us know.
Allan Richards
-
Allan Richards
- Posts: 743
- Joined: Thu Jul 12, 2007 10:34 am
- Location: Kent
- Been liked: 10 times
Sean,
Araldite has been around for years and started life as a two part glue that takes some 12 hours to cure. Later they came out with Araldite Rapid which is a 5 minute epoxy. I am not sure if the 12 hour Araldite is epoxy or not because it may have been around before epoxy was developed as a glue.
I've always had my doubts about epoxy's sticking metal as I've found that the epoxy sets very hard and then the bond fails by cracking due to vibration or sudden impacts/shocks. This seems to occur even when I've taken real care to clean and rough up the bonding area. I've had more success with the Gripfil glues which is like No Nails that never sets rock hard.
This said you obviously know more than I about epoxy so any tips please let us know.
As for welds the popular way seems to be to use a two part epoxy putty which is modelled to look like a weld. I have had trouble with some of this putty breaking off the Tiger and have now developed a technique using this No Nails filler type glue.
Allan Richards
-
Dale jordan
- Posts: 1456
- Joined: Fri Jul 13, 2007 1:10 am
- Location: Port Macquarie Australia
- Been liked: 514 times
- Contact:
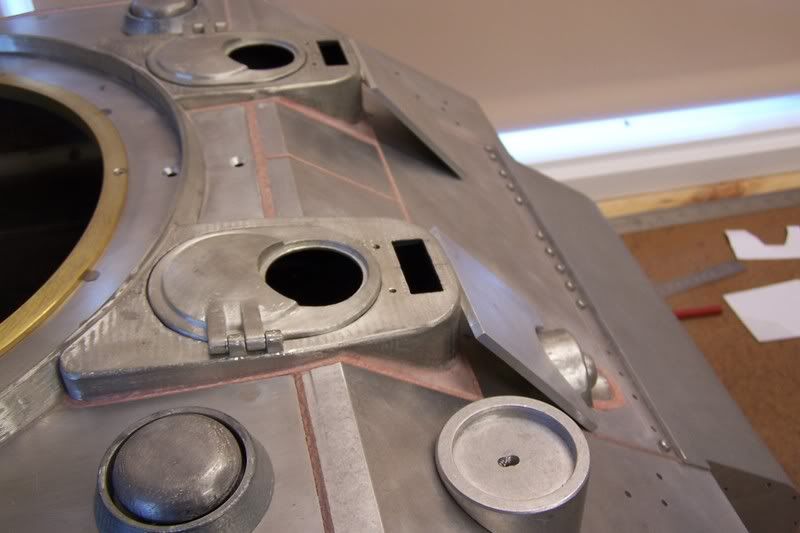
Hello Sean . This is how I do my welds and filling of screw holes using car filler . I tape up the area to the correct scale thickness spread on some filler with a peace of thin plastic . Then stipple the weld with a brush about half way through the drying time , when happy with the look remove the tape as quickly as possible . Once dry light sand the top edge . The best thing is to practise on some scrap alloy first .
-
Dale jordan
- Posts: 1456
- Joined: Fri Jul 13, 2007 1:10 am
- Location: Port Macquarie Australia
- Been liked: 514 times
- Contact:
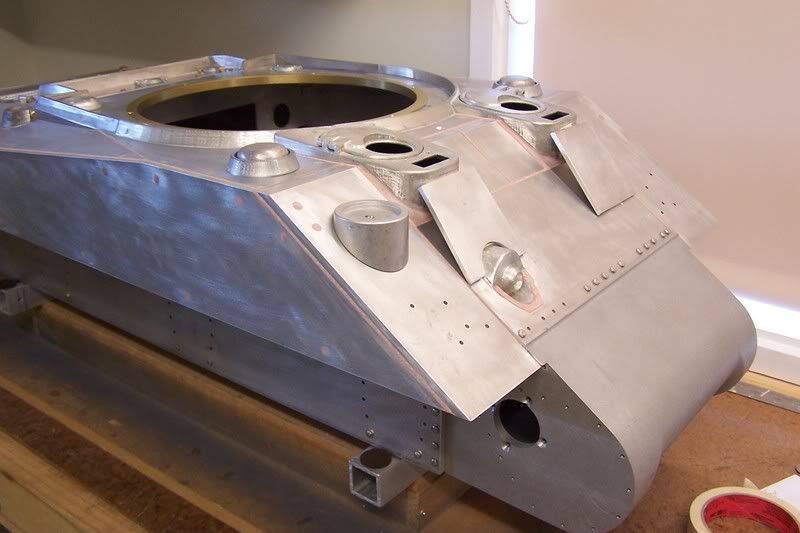
Sean I think the kits are strong enough without the use of any type of epoxy on the joints this is my thoughts anyway !! In this photo you can see that all the bolt holes have been filled and sanded early in the constrution . Once I was happy that I did not have to strip down the model any more . Sean make shore that the heads of the bolts are counter sunk at least .5 mm below the hull plates to allow for the filler . I re-countesunk most of the holes in my tiger and sherman . Dale
-
Dale jordan
- Posts: 1456
- Joined: Fri Jul 13, 2007 1:10 am
- Location: Port Macquarie Australia
- Been liked: 514 times
- Contact:
Sean this is a good photo showing the fake welds around the small parts like the stand off nuts . I also did the track cable holders as well they where done after this photo . I used wet and dry sand paper on a very small wooden block to sand the bolt holes flush with the hull sides . I hope this helps Dale

-
Tim Bowman
- Posts: 1762
- Joined: Fri Jul 13, 2007 4:53 am
- Location: Northern California
- Been liked: 177 times
- Contact:
Dale
Thanks for the weld tip. I'll have to give it a try on my Tiger. Yours look super nice.
I used two-part epoxy on the Panther with some success. It was my first attempt with a learning curve so there are some welds that are much better then others.
Regards
Tim
Thanks for the weld tip. I'll have to give it a try on my Tiger. Yours look super nice.
I used two-part epoxy on the Panther with some success. It was my first attempt with a learning curve so there are some welds that are much better then others.
Regards
Tim
"So long as one isn't carrying one's head under one's arm, things aren't too bad." – Erwin Rommel