Build Problems And How To Deal With Them?

Forum for discussion relating to the Panther
Post Reply
Darryl Vernon
Posts: 52
Joined: Sun Dec 19, 2010 2:53 pm

Build Problems And How To Deal With Them?

Post by Darryl Vernon »

On these boards, there are many tanks being built to an extremely high standard, and there are many helpful tips included in these builds when it comes to making our tanks look realistic.

But, as a newcomer to this hobby, I've come across a fair few problems that many others must have had, but hardly any mention is ever made, if at all, concerning these problems, and how to get around them.

I find that the instruction book, is not as clear as it could be in some sections, and I find myself scratching my head in frustration, trying to work out how parts go together.

Here's a classic example:-
Page 24 - Pack 9 Deck Detail Parts
According to the instruction book, the Fan Grill(CH0642) and the Fan Cover(CH0627), are fitted to the fan cases, using M3x6 Hex bolts.
There is no mention of how many fasteners are used, so I assume it is 1 per fan, as there is a hole in the centre of the grills.
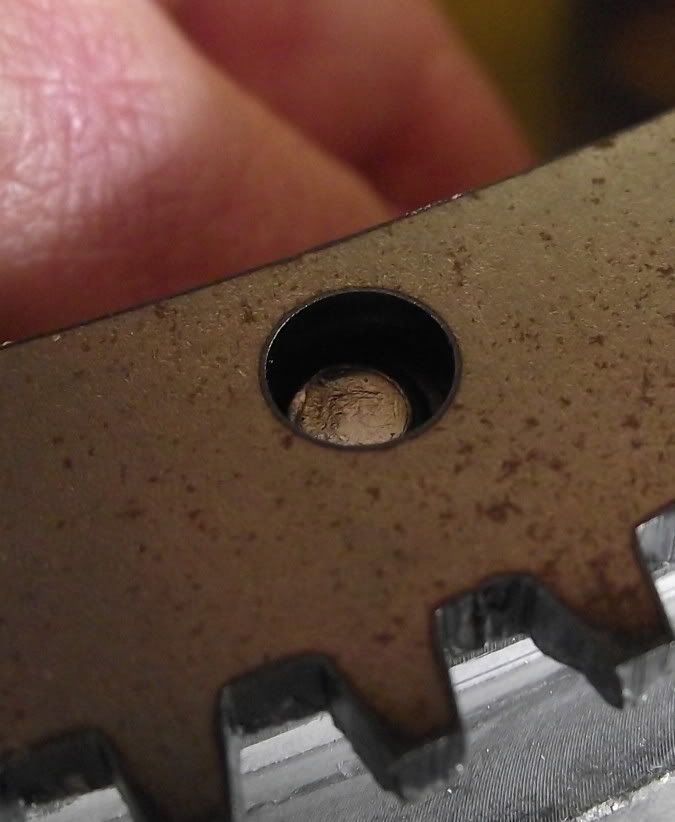
Where does the bolt go?
Image
There is no hole in the centre of the Fan Case. :?:

Another problem that I've come across, that I can find no mention of, is that the two cast parts that make up the main gun Mantlet, (CH0438 and CH0409) have holes that don't line up, by about 1.5-2mm.
The instructions say to 'File any extra clearance that may be required on these sand cast items', but I cannot get inside the outer mantlet to file away, as it is virtually inaccessible, and I'm loath to file as much as 2mm from the inner mantlet, as that seems a lot to take off from one part.
How did you guys get around that problem, as I can find no mention of this in any other posts?

The Turret Ring (CH0405), is an extremely tight fit when placed into the Turret Bearing(CH0117).
So tight in fact, that it is impossible to rotate the ring in the bearing by hand.
When the weight of the turret is on there, will it then rotate ok?
Does the tightness of these parts, not put too much stress on the motor and Ring Gear?
Are they supposed to be this tight? It's not mentioned anywhere.

I've had a few other times when I've been stuck, but managed to bodge/work my way around it eventually, but as a newbie to these kits, with absolutely no engineering skills whatsoever, I do find the instructions could be a little clearer in some areas.

I'm not trying to be negative here, I'm just trying to highlight some of the things that I've had problems with, and that no one else seems to mention, either in the build threads or elsewhere.

This place is a font of knowledge, so let's see more posts on how to get around those little frustrations that one (especially newbies), can come across while building one of these lovely kits.

Ta for reading. :wink:

John Fitzsimons
Posts: 1827
Joined: Tue Dec 14, 2010 3:11 pm
Location: IRELAND,Dublin/Meath
Has liked: 5 times
Been liked: 682 times
Contact:

Post by John Fitzsimons »

I am also building my first Armortek Tiger 1. I agree the instructions can be a little vague. I have a few parts for which I know there are fasteners but the instructions do not mention which ones to use. I have found the builds on the forum to be the best and clearest source of information and found that posting a question when in doubt usually gets a clear and speedy reply.

I still have no idea how to load the blank firer and not looking forward to tackling the electronics.

Somtimes you just have to read the instructions a few times slowly before it all comes clear.

The grills on the Tiger are tied on with wire as far as I know. Maybe the Panther grills are the same.

Luca Fossa
Posts: 101
Joined: Wed Jan 21, 2009 5:20 pm
Location: Parma - Italy

Post by Luca Fossa »

Hi Darryl, i try to help you altough Mark is more indicated to do this.

Regarding the fan grill in fact they doesn't have any hole in the middle, probably they was designated to fit the other type of fan adopted on the late "G" panther. In real the grill was fixed with iron wire or soldered directly over the fan. If you look to my post i have decided to fix them with iron wire. You can fix the grill also with a bolt in the middle, but this solution is not properly correct.

The gun mantlet require a good amount of patience to be adapted. You have to work on the round extremity of the inside mantlet (CHO438), by removing the excess of material until your holes fits togheter. Don't touch absolutely the holes by enlarging them or whatsoever thing. When your holes will be ok probably you have to remove some more material too to have a fluid movement of the mantlet (CHO409).

In my panther i have fixed the turret bearing (CHO117) by screwing it to the upper hull (CHO113), then it was filed carefully. Try the movement with all the turret assembled and you will se the movement will be ok.

Hope this can help

Cheers

Luca

yves mouton
Posts: 1012
Joined: Fri Nov 06, 2009 7:55 pm
Location: Belgium
Has liked: 1 time
Been liked: 603 times

fasteners

Post by yves mouton »

Hello Darryl,

I think John is right about how to connect the grills on the fan grills.
I also used fine iron wire to connect my tiger 1 mesh grills on the deck grills.

regards Yves

John Fitzsimons
Posts: 1827
Joined: Tue Dec 14, 2010 3:11 pm
Location: IRELAND,Dublin/Meath
Has liked: 5 times
Been liked: 682 times
Contact:

Post by John Fitzsimons »

My Tiger Gun Mantlet also required a great deal of filing before it would move freely. It was one of the first things I tackled. I was concerned at the time but now just accept these things as part of the build process.

Darryl Vernon
Posts: 52
Joined: Sun Dec 19, 2010 2:53 pm

Post by Darryl Vernon »

Thanks for the replies guys.
Luca, thanks for the detailed reply. I've looked at the pictures of your grills, but cannot make out how you've attached them with the wire.

In the meantime, when about to bolt the turret gear etc, I came upon another problem. :roll:

Instructions:-
Image

Having got everything ready to assemble, I find that the M5 x30 bolt is not long enough.
Image

It's this sort of thing, that's beginning to make me a bit fed up, to be quite honest.
I set myself up, and get everything sorted out ready to do some assembly, only to find this sort of thing, and I then end up packing it away again in frustration.

willie leonard
Posts: 52
Joined: Sat Apr 05, 2008 11:32 pm
Location: metro-chicago, IL U.S.A
Been liked: 11 times

Post by willie leonard »

Hey Darryl,
Hang in there.I had the same problems your having. First the mantlet.I used a hand grinder with a medium grit pad and took off a little bit at a time of the rounded front of the inner mantlet until the holes lined up.Once the outer mantlet is on you'll won't see the grind marks anyway. On the turrent bearing I took some extra
fine emery clothe and just sanded the inside of the bearing until it
fit snug but loose enough to turn easely.It didn't take much sanding to get to this done. Add a little white litheium grease and your good to go. I, like yourself,have limited engineering skills and at times get frusterated,however i've found that any problem
I come across there is always some way around it or someone on this forum thats more than happy to help.

Luca Fossa
Posts: 101
Joined: Wed Jan 21, 2009 5:20 pm
Location: Parma - Italy

Post by Luca Fossa »

Darryl look carefully

Image


About the screws to fix the rings under the turret is enough to buy some screws more long than those provided in the kit.

Cya all

Luca

Tim Bowman
Posts: 1762
Joined: Fri Jul 13, 2007 4:53 am
Location: Northern California
Been liked: 177 times
Contact:

Post by Tim Bowman »

Hi Darryl

Not that this comment will help you but I can say that without a doubt, the second Armortek kit you build goes so much easier. My Panther was a learning experience too and I am not a mechanical/machining type of person. I think the only fit issue I had on my Panther was the left side of the turret where it attached to the rear plate of the turret. This was easily solved with some minor filing.

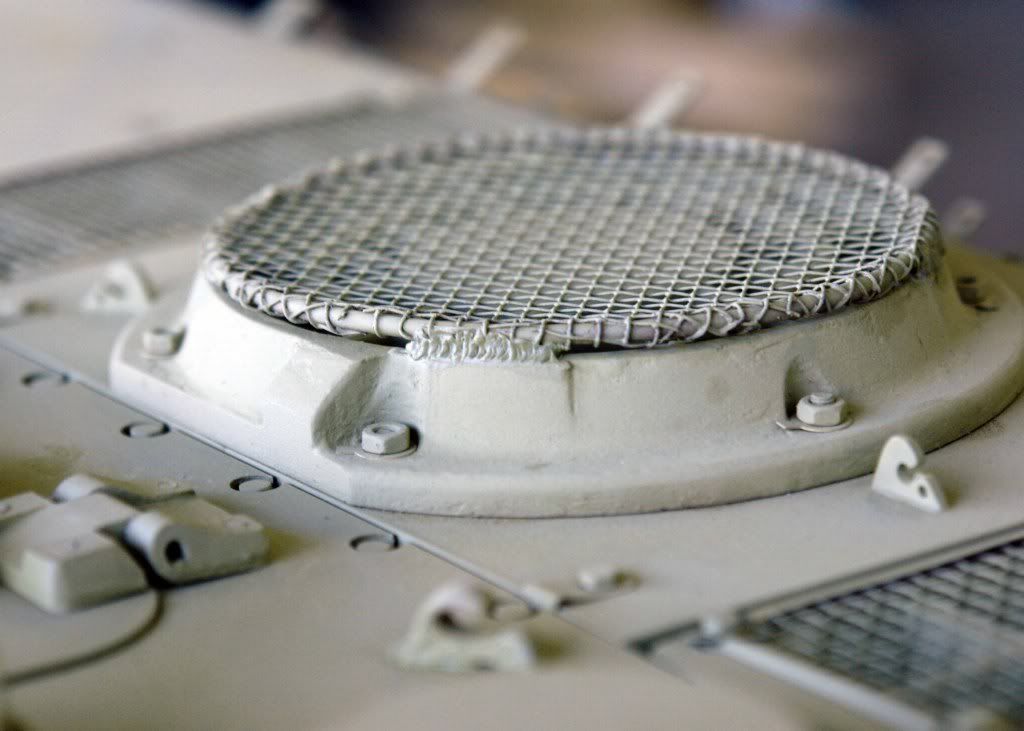
In regards to the mesh covers for the cooling exhaust fan guard, in real life they are tack-welded to the covers in four spots around the perimeter. HArd to do on the etched screen with it's minimal thickness though. The older kit had the hole in the guard for the fastener but it's not on the real one.

Image

Kindest regards
Tim
"So long as one isn't carrying one's head under one's arm, things aren't too bad." – Erwin Rommel

Kent Wiik
Posts: 425
Joined: Sat Dec 04, 2010 11:18 am
Location: Northern Sweden
Has liked: 6 times
Been liked: 194 times

Post by Kent Wiik »

Darryl Vernon wrote:I could find no info anywhere, as to how they were fitted in real life
Hi Darryl,

Tons of information here at the forum:
http://www.armortek.co.uk/forum/viewtop ... &start=120
(scroll down a bit)

"The real mesh ring was attached to the shroud with welds at the bulbs so fake welds (1/â€
It´s all in the details!

Darryl Vernon
Posts: 52
Joined: Sun Dec 19, 2010 2:53 pm

Post by Darryl Vernon »

willie leonard wrote:Hey Darryl,
On the turrent bearing I took some extra
fine emery clothe and just sanded the inside of the bearing until it
fit snug but loose enough to turn easely.It didn't take much sanding to get to this done. Add a little white litheium grease and your good to go.
Thanks Willie. I was a bit concerned about sanding the bearing, but wil do that now.
Luca Fossa wrote:Darryl look carefully

Image

Cya all

Luca
That photo is very clear. Thanks Luca.
Tim Bowman wrote:Hi Darryl

In regards to the mesh covers for the cooling exhaust fan guard, in real life they are tack-welded to the covers in four spots around the perimeter. HArd to do on the etched screen with it's minimal thickness though. The older kit had the hole in the guard for the fastener but it's not on the real one.

Image

Kindest regards
Tim
Pukka grills Tim. Who makes them?
Kent Wiik wrote:
Darryl Vernon wrote:I could find no info anywhere, as to how they were fitted in real life
Hi Darryl,

Tons of information here at the forum:
http://www.armortek.co.uk/forum/viewtop ... &start=120
(scroll down a bit)
I have read through loads of the posts over the last few months, but I somehow missed that.
In my defence, there are thousands of post to go through. :)
Kent Wiik wrote:"The real mesh ring was attached to the shroud with welds at the bulbs so fake welds (1/â€

Tim Bowman
Posts: 1762
Joined: Fri Jul 13, 2007 4:53 am
Location: Northern California
Been liked: 177 times
Contact:

Post by Tim Bowman »

Hi Darryl

The ones on my Panther are from Mike Stannard. He can be contacted through PM or email from his posts here on the 'Craftsman' section.

Good luck with your Panther.

Kind regards
Tim
"So long as one isn't carrying one's head under one's arm, things aren't too bad." – Erwin Rommel

User avatar
Robert E Morey
Posts: 2312
Joined: Wed Jul 18, 2007 12:59 am
Location: Seattle, WA USA
Has liked: 132 times
Been liked: 784 times

Post by Robert E Morey »

Hi Daryl,
Don't get frustrated, just keep plugging. There are lots of minor fitting and modifications to be made, but you should be able to find help locally or on the forum here. We've all been where you are. Take heart you can see what these models can become with some patience and effort.
hang in there,
Bob

Post Reply