John's Late Tiger 1
-
John Fitzsimons
- Posts: 1813
- Joined: Tue Dec 14, 2010 3:11 pm
- Location: IRELAND,Dublin/Meath
- Has liked: 5 times
- Been liked: 624 times
- Contact:
Hi Paul and Adrian.
I used a dremmel attachment. (high speed cutter no 194 applied without pressure over entire surface.) Best tool I had to hand at the time. Hope it's not too coarse. I will be adding molding numbers also. I found a company called squires tools who have a lot of useful items including plastic lettering in various sizes 2mm upwards. Looking forward to getting home next week to get stuck into more detailing of the turret.
I used a dremmel attachment. (high speed cutter no 194 applied without pressure over entire surface.) Best tool I had to hand at the time. Hope it's not too coarse. I will be adding molding numbers also. I found a company called squires tools who have a lot of useful items including plastic lettering in various sizes 2mm upwards. Looking forward to getting home next week to get stuck into more detailing of the turret.
- Adrian Harris
- Posts: 5052
- Joined: Thu Jul 12, 2007 10:46 pm
- Location: Berkshire (UK)
- Has liked: 1363 times
- Been liked: 1557 times
Thanks for the explanation John.
> squires tools who have a lot of useful items
Now there's a money pit if every I met one. Dad used to read their catalogues of a weekend just for the heck of it.
Them and Chiltern Seeds :lol
It's amazing how many different types of pliers you can actually buy
Adrian
> squires tools who have a lot of useful items
Now there's a money pit if every I met one. Dad used to read their catalogues of a weekend just for the heck of it.
Them and Chiltern Seeds :lol
It's amazing how many different types of pliers you can actually buy
Adrian
Contact me at sales@armortekaddict.uk for details of my smoker fan control module
-
John Fitzsimons
- Posts: 1813
- Joined: Tue Dec 14, 2010 3:11 pm
- Location: IRELAND,Dublin/Meath
- Has liked: 5 times
- Been liked: 624 times
- Contact:
My present collection of tools is pitiful compared to what I see on postings from you guys. Anyway I would'nt know how to use them. I must build a collection of useful basic items and improvise with what I have.
I would be very interested in seeing pictures of the tools you are using for applying weld lines and zimmerit.
Is the zimmerit pattern on the turret the same size as the hull?
I would be very interested in seeing pictures of the tools you are using for applying weld lines and zimmerit.
Is the zimmerit pattern on the turret the same size as the hull?
-
Tim Bowman
- Posts: 1762
- Joined: Fri Jul 13, 2007 4:53 am
- Location: Northern California
- Been liked: 177 times
- Contact:
Hi John
No, the pattern is different on the turret. I've never heard a good explaination why this was the case, but it is apparent in nearly all war-time photos. I'll be posting some pictures of my hull fairly soon with zimmerit applied. For the Turret, I'll be experimenting with some various methods to get the correct pattern look.
Your Tiger looks great!
best regards
Tim
"So long as one isn't carrying one's head under one's arm, things aren't too bad." – Erwin Rommel
-
Kent Wiik
- Posts: 425
- Joined: Sat Dec 04, 2010 11:18 am
- Location: Northern Sweden
- Has liked: 6 times
- Been liked: 194 times
Hi John,
Nice build of yours, keep the photos coming.
As Tim says the pattern was different.
At the turret the rows was bigger and broader and also flatten out.
Why the difference no one knows but still it was done so specially on Late Tiger I.
Here are some photos:
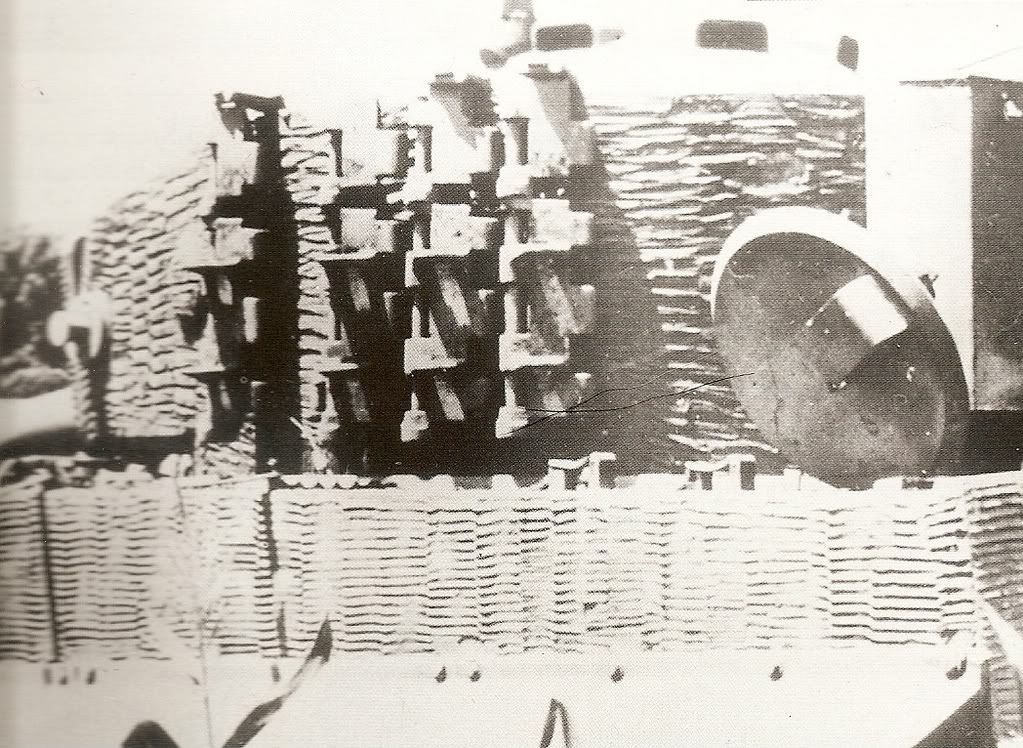
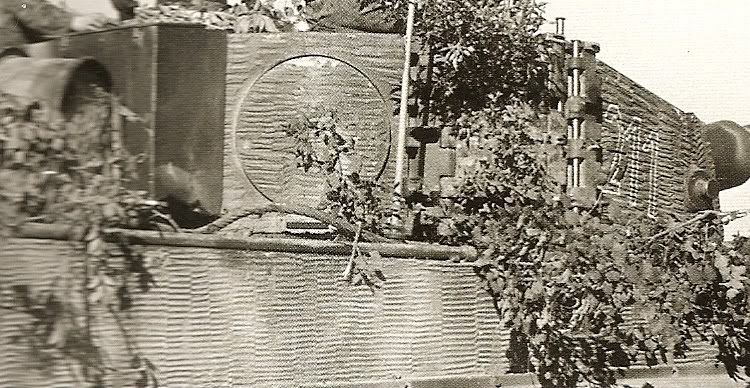
I have only seen one 1:6th rc Late Tiger I made with this zimmerit look (a very, very well made build by UK Mark now living in Belgium) so
yours and Tim’s might be the 2:nd and 3:rd
Here is a topic regarding this matter at another forum.
It is about 1:35 but still a good one that might give you some hints.
http://www.armorama.com/modules.php?op= ... 182&page=1
Kind regards
Kent
Nice build of yours, keep the photos coming.
As Tim says the pattern was different.
At the turret the rows was bigger and broader and also flatten out.
Why the difference no one knows but still it was done so specially on Late Tiger I.
Here are some photos:


I have only seen one 1:6th rc Late Tiger I made with this zimmerit look (a very, very well made build by UK Mark now living in Belgium) so
yours and Tim’s might be the 2:nd and 3:rd
Here is a topic regarding this matter at another forum.
It is about 1:35 but still a good one that might give you some hints.
http://www.armorama.com/modules.php?op= ... 182&page=1
Kind regards
Kent
It´s all in the details!
-
John Fitzsimons
- Posts: 1813
- Joined: Tue Dec 14, 2010 3:11 pm
- Location: IRELAND,Dublin/Meath
- Has liked: 5 times
- Been liked: 624 times
- Contact:
-
Paul Morris
- Posts: 1559
- Joined: Thu Jul 12, 2007 4:44 pm
- Location: North Lancs
- Been liked: 68 times
Hello John.
Thanks for the explanation as Adrian said and well done again it looks really good.
Zimmerit, the tools I use are all home made and nothing much to look at I am afraid, the main tool is a section of brass strip the type you buy from model shops formed at the end into a basic chisel shape and when moved over the Milliput from top to bottom in a jerky fashion forms the ridged pattern.
Welds. Again brass section but this time a tube cut off at an angle the tube I use mostly is 4mm but I also use a tool I made up this is from 3mm section round brass rod hammered into a flat at one end and then rounded off and smoothed with a file I find this easier to work with.
Back to Zimm one big tip plenty of water!
Hope this helps a bit if not give me a shout, always ready to help anyone.
Cheers Paul
Paul's Tank Workshop. Complete Tank builds and re builds zimmerit and paint to museum quality standard. pjtigerman@aol.com
01524 720977
https://www.facebook.com/PaulsTankWorkshop
01524 720977
https://www.facebook.com/PaulsTankWorkshop
-
Kent Wiik
- Posts: 425
- Joined: Sat Dec 04, 2010 11:18 am
- Location: Northern Sweden
- Has liked: 6 times
- Been liked: 194 times
Hi again John,
Armorpax-Dave did some years ago a how to make welds topic at his forum:
http://www.armorpax.com/Armorpax/Forum/ ... c.php?t=77
Kind regards
Kent
Armorpax-Dave did some years ago a how to make welds topic at his forum:
http://www.armorpax.com/Armorpax/Forum/ ... c.php?t=77
Kind regards
Kent
It´s all in the details!
-
John Fitzsimons
- Posts: 1813
- Joined: Tue Dec 14, 2010 3:11 pm
- Location: IRELAND,Dublin/Meath
- Has liked: 5 times
- Been liked: 624 times
- Contact:
Thanks Tim, Kent and Paul.
Tim, Looking forward to seeing how you get on with your zimmerit. Hull looks a lot easier to achieve.
Kent, Thanks for the link. Good to have some idea how to go about the turret zimmerit. It is a very noticable difference. So glad I asked.
Paul, Thanks for the advice on tools for zimmerit and welds. If you vave any pictures it would be great. I did some work on adding welds in 1/16 scale. I used the same dentel tool as used by David Dibb. I will try the tube tool also as it may work better for some welds.
Here are some of my welding attemprs in 1/16 scale.

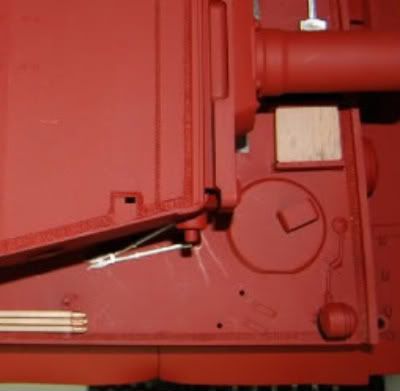
I might get a 1/16 Hull and turret and experiment on the Zimmerit coating.
Tim, Looking forward to seeing how you get on with your zimmerit. Hull looks a lot easier to achieve.
Kent, Thanks for the link. Good to have some idea how to go about the turret zimmerit. It is a very noticable difference. So glad I asked.
Paul, Thanks for the advice on tools for zimmerit and welds. If you vave any pictures it would be great. I did some work on adding welds in 1/16 scale. I used the same dentel tool as used by David Dibb. I will try the tube tool also as it may work better for some welds.
Here are some of my welding attemprs in 1/16 scale.


I might get a 1/16 Hull and turret and experiment on the Zimmerit coating.
-
Paul Morris
- Posts: 1559
- Joined: Thu Jul 12, 2007 4:44 pm
- Location: North Lancs
- Been liked: 68 times
Hi John.
Save the 1/16 turret and just get an old piece of ally sheet or anything really just to try an odd piece of M.D.F. with a coat of P.V.A. will allow you to practice.
Cheers Paul
Save the 1/16 turret and just get an old piece of ally sheet or anything really just to try an odd piece of M.D.F. with a coat of P.V.A. will allow you to practice.
Cheers Paul
Paul's Tank Workshop. Complete Tank builds and re builds zimmerit and paint to museum quality standard. pjtigerman@aol.com
01524 720977
https://www.facebook.com/PaulsTankWorkshop
01524 720977
https://www.facebook.com/PaulsTankWorkshop
-
Matt Jordan
- Posts: 11
- Joined: Fri Sep 10, 2010 12:02 am
- Location: Indiana
- Been liked: 1 time
-
Mike Kasputis
- Posts: 104
- Joined: Thu Jul 26, 2007 2:17 am
- Location: Maryland, USA
- Been liked: 54 times
Have to disagree about the zimmerit pattern on the turret, it was not always different. The majority of the time it was different but there are quite a few with the same pattern as on the hull.
Here are 2 from the 508 with the same pattern.
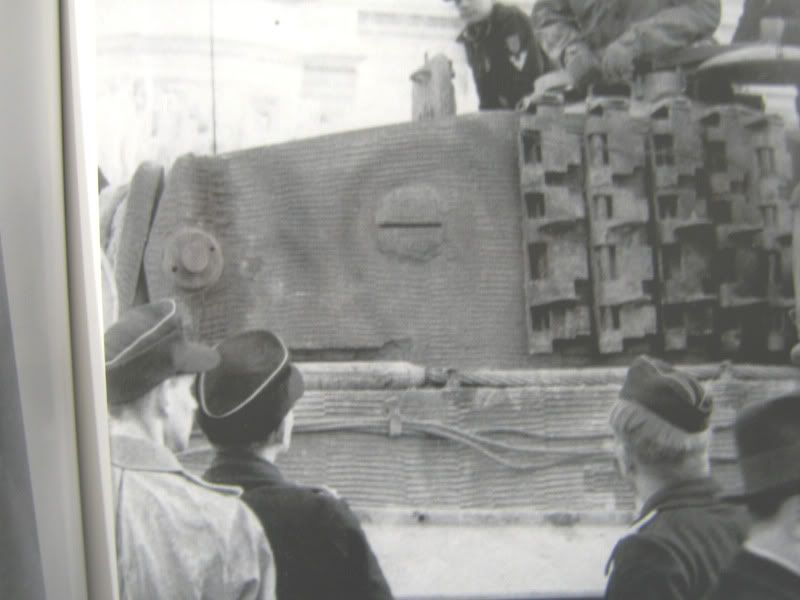
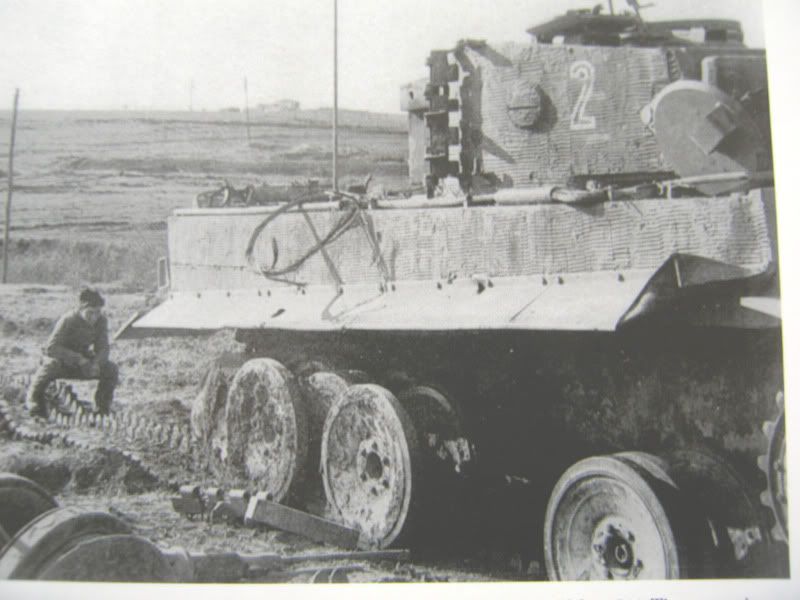
I modeled my Tiger after one in the 507 and a lot of them from there had the same pattern.
At the time I was putting on the zimmerit no one made any tools so I made my own. I blew up a picture to 1/6 scale and took the measurements from that to make my own tool.
Here is a picture of it
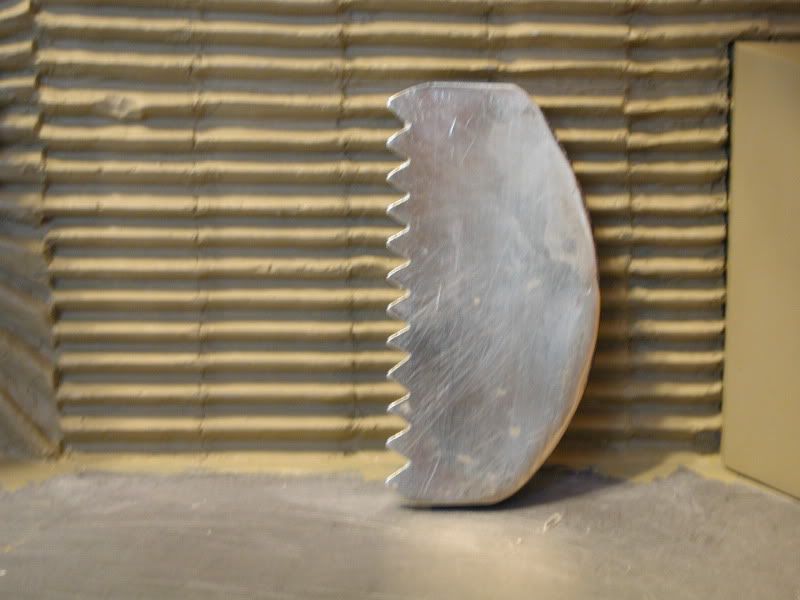
Here are 2 from the 508 with the same pattern.


I modeled my Tiger after one in the 507 and a lot of them from there had the same pattern.
At the time I was putting on the zimmerit no one made any tools so I made my own. I blew up a picture to 1/6 scale and took the measurements from that to make my own tool.
Here is a picture of it

-
Kent Wiik
- Posts: 425
- Joined: Sat Dec 04, 2010 11:18 am
- Location: Northern Sweden
- Has liked: 6 times
- Been liked: 194 times
Yes Mike you are right on this, same pattern can be seen but the text book says some Mid and all Late Tigers I had this difference in turret-hull zimmerit pattern.Mike Kasputis wrote:Have to disagree about the zimmerit pattern on the turret, it was not always different. The majority of the time it was different but there are quite a few with the same pattern as on the hull.
And as John builds a Late Tiger I the different pattern is historically correct here.
Please note that in field swapping hulls/turret was frequent just to get a Tiger back in action and it is not un common to see a Mid turret on a Late hull especially late in war.
Only ww2 photos of the actual Tiger can say what pattern to be used on your Tiger of choice.
Kind regards
Kent
It´s all in the details!
-
Antony Rowley
- Posts: 664
- Joined: Thu Jul 12, 2007 8:32 pm
- Location: Back to Wirral home of the brave or not so brave, England
- Contact:
Interesting discussion.
Surely there's no absolute correct pattern of zimmerit as it would depend on a number of different variables like, who applied the zimmerit, the tool he used, how much pressure was applied, etc, etc. There is no way in the world that there would be 2 Tanks with the exact same pattern on, as it was applied by hand. If the same person applied the hull and the turret then you would expect it to be quite similar though. The only way to replicate a given Tiger is by photographic evidence and even then the same Tiger could have a different turret later.
Thanks Antony
Nord-West KampfGruppe, 1/6th Hetzer, 1/6 Schwimmwagen, 3 x r/c 1/6th Kettenkrad, 1/6th Marder Ausf M, 1/6th Panzer II Static...the collection is growing again....
-
Dale jordan
- Posts: 1428
- Joined: Fri Jul 13, 2007 1:10 am
- Location: Port Macquarie Australia
- Been liked: 429 times
- Contact:
