Hello Sarah
It was nice to speek to you at Stoneliegh.
Lee
Sarah's Panzer III build
-
leesellars
- Posts: 934
- Joined: Thu Jul 12, 2007 11:19 am
- Location: Nottingham
- Has liked: 2 times
- Been liked: 15 times
http://www.Facebook.com/newthorpemodels
Dont hit me so early in the morning with those negative waves.
Listen carefully i shall say this only once.
If its not broke dont fix it.
Ich Hatt Einen Kameraden
Dont hit me so early in the morning with those negative waves.
Listen carefully i shall say this only once.
If its not broke dont fix it.
Ich Hatt Einen Kameraden
-
Dennis Jones
- Posts: 893
- Joined: Wed Feb 04, 2009 11:19 am
- Location: Poole, Dorset
- Has liked: 10 times
- Been liked: 224 times
-
Sarah Frazer
- Posts: 202
- Joined: Sat Oct 17, 2009 8:12 am
- Location: Bristol
- Been liked: 2 times
-
Dennis Jones
- Posts: 893
- Joined: Wed Feb 04, 2009 11:19 am
- Location: Poole, Dorset
- Has liked: 10 times
- Been liked: 224 times
Hi Sarah,
Yes about 9 or 10 I think. I am taking my Tamyia 1/16th King Tiger RC model with sounds etc, not in the same league at the 1/6th. The PZ111 build is coming on though, trying to source paint at the moment. I nearly wasn't going as it clashes with an Autojumble Classic Car event at Shepton Mallett (another hobby). That's on for 2 days but all the lads from the Kit Car Club are going up on Sat. Your build looking good.
Dennis.
-
Sarah Frazer
- Posts: 202
- Joined: Sat Oct 17, 2009 8:12 am
- Location: Bristol
- Been liked: 2 times
Hi Guys,
Well the suspension arms are finished for now, I'm very glad there is only 12 of them!
Milliput was applied to from the 4mm disc to the 16mm base to make the cone section. This was quite easy to form as you can just sand between the disc and base, Milliput was also applied to the soldered joint at the rear of the brass tube.
Disc were also turned and these have been fixed to the suspension arm bases as well. Epoxy was put into the void between the brass tube and the suspension arms to stop the ingress of any water.
Photo below of the suspension arms.
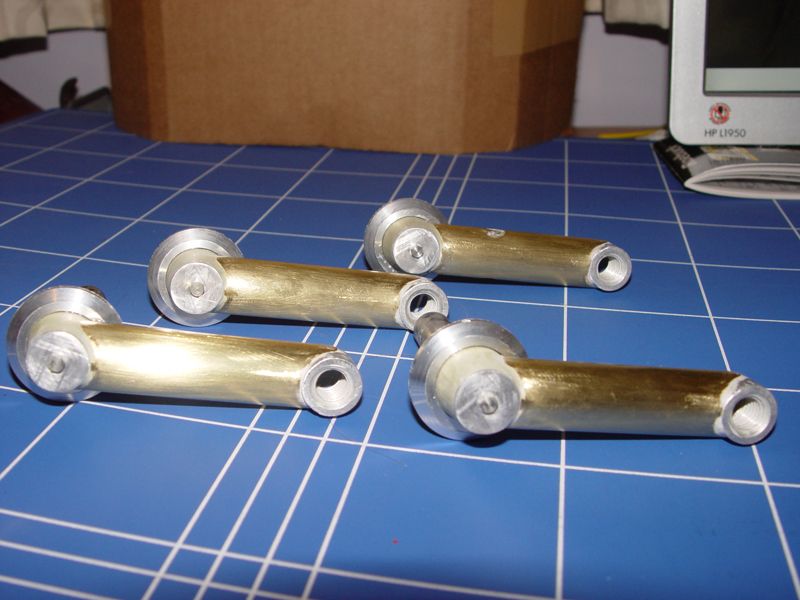
Next jobs are chamfering the escape hatches and reprofiling the front and rear bump stops.
Regards,
Sarah
Last edited by Sarah Frazer on Fri Oct 23, 2015 11:56 pm, edited 2 times in total.
'I reject your reality and substitute my own'
-
Stephen White
- Site Admin
- Posts: 3114
- Joined: Sat Oct 11, 2008 7:05 pm
- Location: Dorset
- Has liked: 1038 times
- Been liked: 2111 times
- Contact:
Sarah
They look superb. You've done a great job. The suspension mods seem to go on forever, a real Forth Bridge job, never quite get to the end. Well worth all the effort though.
The legs were cast and there is a quite prominent casting seam on the outside surface, whichcatches the light and doesn't take a lot to do with some Plastruct rod:

Hope you don't mind the suggestion - the last thing you need is someone making work for you,
All the best - thanks for posting and look forward to seeing the rest of your build.
Stephen
They look superb. You've done a great job. The suspension mods seem to go on forever, a real Forth Bridge job, never quite get to the end. Well worth all the effort though.
The legs were cast and there is a quite prominent casting seam on the outside surface, whichcatches the light and doesn't take a lot to do with some Plastruct rod:
Hope you don't mind the suggestion - the last thing you need is someone making work for you,
All the best - thanks for posting and look forward to seeing the rest of your build.
Stephen
-
Sarah Frazer
- Posts: 202
- Joined: Sat Oct 17, 2009 8:12 am
- Location: Bristol
- Been liked: 2 times
Hi Stephen,
Thanks for the suggestion and the photograph. I'll pop out to the model shop today and get some plastic rod. Please keep the suggestions coming, I'm grateful for any help.
The suspension arms have gone on a bit, but now they are virtually finished I should make reasonable progress.
Thanks again,
Sarah
'I reject your reality and substitute my own'
-
Sarah Frazer
- Posts: 202
- Joined: Sat Oct 17, 2009 8:12 am
- Location: Bristol
- Been liked: 2 times
Hi Guys,
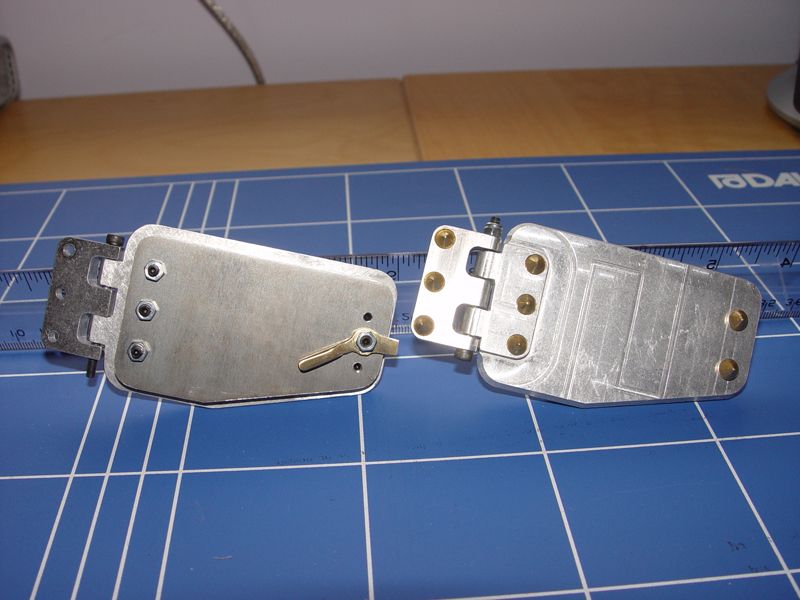
Over the last couple of days I've manged to bevel the Escape hatch door. I was going to bevel the fixed bit of the hatch, but there's not enough material there to bevel. I might add some filler to the sides and bevel that at a later date.
I've also roughly machined the front/rear bump stops to a better profile, they still need hand filing to finish off.

It's nice to progress with something a bit quicker, the suspension arms have taken quite some time
Sarah
Last edited by Sarah Frazer on Fri Oct 23, 2015 11:58 pm, edited 2 times in total.
'I reject your reality and substitute my own'
-
Sarah Frazer
- Posts: 202
- Joined: Sat Oct 17, 2009 8:12 am
- Location: Bristol
- Been liked: 2 times
Hi Guys,
Well after being away from home, short stay in Hospital and recuperating, a month has gone by with no work on the Panzer
Anyway back to the build at last!
I've finished off filing the Bump Stops and I've also tried Stephen's technique on the surface, with a Dremel and a Wire Brush. The finish does look good, being more cast than machined, photo below:
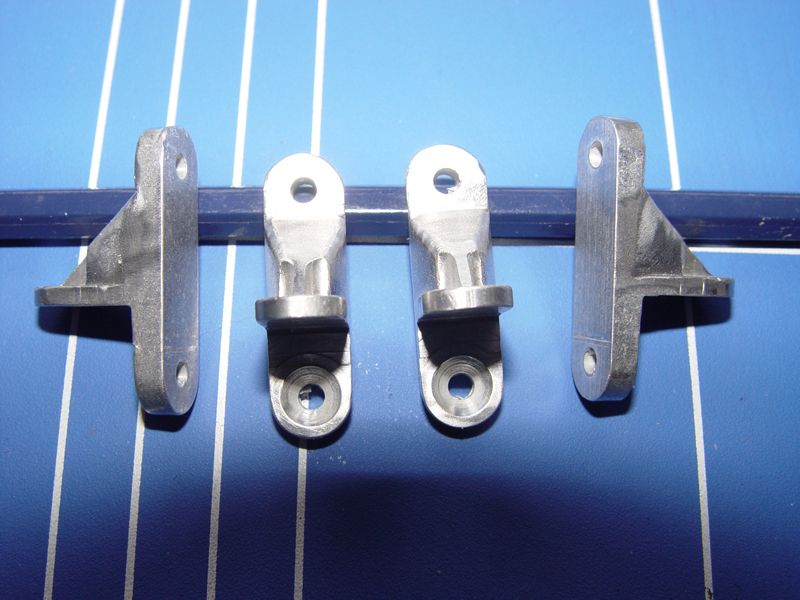
I've also done more work on the Escape Hatches, the sides have been bevelled, an interior section machined, a catch made and Cone Nuts fitted. Quite pleased with the result as I'm quite new to Milling.
Next are the Suspension Units, a new Front Lower Deck and Transmission Hatches, then I'll start assembling the chassis. It will be great to see it coming together.
Well after being away from home, short stay in Hospital and recuperating, a month has gone by with no work on the Panzer
Anyway back to the build at last!
I've finished off filing the Bump Stops and I've also tried Stephen's technique on the surface, with a Dremel and a Wire Brush. The finish does look good, being more cast than machined, photo below:

I've also done more work on the Escape Hatches, the sides have been bevelled, an interior section machined, a catch made and Cone Nuts fitted. Quite pleased with the result as I'm quite new to Milling.

Next are the Suspension Units, a new Front Lower Deck and Transmission Hatches, then I'll start assembling the chassis. It will be great to see it coming together.
Last edited by Sarah Frazer on Sat Oct 24, 2015 12:04 am, edited 3 times in total.
'I reject your reality and substitute my own'
-
Tim Bowman
- Posts: 1762
- Joined: Fri Jul 13, 2007 4:53 am
- Location: Northern California
- Been liked: 177 times
- Contact:
-
Adrian Harris

- Posts: 5116
- Joined: Thu Jul 12, 2007 10:46 pm
- Location: Berkshire (UK)
- Has liked: 1473 times
- Been liked: 1667 times
-
Sarah Frazer
- Posts: 202
- Joined: Sat Oct 17, 2009 8:12 am
- Location: Bristol
- Been liked: 2 times
-
Adrian Harris
- Posts: 5116
- Joined: Thu Jul 12, 2007 10:46 pm
- Location: Berkshire (UK)
- Has liked: 1473 times
- Been liked: 1667 times
-
Sarah Frazer
- Posts: 202
- Joined: Sat Oct 17, 2009 8:12 am
- Location: Bristol
- Been liked: 2 times
Hi Guys,
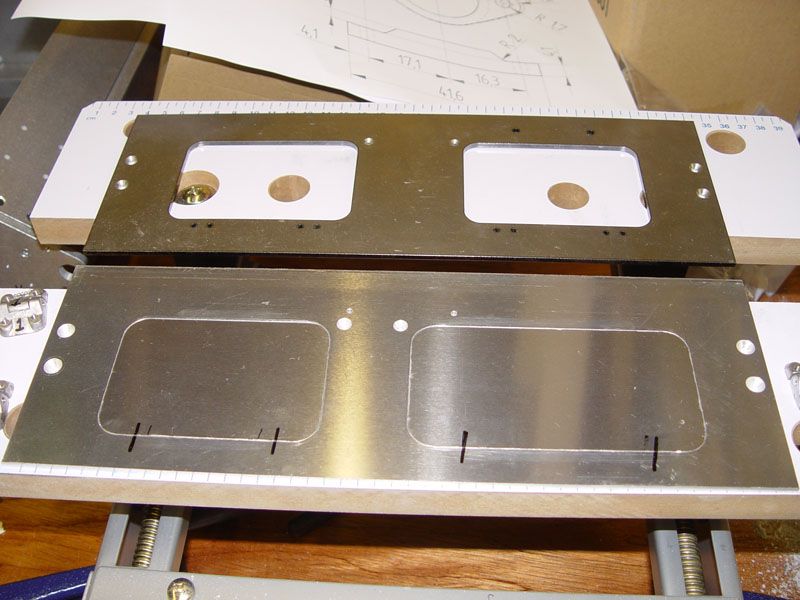
It's been a bit slow with the Front Lower Deck, but I've been getting used to Milling bits and pieces. A couple of 'Practice' bits later and I've finished the deck and the Transmission hatches as well. It's been quite a learning curve milling the deck and hatches, but hopefully a bit easier in the future.
Apart from making the resized Transmission Hatches I've also moved the hatch apertures lower down so that the bottom of the Hatch Hinges will rest on the weld line across the deck. I do need to make a little recess on the lower part of the deck for the weld line that runs across.
Just to make Dale happy I've made them from Aluminium as well
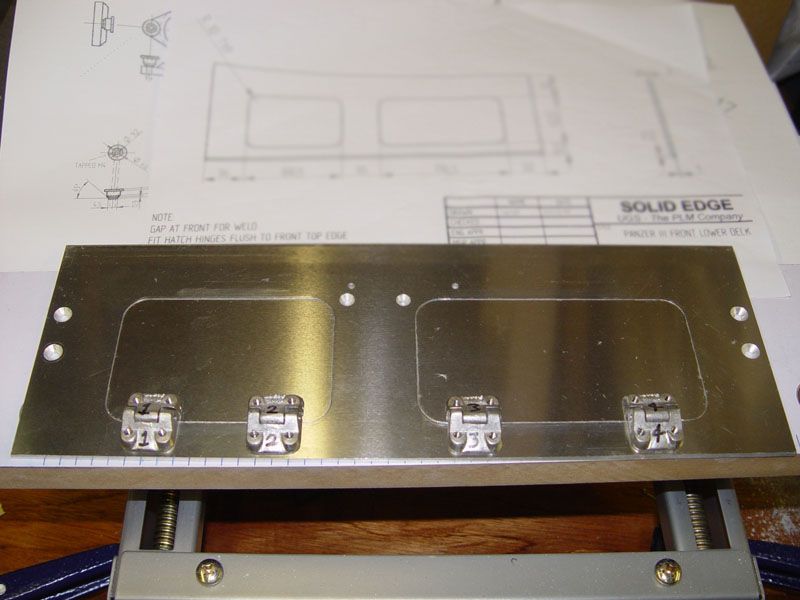
Just for a comparison the original deck and my new one.
Regards,
Sarah
It's been a bit slow with the Front Lower Deck, but I've been getting used to Milling bits and pieces. A couple of 'Practice' bits later
Apart from making the resized Transmission Hatches I've also moved the hatch apertures lower down so that the bottom of the Hatch Hinges will rest on the weld line across the deck. I do need to make a little recess on the lower part of the deck for the weld line that runs across.
Just to make Dale happy I've made them from Aluminium as well

Just for a comparison the original deck and my new one.

Regards,
Sarah
Last edited by Sarah Frazer on Sat Oct 24, 2015 12:00 am, edited 4 times in total.
'I reject your reality and substitute my own'
-
Dale jordan
- Posts: 1447
- Joined: Fri Jul 13, 2007 1:10 am
- Location: Port Macquarie Australia
- Been liked: 472 times
- Contact: