Sarah's Panzer III build

Forum for discussion relating to the Panzer III/StuG III
Sarah Frazer
Posts: 202
Joined: Sat Oct 17, 2009 8:12 am
Location: Bristol
Been liked: 2 times

Sarah's Panzer III build

Post by Sarah Frazer »

Hi Guys,

I thought it was time I started a build topic for my Panzer III. I will be copying some of the good modifications that Stephen, Jeff, Derek, Clive and others have done, but I do hope to have some of my own.

I've already drilled new holes in the side plates to reposition the rollers, etc., I'll show some photo's when I mount the rollers.

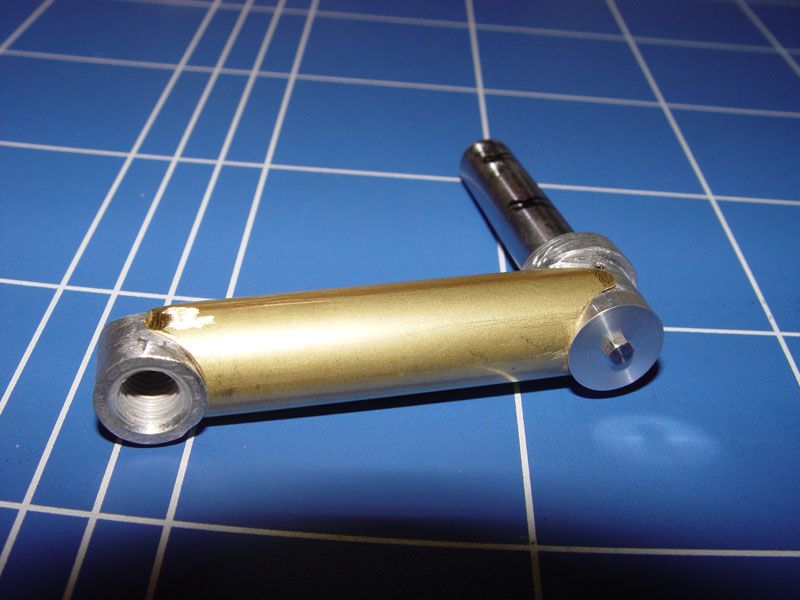
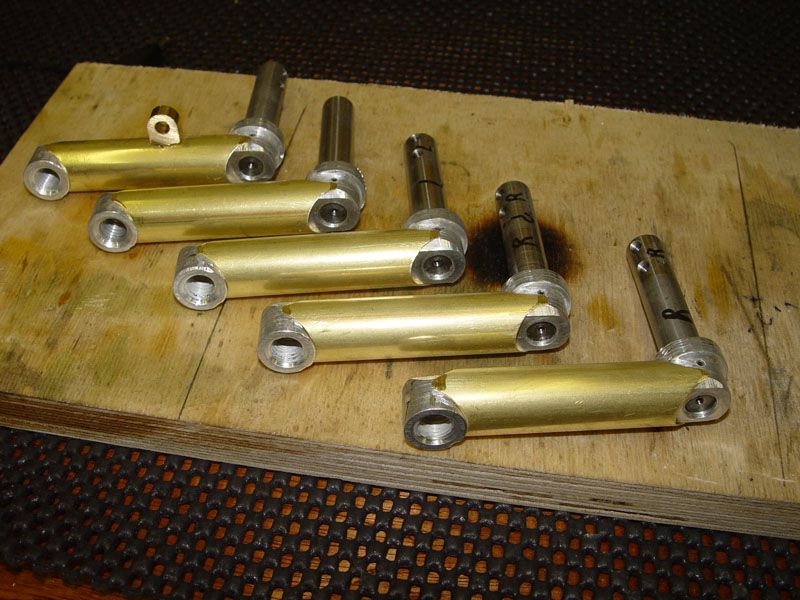
Then I started on the suspension arms to change the profile from rectangular to circular. I had a play at adding half round section aluminium to the suspension arms, but settled on using brass tubing instead. The brass tubing ends were shaped to match the diameters of the suspension arm ends and then the tubing was split at the rear. After making a brass tongue to fit inside the split tube, it was soldered to the split tube.
Image

As well as using Loctite 2701 on the suspension shaft/suspension arm threads the suspension shafts have been pinned to the suspension arms with 2mm roll pins. I've also drilled and tapped the suspension shaft to accept a 7BA bolt. I'm going to make little caps to raise the height at that point to be level with the brass tubing. Then I need to make the disc's at the rear of that section, like Stephen has done. Then finally adding filler to finish the profile off.

More details later,

Sarah
Last edited by Sarah Frazer on Fri Oct 23, 2015 11:42 pm, edited 4 times in total.
'I reject your reality and substitute my own'

Brian Leach
Posts: 363
Joined: Tue Nov 18, 2008 4:15 pm
Location: Auburn, Wa USA
Been liked: 3 times

Post by Brian Leach »

Sarah,

Very nice and neat.

A question; I am not a PIII owner but was wondering "what are the arms made of , Aluminum? I am suprised that no one has tried offering corrected "arms" for sale.

Brain

Jeffrey Goff
Posts: 804
Joined: Thu Jul 12, 2007 12:52 pm
Location: NORTHAMPTON
Has liked: 20 times
Been liked: 737 times

Post by Jeffrey Goff »

Hi Sarah, the suspension arms are looking good, did you use any inserts before fitting the tube, or is it just a tight fit over the rectangle
regards
Jeff

clive Lockwood
Posts: 429
Joined: Wed Jul 25, 2007 2:02 pm
Location: Cumbria

Post by clive Lockwood »

Very nice work Sarha, That looks really neat, looking forward to more pics.
clive.

colin fairweather
Posts: 253
Joined: Fri Aug 17, 2007 4:34 pm
Location: athlone rep of ireland
Been liked: 9 times

Post by colin fairweather »

very clever idea sarah 8) keep them coming

colin :)
Image

2003 first batch tiger 1 mid still fiddling with it

2006 222 SOLD

2009 pzr111 046 SOLD

David Gray
Posts: 289
Joined: Tue Jul 24, 2007 7:22 pm
Location: chesterfield derbyshire
Been liked: 1 time

Post by David Gray »

Hi Sarah your arms look great , What size brass tube did you use.

Dave Gray :D

User avatar
Robert E Morey
Posts: 2303
Joined: Wed Jul 18, 2007 12:59 am
Location: Seattle, WA USA
Has liked: 126 times
Been liked: 757 times

Post by Robert E Morey »

Sarah,
Excellent work, the brass tube looks perfect - very clean modification.
Keep us posted on your progress.
Bob

Sarah Frazer
Posts: 202
Joined: Sat Oct 17, 2009 8:12 am
Location: Bristol
Been liked: 2 times

Post by Sarah Frazer »

Hi Guys,

Brian, the suspension arms are made of aluminium, there would be quite a bit of work to offer them as an after-market part.

Jeff, I didn't use any inserts, but I did chamfer the corners of the rectangular section like you did. It fits quite snug on the top and bottom surfaces, but I was wondering about filling the voids in the sides with epoxy, do you think it is worth it?

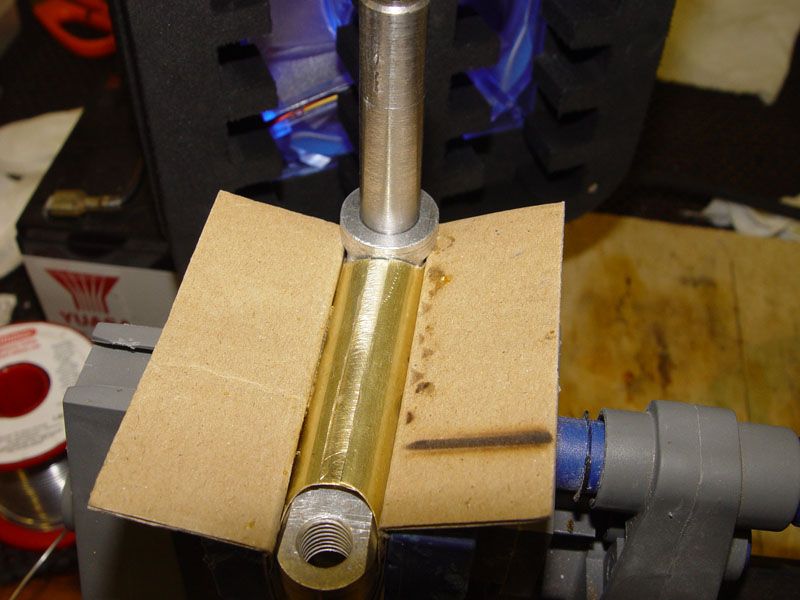
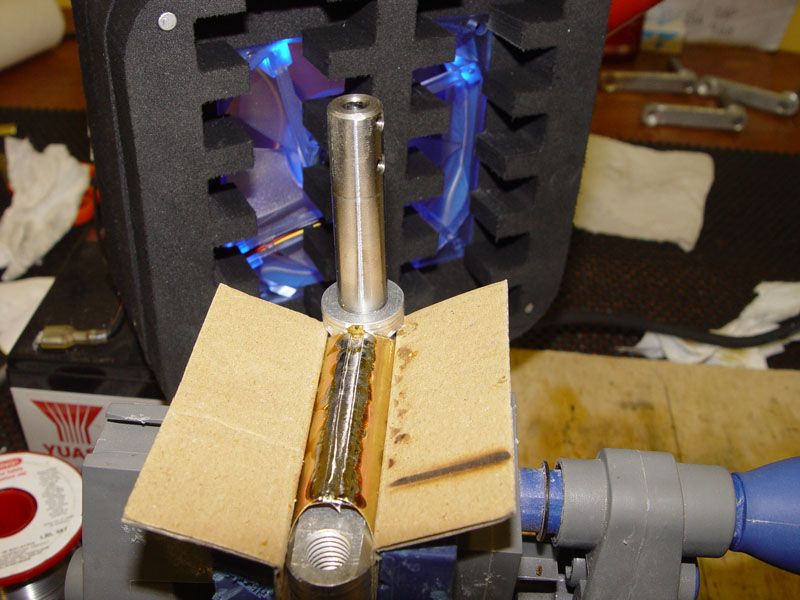
Dave, the tubes are made out of 21/32" tubing (wall thickness 0.014"), which equates to 16.669mm outside diameter and 15.96mm inside diameter. In the Panzer Tract Panzer III book the suspension arms are 10mm at 1/10th scale, so 100mm divided by 6 equates to 16.667mm outside diameter. If you use the same method it's better to use a cutting disc than tin snips as it gives a flatter finish to solder to. I used a 3" cutting disc, which actually gives plenty of room to solder. Also the brass tubing will spring out slightly when cut, so it will need to be clamped together when soldered. Solder in stages so that the Loctited threaded section does not get too hot.

Image

The photo above has the disc and 7BA bolt added, it still needs the rear discs and then a bit of filler.


Regards,

Sarah
Last edited by Sarah Frazer on Fri Oct 23, 2015 11:49 pm, edited 2 times in total.
'I reject your reality and substitute my own'

Jim Fowler
Posts: 279
Joined: Fri Aug 01, 2008 1:01 am
Location: Grafton, OH - USA

Post by Jim Fowler »

OUTSTANDING WORK Sarah!

Thanks for sharing this technique with us!

Best Wishes,
Thanks,

Jim

Dale jordan
Posts: 1428
Joined: Fri Jul 13, 2007 1:10 am
Location: Port Macquarie Australia
Been liked: 429 times
Contact:

Post by Dale jordan »

Great idea Sarah. Can we have a photo of the soldered joint please.....Dale

Tim Bowman
Posts: 1762
Joined: Fri Jul 13, 2007 4:53 am
Location: Northern California
Been liked: 177 times
Contact:

Post by Tim Bowman »

Hi Sarah

Excellent! Another great Panzer III build under way. Look forward to seeing more as you progress.

Kind regards
Tim
Last edited by Tim Bowman on Sat Jan 30, 2010 2:15 am, edited 1 time in total.
"So long as one isn't carrying one's head under one's arm, things aren't too bad." – Erwin Rommel

Lawrence Godson
Posts: 165
Joined: Thu Jul 12, 2007 7:06 pm
Location: Westchester, suburb of Chicago, USA

Post by Lawrence Godson »

Hello Sarah,

Thanks for giving me some new ideas on finishing the suspension arms! I was sitting around trying to figure out if I had the artistic talent/patience to sculpt all those bosses on the ends. Can you tell us how you built up the boss under the disc and bolt. Is it a circular aluminum wafer under there?
Lawrence Godson

Sarah Frazer
Posts: 202
Joined: Sat Oct 17, 2009 8:12 am
Location: Bristol
Been liked: 2 times

Post by Sarah Frazer »

Dale jordan wrote:Great idea Sarah. Can we have a photo of the soldered joint please.....Dale
Hi Dale,

Just for you :D

The first photo is the brass tube before soldering. Initially the outer tube ends butted together, but I wasn't sure how the solder was flowing around the joint. So I made the cut out wider, which made it easier to solder. Instead of doing two thin cuts with a Dremel cut-off wheel, I used a three inch grinder which gave me a wider slot.

Image

The second photo is after soldering the joint. I soldered the joint in three sections and then used the fan behind to cool the suspension shaft so that the thread would not get too hot and degrade the applied Loctite. Afterwards I filed the excess solder off the outer tube and later I'll use a little filler to fill the seam.

Image

Are you going to keep your Panzer III now Dale?


Regards,

Sarah
Last edited by Sarah Frazer on Fri Oct 23, 2015 11:54 pm, edited 5 times in total.
'I reject your reality and substitute my own'

Sarah Frazer
Posts: 202
Joined: Sat Oct 17, 2009 8:12 am
Location: Bristol
Been liked: 2 times

Post by Sarah Frazer »

Lawrence Godson wrote:Hello Sarah,

Thanks for giving me some new ideas on finishing the suspension arms! I was sitting around trying to figure out if I had the artistic talent/patience to sculpt all those bosses on the ends. Can you tell us how you built up the boss under the disc and bolt. Is it a circular aluminum wafer under there?
Hi Lawrence,

The disc is used to build up the boss. It is made of aluminium, 4mm thick, 16mm O/D and 2.5mm I/D so the 7BA bolt can pass through. I did think of cutting the discs out of plastic card, but eventually turned them on a lathe. I intend to put some filler on the boss to make it cone shaped like the full size suspension arm.


Regards,

Sarah
'I reject your reality and substitute my own'

Lawrence Godson
Posts: 165
Joined: Thu Jul 12, 2007 7:06 pm
Location: Westchester, suburb of Chicago, USA

Post by Lawrence Godson »

OK thanks Sarah ---got it!
Lawrence Godson

Post Reply